00900068-02_SM_ASM_ProcessLens_EN.pdf - 第59页
ASM Proces sLens Single - l ane 03/2020 Edit ion 59 Step 3 1. Push the g antr y on the bac k CAUTION! Do not pus h o n the camera mod ule . 2. Connect the light ing cab le form the calibr ation t ool to the machine ´ s t…
ASM ProcessLens Single-lane 03/2020 Edition
58
2D and 3D cal fixture info
Mechanical feature
Dimension
Length:
260 mm
Width:
154 mm
Hight:
4 mm
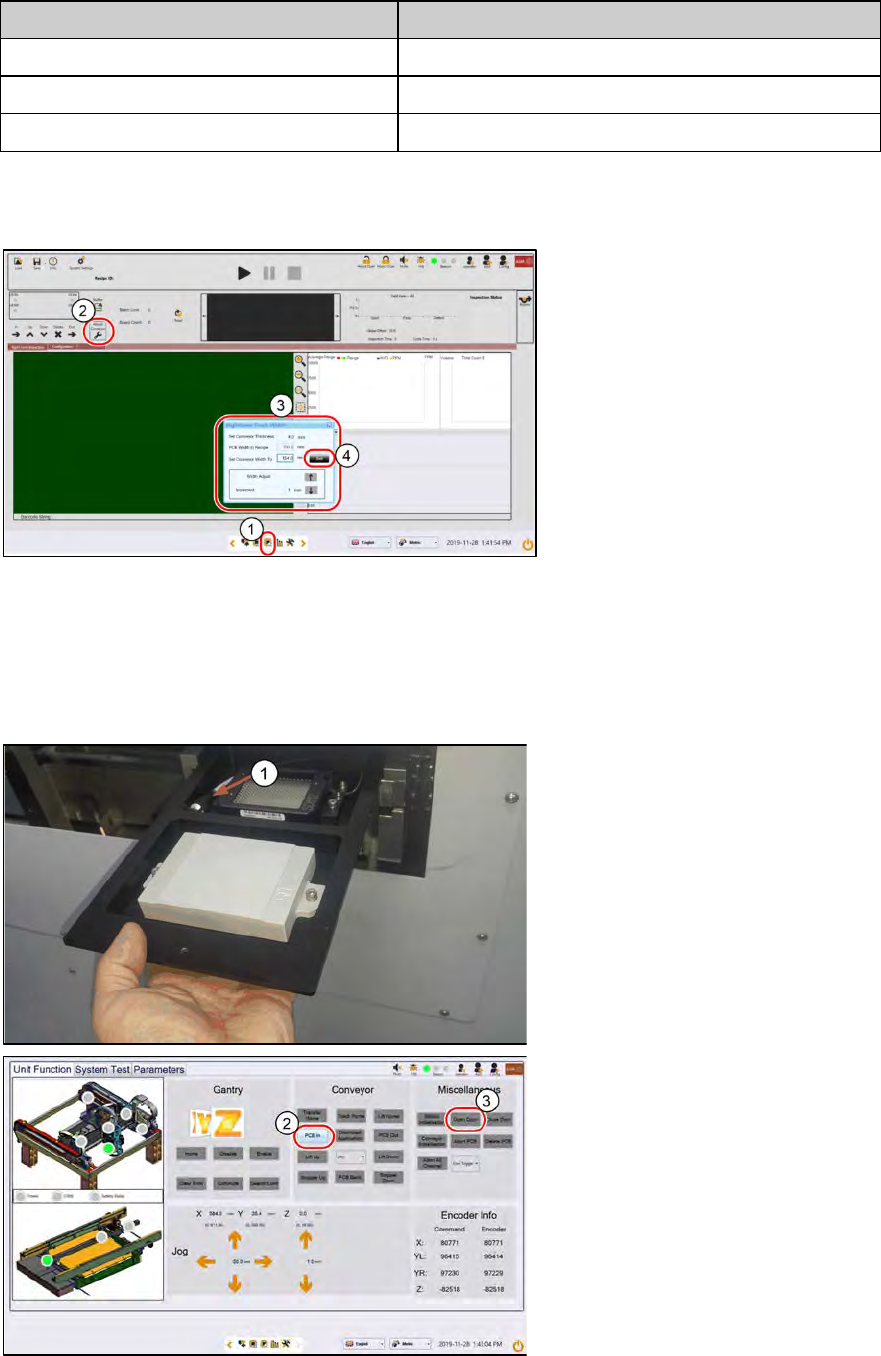
Step 1
1.
Go to Inspection Page.
2.
Click Adjust Conveyor.
3.
Set the following:
– Thickness, 4mm.
– Width, 154mm
4.
Click Set..
The conveyor starts to adjust to
154mm width.
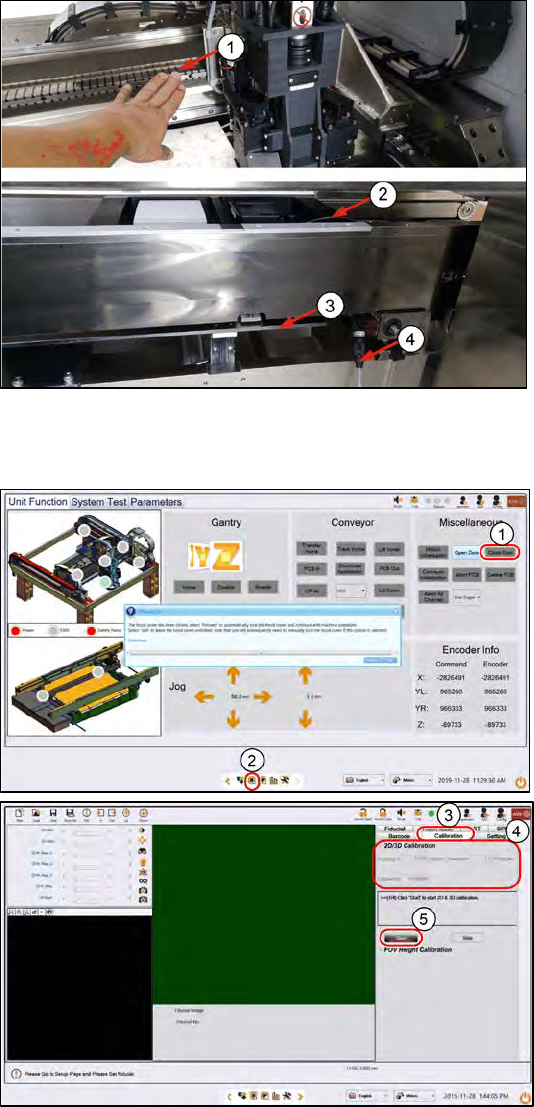
Step 2
1. Place the 2D and 3D target onto
the inlet section in the orientation
shown below. The 2D target
should be loaded head in first.
Ensure the 2D lighting cable is in
the cavity.
2.
At Conveyor, click PCB In. The
target loads into the inspection
section, stops at the stopper and
clamps.
3.
At Miscellaneous, click Open
Door. Open the machine cover.
ASM ProcessLens Single-lane 03/2020 Edition
59
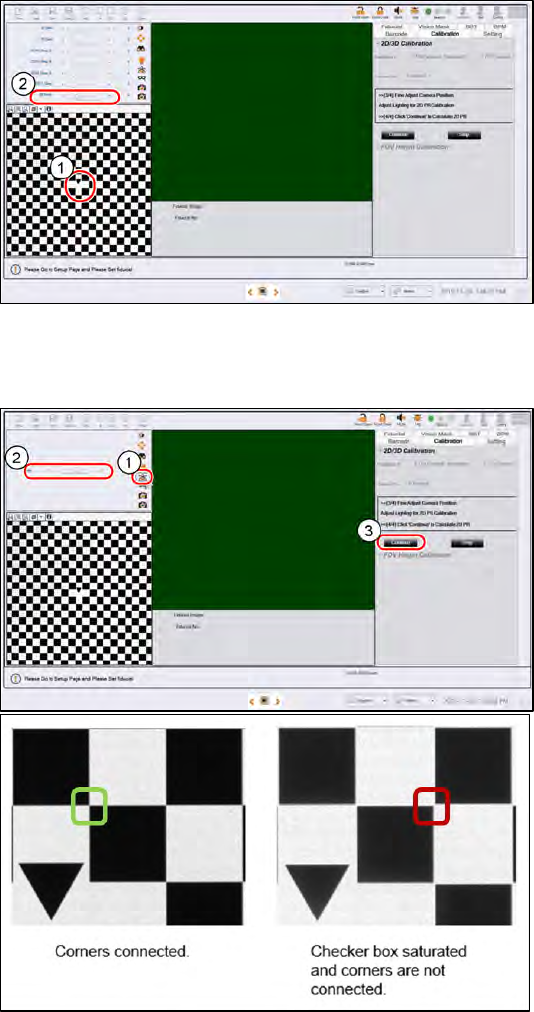
Step 3
1.
Push the gantry on the back
CAUTION! Do not push on the
camera module.
2.
Connect the lighting cable form
the calibration tool to the
machine´s through the gap under
the conveyor and to the right of
the lift table.
3.
Lift table.at the top position
4.
Ensure the lighting cable is lying
low and will not be in the path of
the moving camera module.
Step 4
1.
Close the cover. At
Miscellaneous > Click Close
Door. The machine locks the
cover.
2.
Click on the Vision page icon.
3. Click Calibration.
4.
Make
a note of the current 2D and
3D calibration values for before-
and-after calibration comparisons.
5.
Click Start. The camera moves to
the 2D target. The 2D target lights
up.
ASM ProcessLens Single-lane 03/2020 Edition
60
Step 5
1.
Click on the tip of the inverted
triange of the 2D target to centre
the FOV.
2.
At the Lighting Box
menu, adjust
the Back light if necessary. 15 is
default. A value of 10 to 20 is
good to use. There should be
good contrast between the black
patterns and the white
background. Set all other lighting
values at 0.
Step 6
1.
Click on Focus icon.
2.
Adjust to value 50~60.
The machine takes about 40s to
adjust the Side 1 and Side 2
lighting. The fringe pattern in the
FOV will disappear, this is OK.
a. When perform 2D calibration,
user can zoom in the image to
check if the lighting is too
bright and the image
saturated.
b. As you can see from image
below, the corners should be
connected and the “White
regions” are not totally white
but have lower gray level
value.
3.
Click Continue to start 2D
calibration, calibration takes about
30s to complete.