00197569-01_MM_DLM34_Kunde_en.pdf - 第44页
Major Maintenance Maintenance Tasks for DLM 4.1.4 Performing Maintenance Tasks 44 Maintenance Manual SIPLACE Placement Heads DLM3/DLM4 4.1.4.7 4 . 1 . 4 . 7 T u r n in g s t a t io n Turning station NOTICE DLM3 and DLM4 …
Major Maintenance
4.1.4 Performing Maintenance Tasks Maintenance Tasks for DLM
Maintenance Manual SIPLACE Placement Heads DLM3/DLM4 43
4.1.4.5
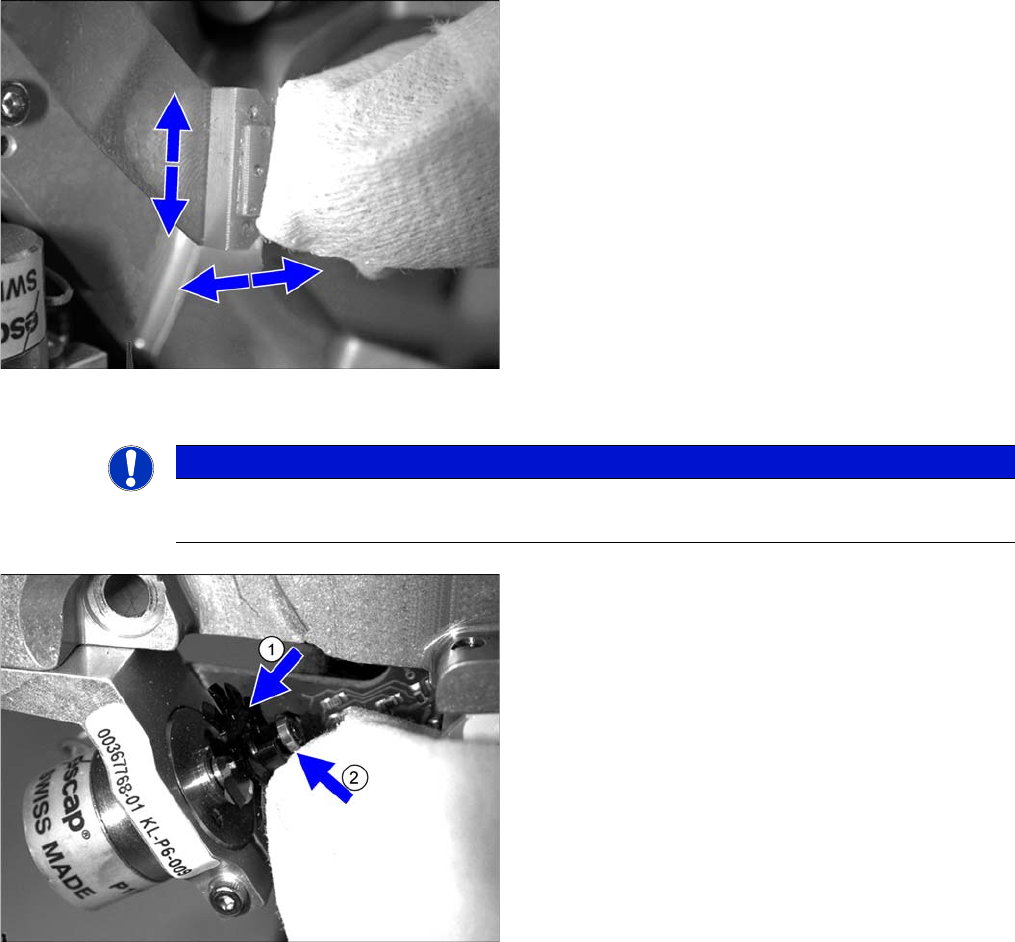
4.1.4.5 Star brake
Star brake
4.1.4.6
4.1.4.6 Valve adjustment drives
Valve adjustment drives
► Check the star brake for damage and to ensure that
it is working correctly.
► Wipe the star brake with a dry lint-free cloth. Make
sure you remove all grease residues.
► Fill each of the three small holes in the star brake with
ISOFLEX TOPAS NCA 52.
► Remove excess grease with a lint-free cloth.
► Apply a thin film of grease to the surface of the star
brake.
NOTICE
DX series
In the DX series, the DLM4 head has only one valve drive in the placement and pick-up position.
➢ You will need to dismantle the front section of the
head for this maintenance work.
► Clean the valve adjusting drive and wipe the space
between the disk (1) and the motor mount dry with a
lint-free cloth.
► Wipe the ball bearings (2) dry with a lint-free cloth.
► Check that the ball bearing is working correctly. In
case of problems, the valve drive has to be replaced
by authorized personnel. For removal and installation
details, read the Service manual.
► Remove any visible dirt.
► Repeat these steps for all valve adjustment drives.

Major Maintenance
Maintenance Tasks for DLM 4.1.4 Performing Maintenance Tasks
44 Maintenance Manual SIPLACE Placement Heads DLM3/DLM4
4.1.4.7
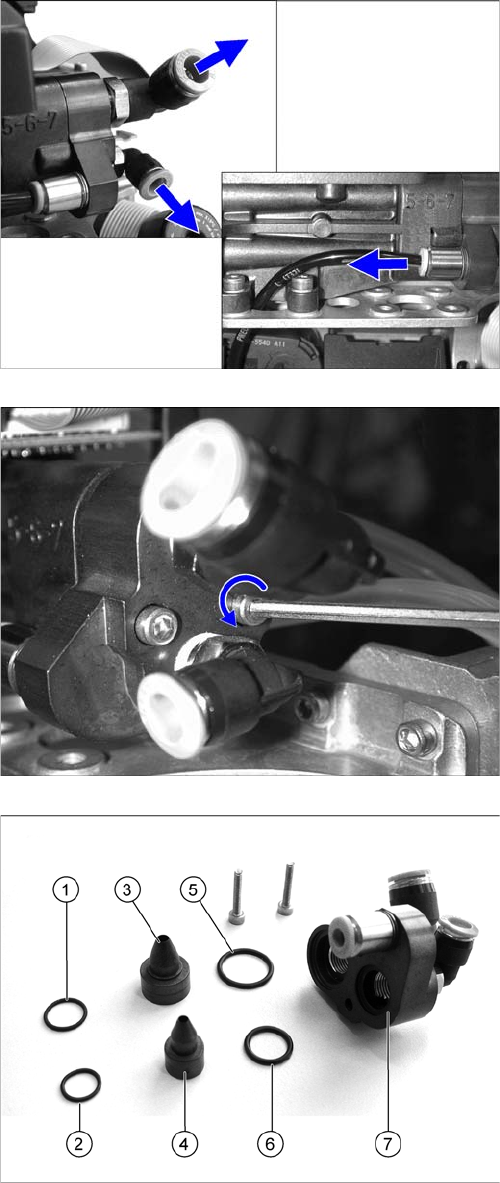
4.1.4.7 Turning station
Turning station
NOTICE
DLM3 and DLM4
The turning stations at DLM3 and at DLM4 are different and have different item numbers.
► Wipe the black O-ring (1) for the turning station clean
with a lint-free cloth moistened with ethanol.
► Check the O-ring for damage and replace if neces
-
sary. For removal and installation details, read the
Service manual.
► Check the toothed belt (2) for damage and replace if
necessary. For removal and installation details, read
the Service manual.
NOTICE!
The O-ring can be cleaned while still installed using a
cleaning stick moistened with ethanol.
► Press the friction wheel of the turning station against
the spring.
► Clean the stop surfaces using a cleaning stick mois
-
tened with ethanol.
Major Maintenance
4.1.4 Performing Maintenance Tasks Maintenance Tasks for DLM
Maintenance Manual SIPLACE Placement Heads DLM3/DLM4 45
4.1.4.8
4.1.4.8 Vacuum Generator
Vacuum Generator
► Carefully clean the vacuum nozzles with a lint-free cloth moistened with ethanol.
► Blow through the vacuum nozzles with compressed air.
► Clean the O-rings with a dry lint-free cloth (replace if necessary).
► Lightly grease the O-rings of the vacuum nozzles with UNISILKON L250L.
► Clean the vacuum generator block using a cleaning stick moistened with ethanol.
► Place the cleaned parts of the vacuum generator on a clean surface.
► Detach the vacuum generator hoses.
► Loosen the two screws (Allen key 2.5 mm) fastening
the vacuum generator block with the two vacuum
nozzles (Venturi nozzles).
► Remove the vacuum nozzles.
1. O-ring 10*1 Viton 75 [00350662-xx]
2. O-ring 8*1 Viton 75 [00350661-xx]
3. Compressed air operation: vacuum nozzle diameter
1.5 [00319420-xx] ]
Vacuum pump operation: vacuum nozzle D=1.5
[03003156-xx]
4. Vacuum nozzle diameter 1.0 [00319423-xx]
5. O-ring 14*1.5 NBR 70 B [00320048
-
xx]
6. O-ring 10*1.5 NBR 70 B [00320047
-
xx]
7. Vacuum generator block