00197569-01_MM_DLM34_Kunde_en.pdf - 第46页
Major Maintenance Maintenance Tasks for DLM 4.1.4 Performing Maintenance Tasks 46 Maintenance Manual SIPLACE Placement Heads DLM3/DLM4 ► Fit the vacuum generator and sil encer. Follow the removal instr uctions in reverse…
Major Maintenance
4.1.4 Performing Maintenance Tasks Maintenance Tasks for DLM
Maintenance Manual SIPLACE Placement Heads DLM3/DLM4 45
4.1.4.8
4.1.4.8 Vacuum Generator
Vacuum Generator
► Carefully clean the vacuum nozzles with a lint-free cloth moistened with ethanol.
► Blow through the vacuum nozzles with compressed air.
► Clean the O-rings with a dry lint-free cloth (replace if necessary).
► Lightly grease the O-rings of the vacuum nozzles with UNISILKON L250L.
► Clean the vacuum generator block using a cleaning stick moistened with ethanol.
► Place the cleaned parts of the vacuum generator on a clean surface.
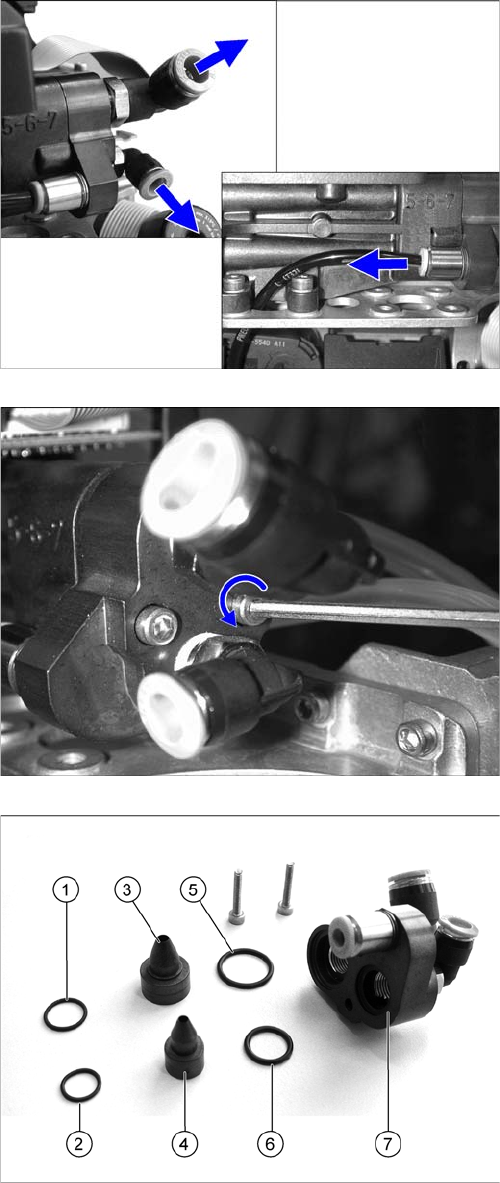
► Detach the vacuum generator hoses.
► Loosen the two screws (Allen key 2.5 mm) fastening
the vacuum generator block with the two vacuum
nozzles (Venturi nozzles).
► Remove the vacuum nozzles.
1. O-ring 10*1 Viton 75 [00350662-xx]
2. O-ring 8*1 Viton 75 [00350661-xx]
3. Compressed air operation: vacuum nozzle diameter
1.5 [00319420-xx] ]
Vacuum pump operation: vacuum nozzle D=1.5
[03003156-xx]
4. Vacuum nozzle diameter 1.0 [00319423-xx]
5. O-ring 14*1.5 NBR 70 B [00320048
-
xx]
6. O-ring 10*1.5 NBR 70 B [00320047
-
xx]
7. Vacuum generator block
Major Maintenance
Maintenance Tasks for DLM 4.1.4 Performing Maintenance Tasks
46 Maintenance Manual SIPLACE Placement Heads DLM3/DLM4
► Fit the vacuum generator and silencer. Follow the removal instructions in reverse order for installa
-
tion. Also observe the following instructions:
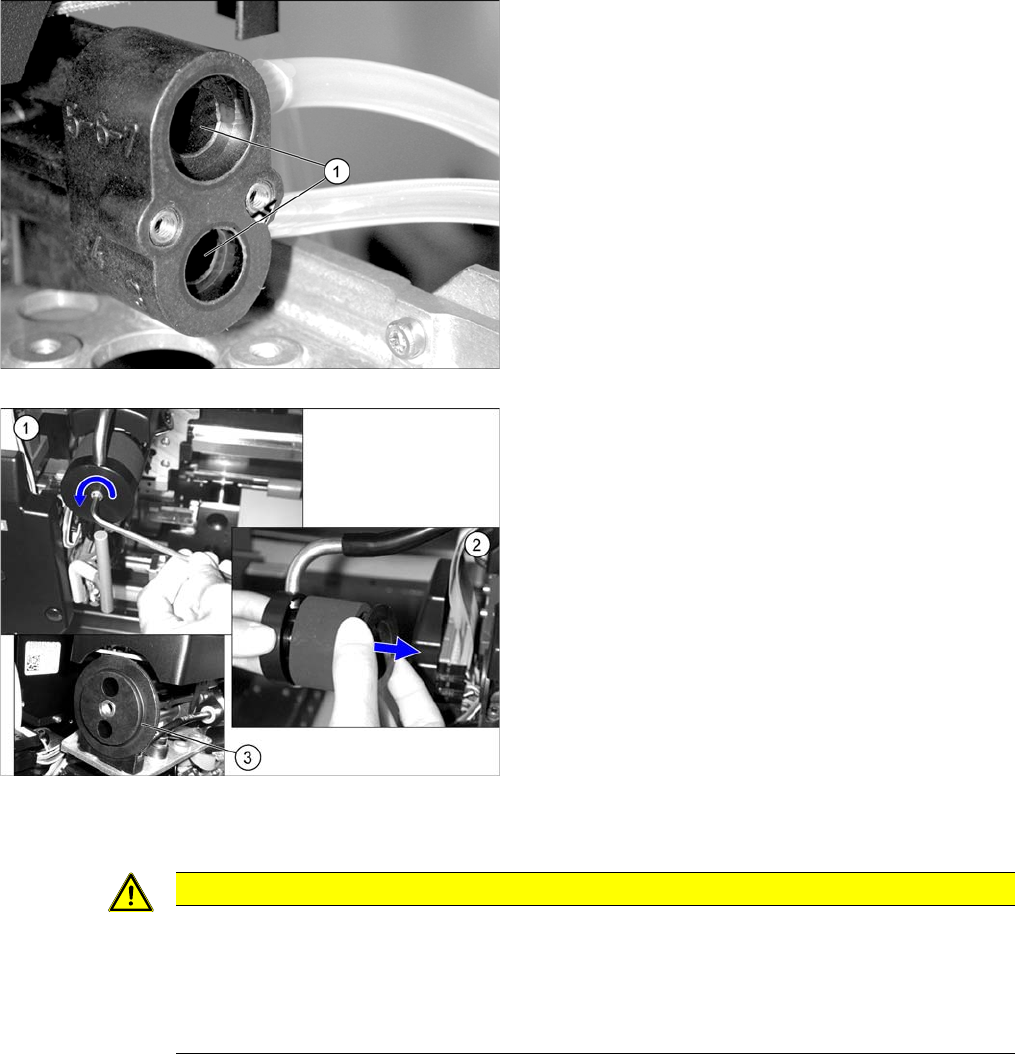
► Clean the drilled holes (1) to the vacuum nozzles with
a cleaning stick moistened with ethanol.
Check or replace the silencer on the vacuum generator.
► (1) Loosen the screw used to fix the C&P head silenc
-
er.
► (2) Check the silencer for dirt. If the silencer shows
discoloration, remove it and replace it with a new one.
► Clean the O-ring (3) [00343022-xx] with a dry lint-free
cloth and then grease slightly with UNISILKON
L250L. If the O-ring is damaged, replace it.
► Check the plastic fixture for the silencer for cracks or
other damage. If the fixture is damaged, the silencer
has to be replaced by authorized personnel. For re
-
moval and installation details, read the Service man
-
ual.
CAUTION
Installation instructions
► Carefully screw the vacuum generator block with the vacuum nozzles tight.
► Before the Venturi nozzles are refitted with the O-rings, make sure that the ethanol has
evaporated completely. If this is not the case, the O-rings could be dissolved over time by
the ethanol.
Major Maintenance
4.1.4 Performing Maintenance Tasks Maintenance Tasks for DLM
Maintenance Manual SIPLACE Placement Heads DLM3/DLM4 47
4.1.4.9
4.1.4.9 Component sensor (only DLM3)
Component sensor (only DLM3)
CAUTION
Prisms, cleaning sticks
► Take care not to damage the component sensor prisms.
► Make sure that you do not use the cleaning sticks soaked in oil from cleaning the sleeves.
Always use a new cleaning stick!
NOTICE!
For clarity, the diagram shows the component sensor
when removed from the machine. However, you do not
need to remove it when cleaning the component sensor.
► Clean the prisms (2)on the rear side of the compo
-
nent sensor (1) with a cleaning stick soaked in etha
-
nol.