YesAX V3.1.2 - Software User Manual - 第234页
19 -4 Optional A ccessories 1. Wit h the Yes AX software not running, make sure both the normal report printer and the label printer are connected and functional. 2. From Windows XP control panel, Printers and Faxes icon…

Optional Accessories 19-3
Live Display: Integrate sets up the number of image frames for live display. For X2 the number
is normally set to 4 and for X3, the number is set to 1.
Image Capture: Average sets up the average number of frames for a captured image. A larger
number will make the image less noisy but takes more time to capture. For X2 the number is
normally set to either 4 or 8. For X3, the number is set to 1 most of the time.
X-ray Capture Delay sets up the specific time period the system will wait, after motion is
complete, to start capturing an X-ray image. This number is set to 0 by default. In case the
system has a vibration issue, a small number (i.e. 10 or 20) can be put into this field to delay the
image capture process. This option affects the X-ray image capture only.
Auto Contrast and Real Time Sharpening are applied to manual inspection only. For inline
inspection, these two options should not be turned on.
Xray Correction and Gray Correction should be turned on most of the time for X3 and turned
off for X2.
Update Dark Image is for X3 only. When the X-Ray is turned off and within X-Ray view, click
this button once to update the dark image buffer in computer memory. Normally there is no need
to update dark image during run time.
Save D. Image to Disk is for X3 only. This button saves the updated dark image to hard disk so
the update becomes permanent.
The low threshold bar and high threshold bars are for X3 only. The X-Ray camera has a
dynamic range of 0 and 4095. In most situations inspections are done on 8bit gray scale images
only. Therefore there is a need to convert the original 16bit image with a range of 0 and 4095, to
an 8bit image with a range of 0 and 255. The low threshold and high threshold are two threshold
values that perform the conversion. Original gray scale values in between the low and high
threshold will be linearly scaled to a number between 0 and 255. Original gray values too small
or too big will be converted to either 0 or 255.
NOTE
To keep the consistency of image qualities, make sure to use 0 for low threshold
and 511 for high threshold all the time.
19.2 Print Barcode Label (YESTrack)
For users who do not serialize their boards with barcode, but still want to utilize the offline line
review and rework features of the YesAX, can purchase the YESTrack option. This option prints
out the board’s serial number on a barcode label. You can put this label on the defective boards.
On the rework station the operator can just scan the barcode to pull up the record for this board
to perform rework.
When you purchase this option Nordson YESTECH will supply an Avery personal label printer.
This software option can work with any Windows XP compatible label printer that may be
purchased separately.
Because the normal report and the barcode labels use different printers, use the following steps to
set the printer selection:
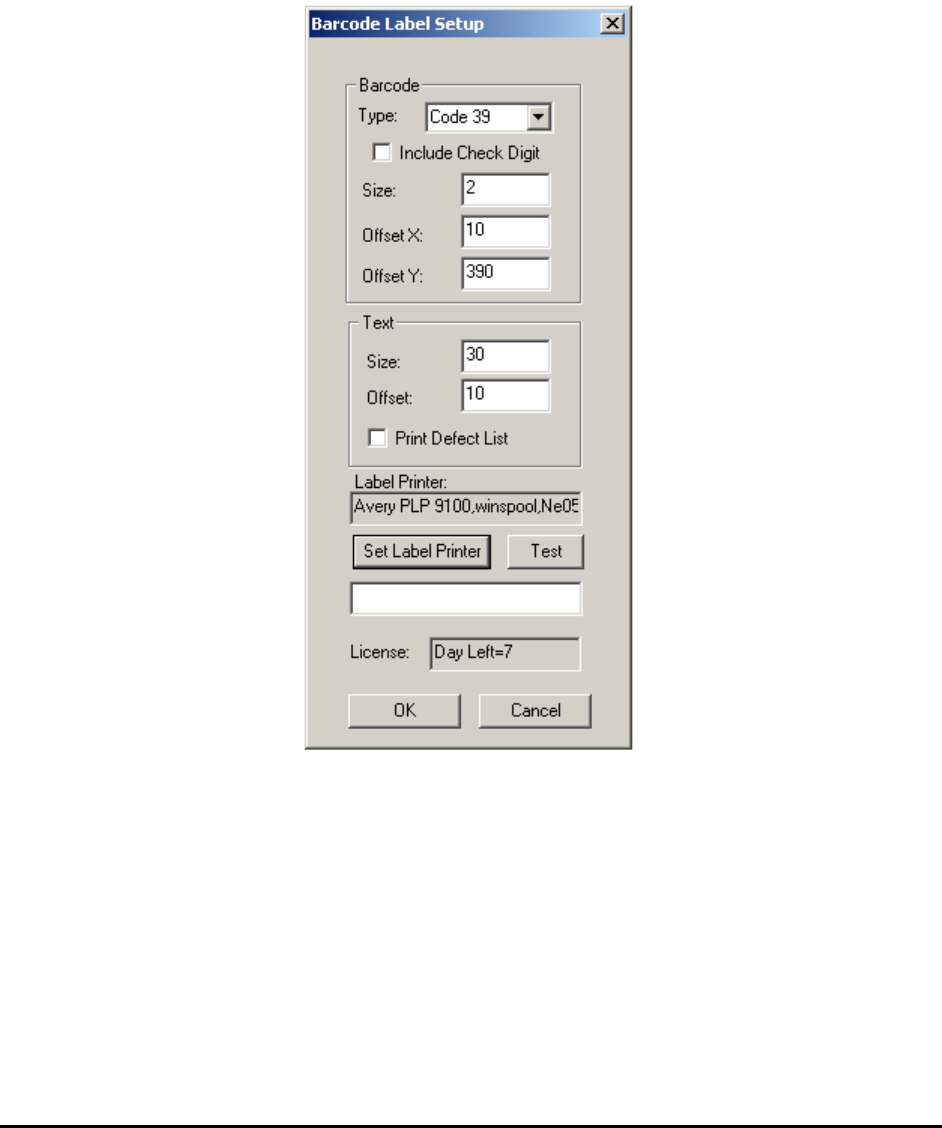
19-4 Optional Accessories
1. With the YesAX software not running, make sure both the normal report printer and the
label printer are connected and functional.
2. From Windows XP control panel, Printers and Faxes icon, select the normal report
printer as the default printer.
3. Start the YesAX software. (During start up the software records the default printer at the
time as the printer for normal report.)
4. From System Options, press the Setup button on the right of the Print Barcode Label
option to display the Barcode Label Setup dialog.
5. From Windows XP control panel, Printers and Faxes icon, select the barcode label
printer as the default printer.
6. Press the Set Label Printer button on the Barcode Label Setup dialog. (Pressing the Set
Label Printer button causes the software to record the default printer at the time as the
barcode label printer.) Press the Test button to verify barcode printing.
7. Press OK to close the dialog.
This option requires a license code to activate. The very first time you enable this option a dialog
displays showing a system code and prompt for a license code. Call Nordson YESTECH’s
technical support to obtain a license code.
Optional Accessories 19-5
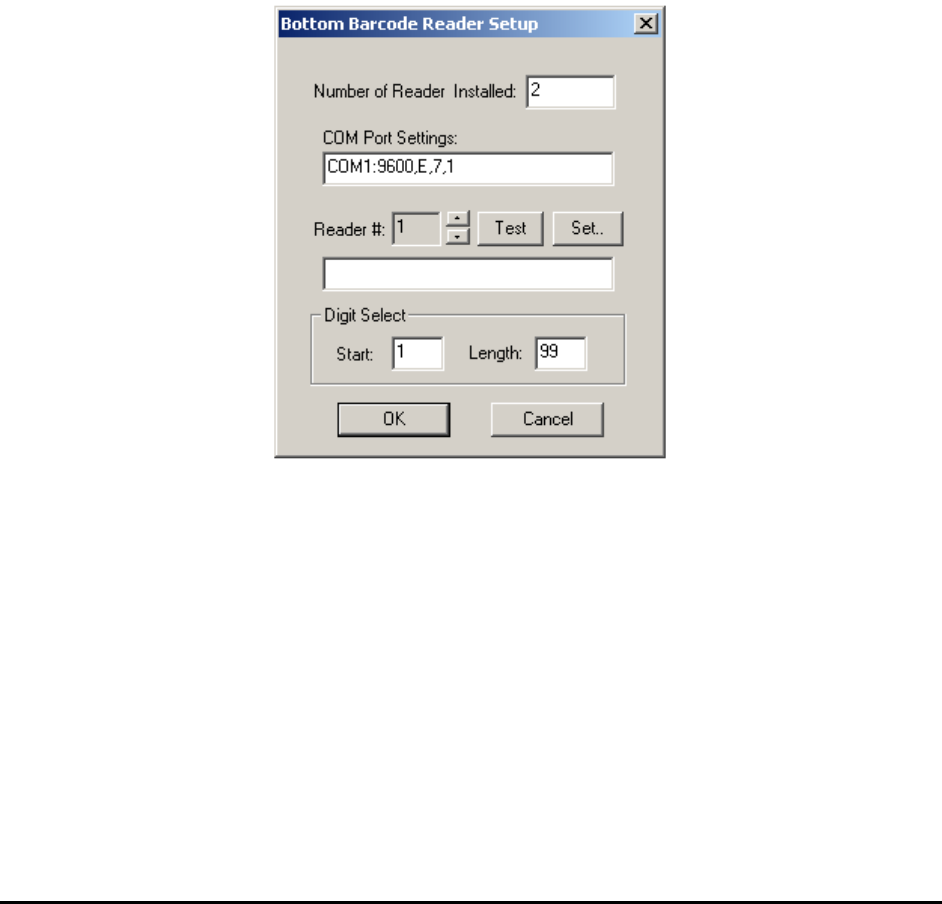
19.3 Bottom Barcode Readers
Both the bottom camera and the bottom barcode reader options can read barcodes placed on the
bottom side of the PCB. The bottom camera has the advantage to also perform OCR. It is also
generally easier to setup the bottom camera for barcode reading because it has the same barcode
reading capability as the top camera.
The Bottom Barcode Reader option has the advantage of using multiple read heads to read
multiple barcodes from a panelized board. The multiple read heads are daisy chained together
and interfaced with the PC via the RS232 (Serial) Port.
It is generally more difficult to setup the bottom barcode reader because it is hard to see where
the head is reading. The Bottom Barcode Reader is recommended for high volume applications
where the barcodes are machine placed. In addition it is also for applications where non
sequential barcodes are used on panelized boards.
Pressing the Setup button on the System Options dialog displays the Bottom Barcode Reader
Setup dialog.