00191025-01.pdf - 第427页
9 Maintenance SIPLACE 80S /F/G User’s Manual 9.5 Revolver Head, Segment Version 2 (New Nozzle Seat) Edition 07/97 from Software Vers ion SR.010.xx 9 - 68 Fig. 9.5.15 Removal, installati on and maintenance of the "se…

SIPLACE 80S/F/G User’s Manual 9 Maintenance
Edition 07/97 from Software Version SR.010.xx 9.5 Revolver Head, Segment Version 2 (New Nozzle Seat)
9 - 67
NOTE
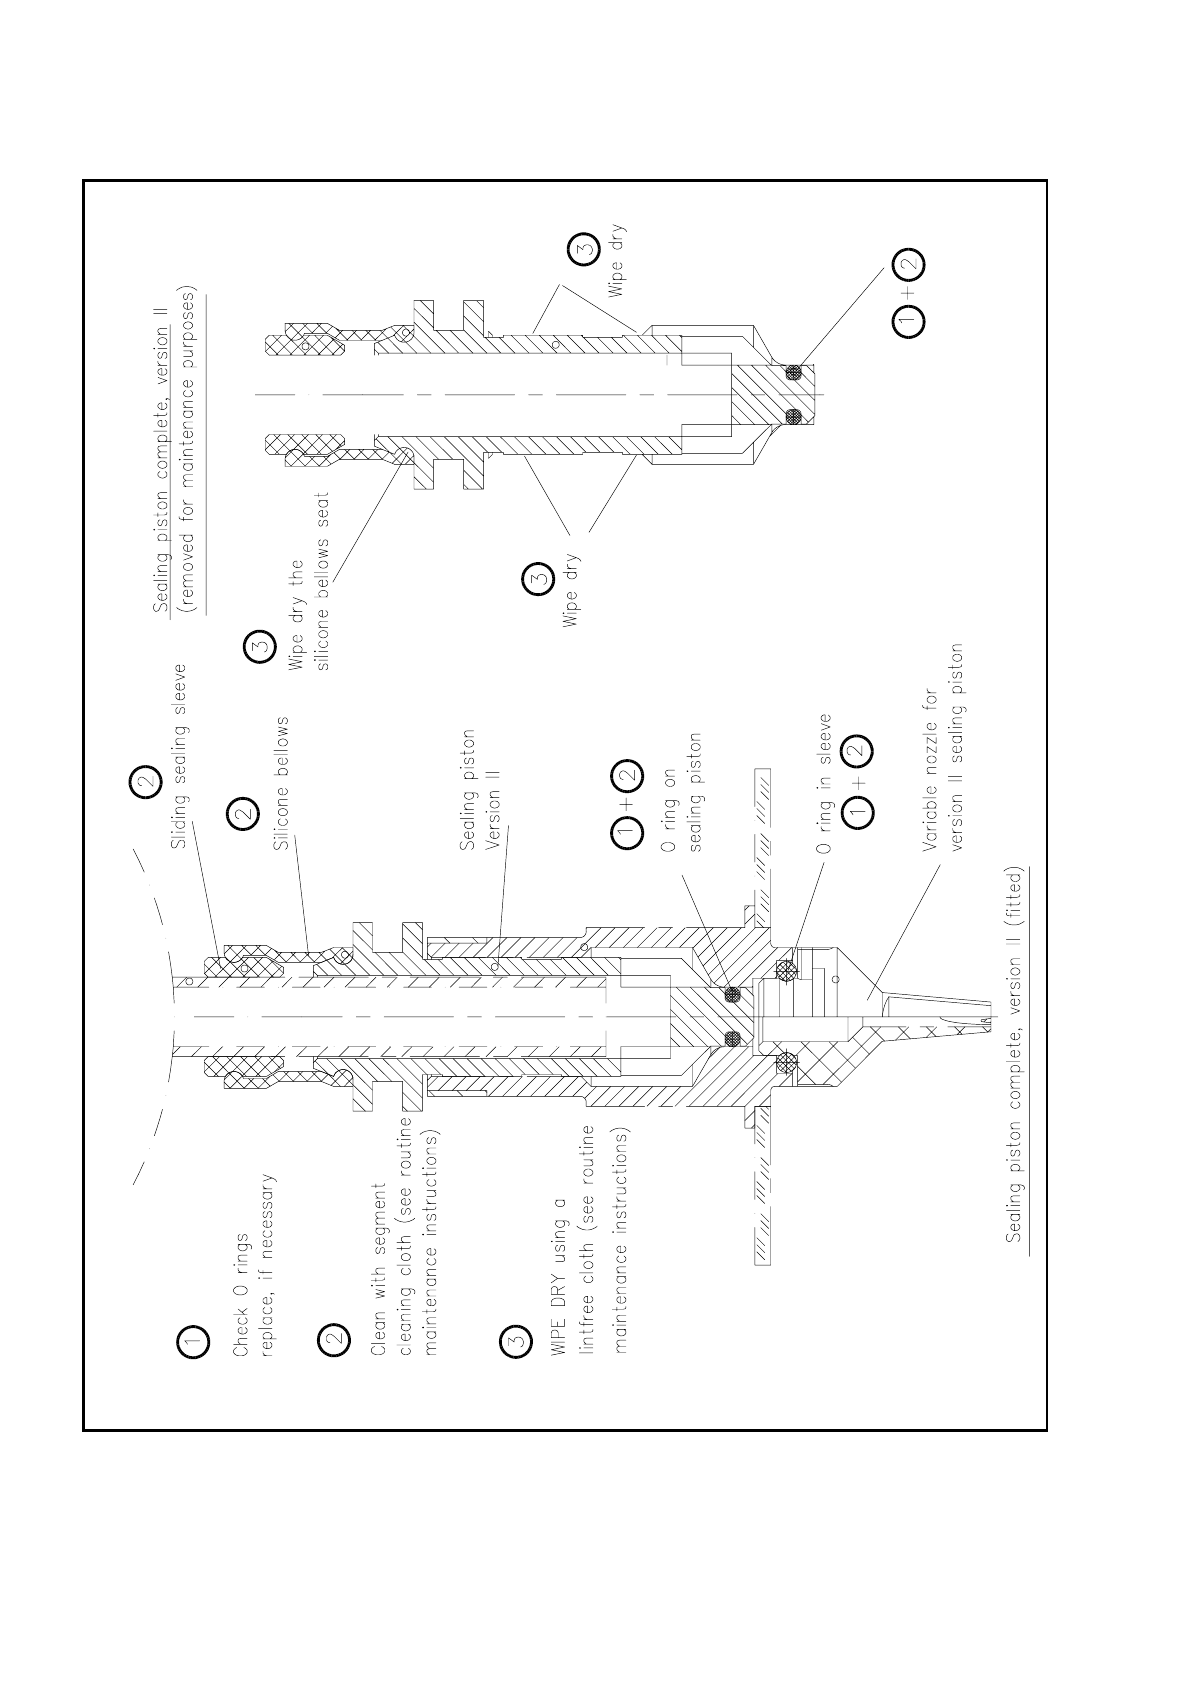
The silicone bellows must engage in the annular groove (sliding sealing sleeve) or be pushed onto the
plug-on nipple (sealing piston) as far as the stop. Wipe annular groove and plug-on nipple dry.
●
Clean the sliding sealing sleeve with a pipe cleaner as specified in the Short Reference Maintenance Seg-
ments Version 2. The sliding sealing sleeve will here absorb an insignificant amount of cleaning agent.
9.5.10.5 Cleaning the Glass Disk and Driving Disk (Friction Wheel)
WARNING
∆
!
If the incremental disk is contaminated, damaged or if a graduation mark is missing, this will cause counting
errors and this in turn to inaccurate placement with rotational misalignment (and with no error message!).
If the driving disk (friction wheel) is greasy transmission of the rotary movement to the driving disk will no
longer be optimal. This can lead to the timeout error at dp1 or dp2 (fatal error message).
Spare part:
Sleeve complete, version II, from item no. 00310319S01 (for segment with sealing piston version II)
●
Remove the segments as described under "Removal of the segments" .
●
Check the incremental disk:
If the glass disk is broken or graduation marks are missing, use a new segment. In such a case fault cor-
rection for the segment is only carried out in the factory.
DANGER
∆
!
∆
!
∆
!
Do not perform the following work in the vicinity of fire!
●
Wipe both sides of the incremental disk over with a clean, soft and lintfree cloth which has been moistened
with some alcohol.
●
Steady your hand if necessary against the lower sealing piston end not the cleaned (!) driving disk.
●
Make sure that all foreign bodies or obstinate contamination have been removed from the incremental
disk.
●
Clean the circumference of the driving disk with a cloth moistened with alcohol while turning the disk.
●
After this the driving disk must be absolutely free of grease.
9 Maintenance SIPLACE 80S/F/G User’s Manual
9.5 Revolver Head, Segment Version 2 (New Nozzle Seat) Edition 07/97 from Software Version SR.010.xx
9 - 68
Fig. 9.5.15 Removal, installation and maintenance of the "sealing piston complete", version 2, (shown in direction of removal)

SIPLACE 80S/F/G User’s Manual 9 Maintenance
Edition 07/97 from Software Version SR.010.xx 9.5 Revolver Head, Segment Version 2 (New Nozzle Seat)
9 - 69
9.5.10.6 Cleaning and Maintaining the O-Ring and Slide Surface of the Sealing
Piston
NOTE
If the slide surface of the sealing piston (formerly called the pusher) is not cleaned or maintained, this can lead
to stiffness of operation and this in turn, for example, to fatal error message No. 28 and stopping of the place-
ment sequence.
If the O-ring at the front end of the sealing piston is not cleaned or maintained or is damaged, this can lead to
excess air and this in turn to warning No. 16 during the vacuum test "Segment airtight?" (when more than one
segment is leaky = fatal error message No. 39).
●
Remove the segments from the star as described under "Removal of the segments" .
●
Remove the sealing piston complete (see Fig. 9.5.15):
●
Remove the eccentric shaft.
●
Pull the sealing piston carefully downwards and out.
●
Cleaning and maintaining the O-ring and sealing piston:
●
Clean the O-ring with the segment maintenance cloth. If damaged use a new O-ring.
●
Wipe the slide surface of the sealing piston with the segment maintenance cloth. Then wipe the slide
surface with a lintfree cloth (according to the Short Reference Maintenance Segments Version 2).
●
Installing the "sealing piston complete" and eccentric shaft:
●
Slide the sealing piston carefully from below into the sleeve of the segment.
●
Slide the eccentric shaft with its slot vertical into the hole until the pin on the end of the eccentric shaft
engages the circumferential groove of the sealing piston.
●
Rotate the eccentric shaft until the slot is horizontal when the sealing piston is retracted and feel that it
has properly engaged.
●
Reinstall the segments as described under "Installation of the segments" .
NOTE
Segments with ballcatch are marked by "E6.1".
9.5.10.7 Replacing the O-Ring on the Sealing Piston
Spare part:
O-ring 1.75 x 0.75 NBR55, Item No. 00310170-02
●
Remove the segments as described under "Removal of the segments" .
●
Remove the sealing piston as described under the preceding maintenance work .
●
Take the old O-ring (see Fig. 9.5.15) off the sealing piston, clean the circumferential groove with the seg-
ment maintenance cloth.
●
Clean the new O-ring with the segment maintenance cloth and insert the O-ring in the circumferential
groove.
●
Wipe the slide surface of the sealing piston (see Fig. 9.5.15) with the segment maintenance cloth.