00191025-01.pdf - 第464页
SIPLACE 80S/F/G User’s Manual 9 Maintenance Edition 07/97 from S oftware Version SR.010.xx 9.9 Adhesive Application Hea ds 1, 2 and 3 9 - 105 NOTE: When re fitted, the a llocation a nd position of the spacer s with respe…
9 Maintenance SIPLACE 80S/F/G User’s Manual
9.9 Adhesive Application Heads 1, 2 and 3 Edition 07/97 from Software Version SR.010.xx
9 - 104
9.9.3 Removing the Glue Cartridges and Cleaning the Glue Nozzles
9.9.3.1 Removing the Glue Cartridges and Detaching the Glue Nozzle
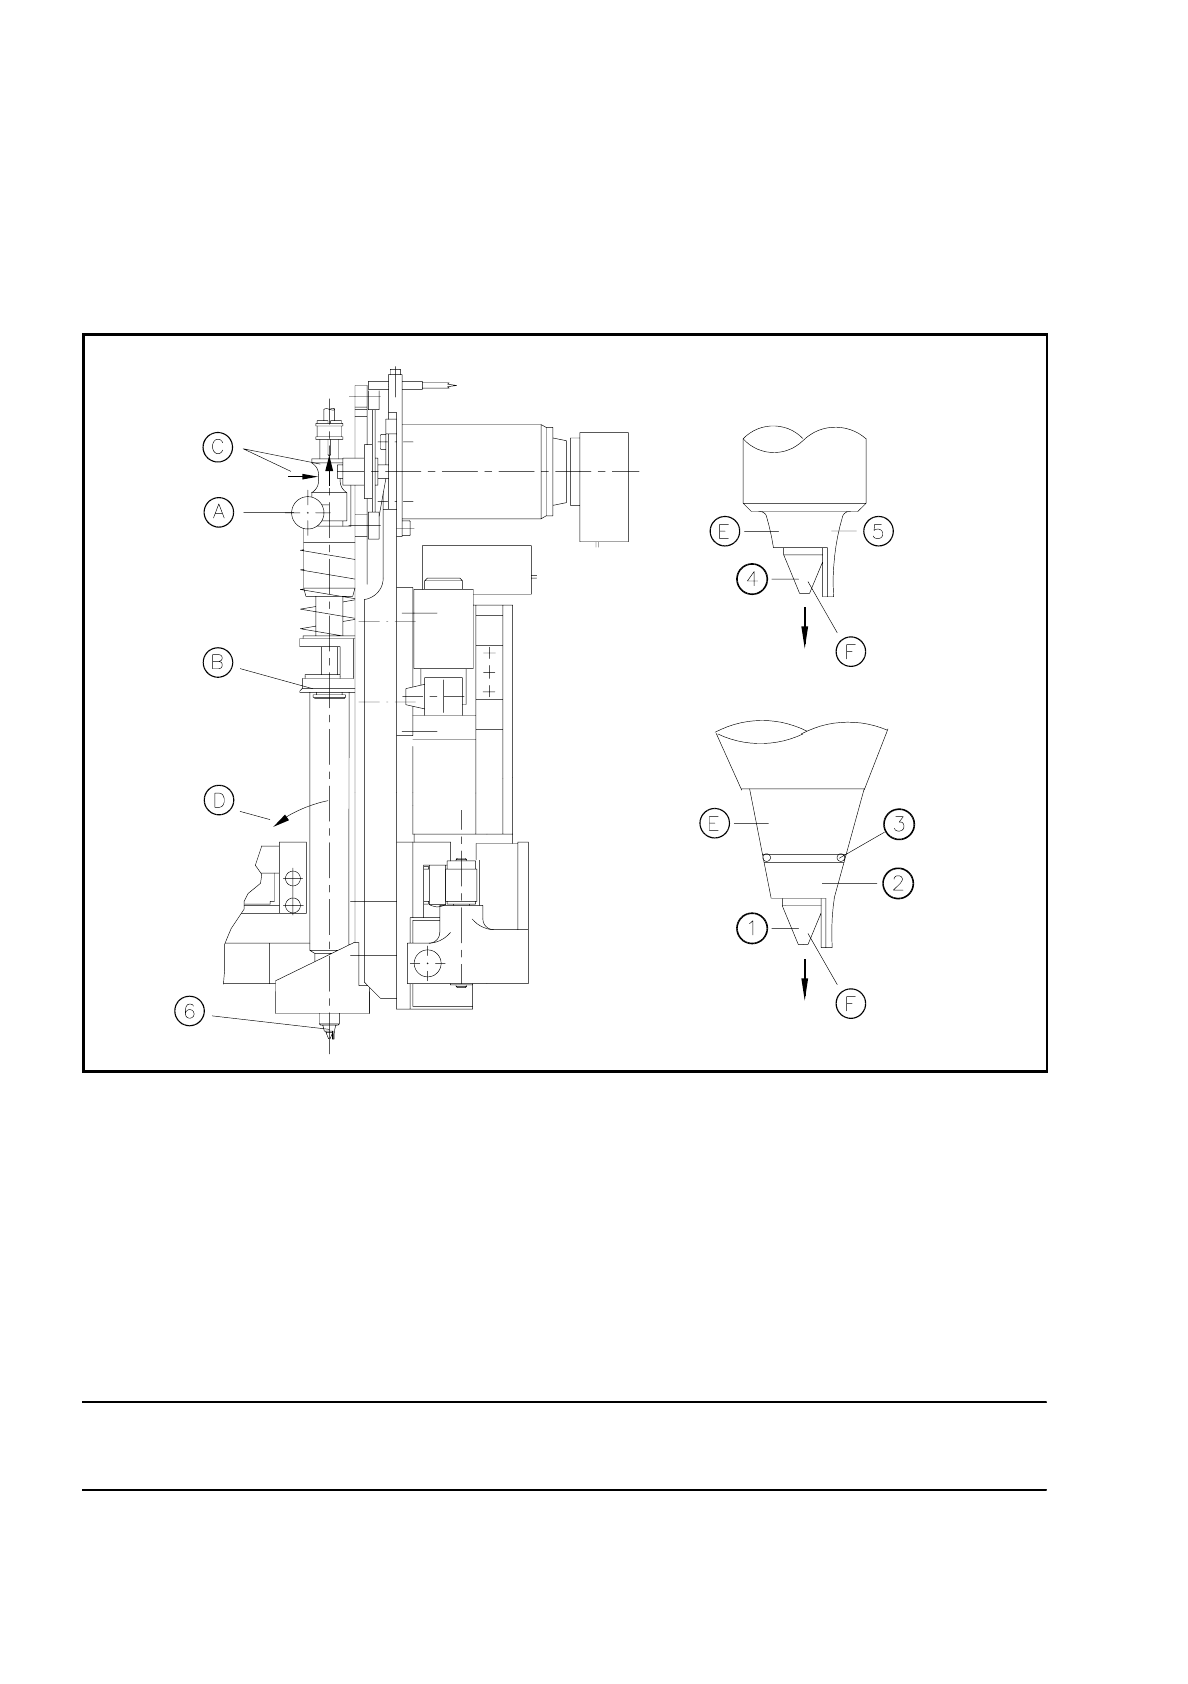
Fig. 9.9.4 Removing the glue cartridge and detaching the glue nozzle
Key to Fig.9.9.4 Sequence in Fig. 9.9.4
NOTE
The spacers of adhesive heads 1 and 2 are identical.
1 Conical glue nozzle
2Spacer
3 Split washer
4 Cylindrical glue nozzle
5Spacer
6 Glue nozzle with spacer
A Loosen the knurled screw
B Hold against the cartridge
C Hold the dispenser unit and pull up
D Swivel the cartridge out a little and lift up to remove
E Turn the spacer and pull down to remove
F Unscrew the glue nozzle
SIPLACE 80S/F/G User’s Manual 9 Maintenance
Edition 07/97 from Software Version SR.010.xx 9.9 Adhesive Application Heads 1, 2 and 3
9 - 105
NOTE:
When refitted, the allocation and position of the spacers with respect to the adhesive application heads must
be the same as before, i.e. the spacer of adhesive application head 3 must be refitted to head 3 and the posi-
tion of the spacer must be correct. The spacers of adhesive heads 1 and 2 are identical.
NOTE
When installing ensure that, after fixing the new glue cartridge, the dispenser unit is guided downwards and is
not moved down too quickly by the force of the spring.
9.9.3.2 Cleaning the Adhesive Nozzles
NOTE
Carry out cleaning of the adhesive nozzles before the other maintenance work on the adhesive application
heads so that the adhesive does not dry out in the nozzles.
CAUTION
∆
!
For the following work you will require a solvent or synthetic-resin solvent. This presents a fire hazard!
There will therefore be an increased risk of accident! Do not perform the following work under any circum-
stances in the vicinity of fire. Close off the working area around the ultrasonic bath correspondingly, and also
while the nozzles are drying.
Work only if there is adequate air extraction!
Maintenance frequencies:
Aluminum - nozzles After 1 week's operation or 24 hours out of service
Aluminum PTFE- nozzles After 2 weeks' operation or 48 hours out of service
Conical aluminum/PTFE nozzles After 2 weeks' operation or 48 hours out of service
Spare parts:
Aluminum nozzles: Will be replaced by aluminum PTFE nozzles
Aluminum PTFE- nozzles
Size 0.30 mm Item No. 00317870-01
Size 0.44 mm Item No. 00317871-01
Size 0.60 mm Item No. 00317872-01
Conical aluminum/PTFE nozzles
Size 0.10 mm Item No. 00305554-06
Size 0.15 mm Item No. 00305555-06
Size 0.2 mm Item No. 00305556-06
Size 0.25 mm Item No. 00305557-06
Size 0.3 mm Item No. 00305558-06

9 Maintenance SIPLACE 80S/F/G User’s Manual
9.9 Adhesive Application Heads 1, 2 and 3 Edition 07/97 from Software Version SR.010.xx
9 - 106
Conical aluminum/PTFE nozzles
Size 0.30 mm Item No. 00320895-01
Size 0.44 mm Item No. 00320897-01
Size 0.60 mm Item No. 00320900-01
Spacer for conical aluminum/PTFE nozzles
Size 0.10 mm Item No. 00320902-01
Size 0.15 mm Item No. 00320903-01
Size 0.20 mm Item No. 00320904-01
Size 0.25 mm Item No. 00320905-01
Size 0.30 mm Item No. 00320906-01
Split washer for spacers Item No. 00320907-01
Remove the glue cartridges one after another and remove the adhesive nozzles as described in Section
9.9.3.1.
PLEASE NOTE on conical nozzles
The spacers may be cleaned together with the glue nozzles. To be cleaned, the glue nozzle does not have to
be removed from the spacers.
However, if you wish to replace the spacers, be careful not to lose the split washer which stabilizes the spac-
ers on the glue nozzle (see Fig. 9.9.4).
●
The nozzles are to be cleaned immediately and then stored ready for the next scheduled maintenance.
●
Clean the nozzles as follows:
●
Press the cleaning tool only from the large nozzle diameter end into the nozzle so as to force out as
much adhesive as possible in the forward direction.
●
Place the nozzles which have been precleaned in this way into the ultrasonic bath:
The time spent in the ultrasonic bath will depend
- on the solvent used (shortest time with synthetic-resin solvent) and K
- on the drying time of the adhesive. Take care that the adhesive does not dry in.
Recommended times for the ultrasonic bath: 15 - 30 minutes.
●
While waiting fit new nozzles in order to keep downtime as brief as possible.
●
Replace the adhesive cartridges back in the cartridge guides. Proceed here in the reverse sequence of
operations to that described for removal (see Sections 9.9.3.1).
●
Check the nozzle after removing it from the ultrasonic bath. There should not be any signs of adhesive
remnants on the inner wall.
●
Blow out the nozzle hole using compressed air. Provide adequate air extraction.
●
Store the cleaned nozzles ready for the next scheduled maintenance of the adhesive application heads.
❒