00197195-02-UG SetupCenter 5.1_en.pdf - 第32页
Configuring Setup Center Barcode Labels Fragment Mapping 32 User Guide SIPLACE Setup Center 5.1 3.3.1 Fragment Mapping ► In the main menu open Extras > Settings and the Settings window is opened. ► Select the category…
Configuring Setup Center
Print Current Quantity Barcode Label on Tear down Barcode Labels
User Guide SIPLACE Setup Center 5.1 31
3.2.6.1 Teardown with Quantity Printout
If the used packaging units are processed without unique ID barcodes, all entries for a packaging unit
are deleted from the Setup Center database after teardown. This also means that the current quantity
for a partially processed reel remains unused.
In order to prevent this, you can print out quantity barcodes during teardown.
The contents of the quantity barcode can be configured as follows in the ApplicationSettings.xml file:
<Setting key="BusinessRules.SetupVerification.QuantityPrintout.BarcodePattern" value="$CQ{Quanti-
ty}${OriginalQuantity}"/>
The following place holders are possible:
Component, Quantity, OriginalQuantity, Batch, Extra1, Extra2, Extra3, Serial, SiplaceProComponent,
Supplier, Manufacturer, ExpiryDate, ManufactureDate.
Prerequisite
▪ The "Print current quantity barcode label on tear down" was activated via
Extras → Settings
→ General
.
▪ A label printer is ready to operate and can be accessed by Setup Center.
▪ A barcode label must be configured which corresponds to the printed barcode (default quantity bar-
code: '^\$CQ(?<Quantity>\d{1,6})\$(?<OriginalQuantity>\d{1,6})$').
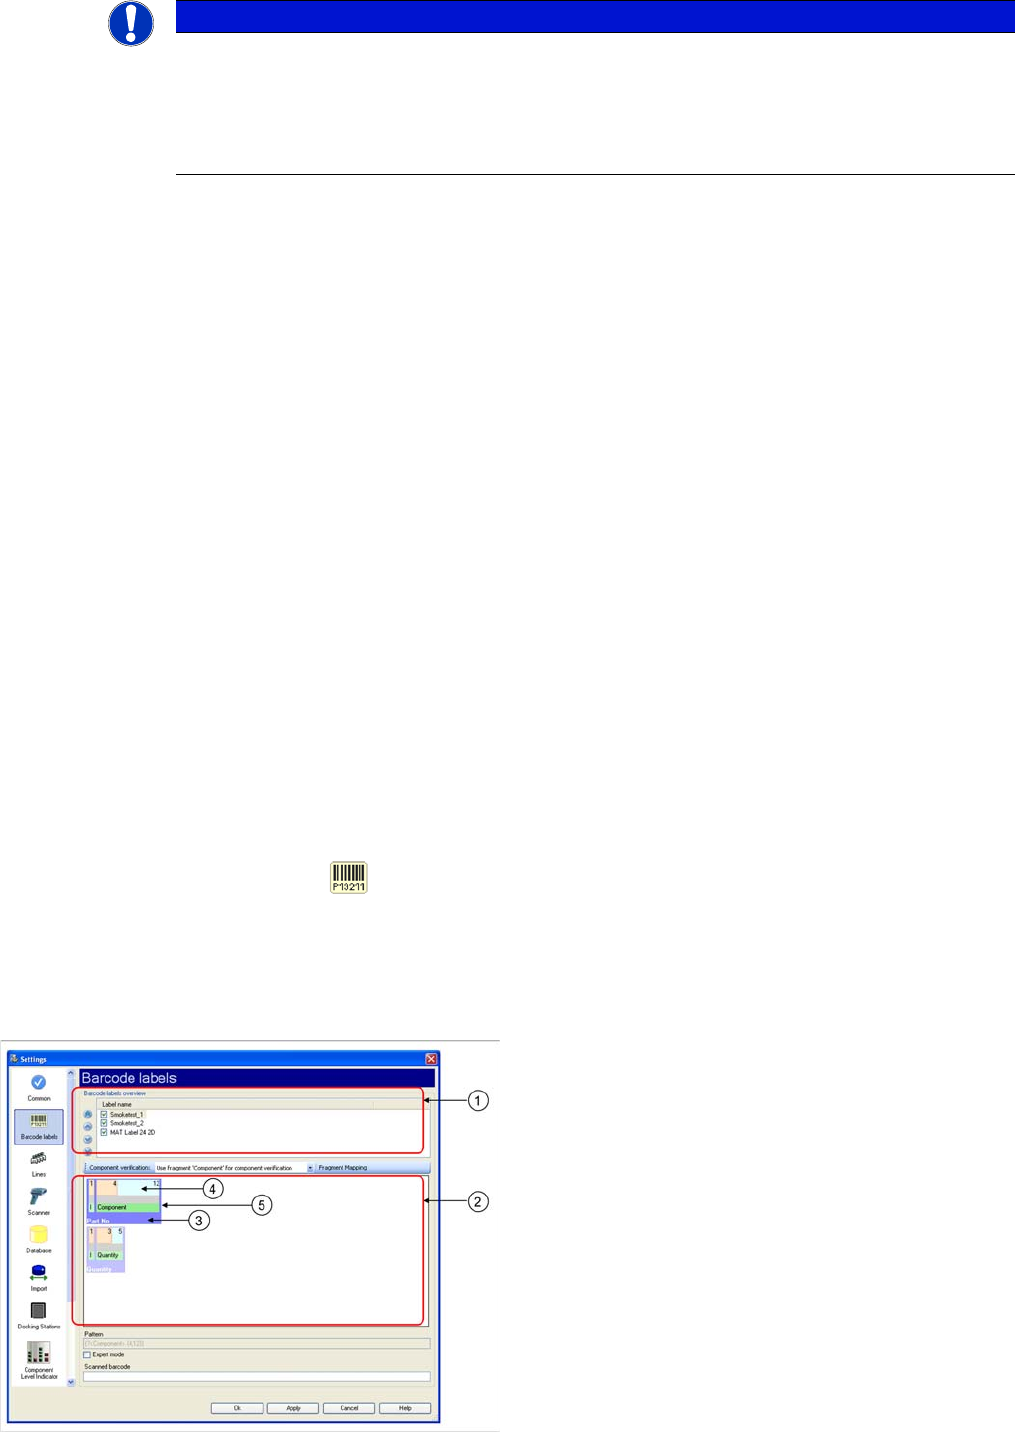
3.3 Barcode Labels
► In the main menu open Extras > Settings and the Settings window is opened.
► Select the category Barcode labels and the settings are opened.
In this view the barcode definitions used by Setup Center are created. Barcode labels can be defined for
use during the setup verification of Setup Center.
Overview of Barcode Labels
NOTICE
Save the settings for barcode label templates
The settings for these barcode label templates are stored in the file "BarcodelabelsPrintout-
Styles.xml" in the installation directory (as a default, this is: C:\Programs\SIPLACE\SIPLACE
Setup Center). If your settings result in illegible printouts, change the settings here and save a
copy of the file.
Legend
1. Sorted list of barcode labels
2. Barcode label - full view
3. Barcode label name
4. Barcode Fragment
5. Barcode
Configuring Setup Center
Barcode Labels Fragment Mapping
32 User Guide SIPLACE Setup Center 5.1
3.3.1 Fragment Mapping
► In the main menu open Extras > Settings and the Settings window is opened.
► Select the category Barcode labels and the settings are opened.
► Select the Fragment Mapping function and the Fragment Mapping dialog box will open.
If a barcode fragment contains values which do not match the standard, alternative values can be en-
tered with this function. An error message will be issued if the scanned barcode does not match the pre-
scribed values.
Settings Description
Label name Names of barcode labels as sorted list.
Component verification "Component“ fragment for component verification
The barcode fragment 'Component' is extracted from the fully scanned bar-
code and is then (just this fragment) compared with the supplier barcode in the
programming system. This ensures that the barcode containing the fragment
'Component' can also contain other fragments and have any length, without
the need to generate matching versions of the supplier barcode.
Component barcode for verification
The fully scanned barcode, which contains the barcode fragment 'Compo-
nent', will be compared with the supplier barcode in the programming system.
If the barcode contains other barcode fragments, you will need to enter filler
characters in the supplier barcode and the filter, to ensure that the number of
characters matches the barcode which was scanned in.
Fragment mapping The Fragment Mapping dialog box will open. See "3.3.1 Fragment Mapping"
[➙32].
If a barcode fragment contains values which do not match those prescribed,
alternative values can be entered with this function. An error message will be
issued if the scanned barcode does not match the prescribed values.
Pattern Total barcode pattern for selected barcode label.
Expert mode Activation of expert mode for manual editing of barcode pattern.
Scanned barcode During the barcode test the scanned barcode is entered here.
Tab Description
MSD Level Value: MSD level values acc. to IPC/JEDEC standard (1, 2, 2a, 3, 4, 5, 5a, 6)
Alternative values: enter the alternative value here.
RoHS adherence Value: Y = Yes, N= No, 0 = Unknown
Alternative values: enter the alternative value here.
Brightness Class Define a placeholder (filter) for those characters in the brightness class bar-
code which you do not want Setup Center to check.
Example:
Brightness class on the packaging unit: S10300S40300
Definition of brightness class
in the SIPLACE Pro setup: S1XXXXS4XXXX
If X is defined here as a placeholder, only the characters at S1 and S4 on the
barcode will be checked by Setup Center.
Configuring Setup Center
Verification Settings for Domains Lines
User Guide SIPLACE Setup Center 5.1 33
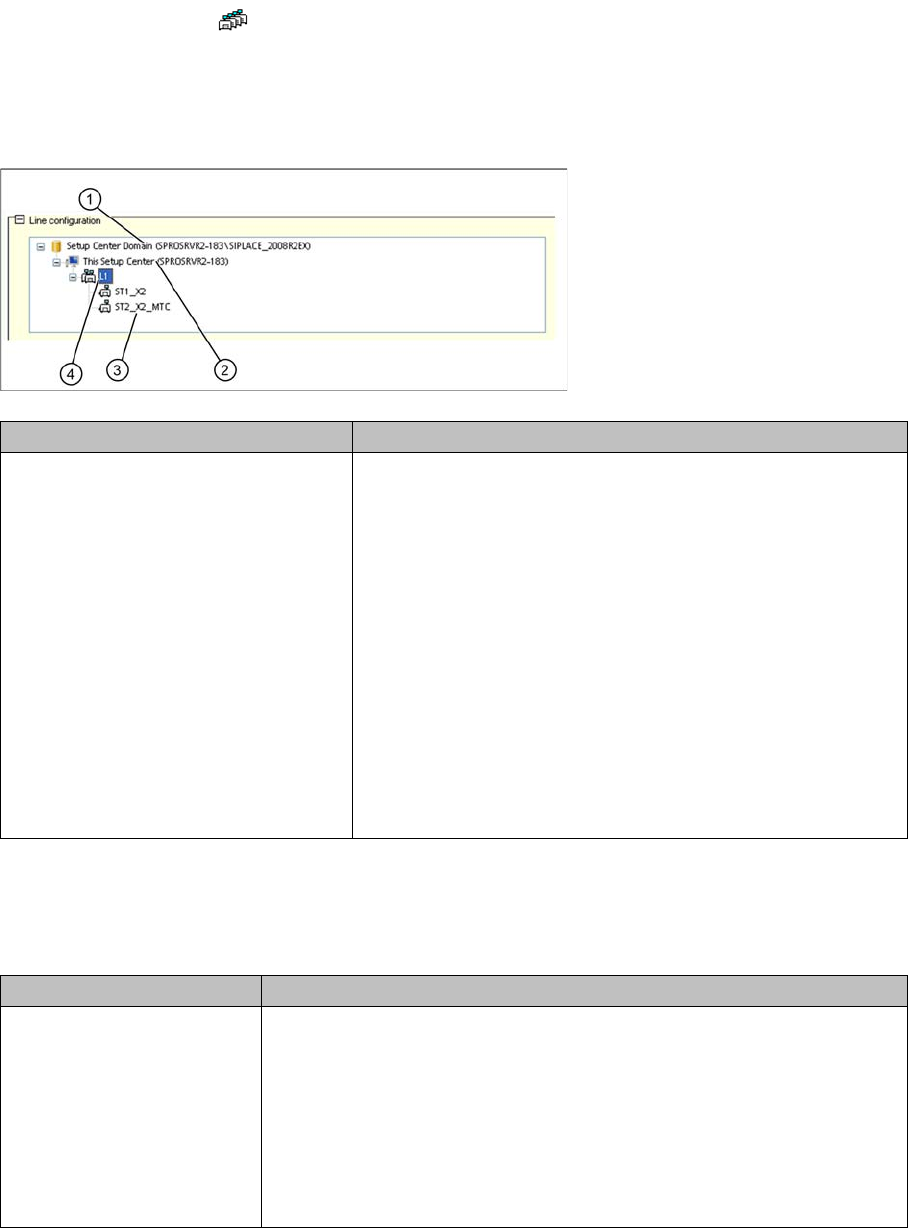
3.4 Lines
► In the main menu open Extras > Settings and the Settings window is opened.
► Select the category Line and the settings will be opened.
In this view you configure the lines that are used for online setup verification. You can add, remove and
repair these lines. In addition, you can define domain-wide, line-specific and station-specific verification
settings. The tree view shows the domains, all currently configured lines and their stations. The param-
eters shown differ, according to which element has been selected.
3.4.1 Verification Settings for Domains
The domain has been selected in the tree view. The following settings are possible for the selected do-
main:
Edit field Description
Line configuration 1. Domains
2. Name for this Setup Center
3. Configured lines
4. Stations for the lines
The online setup verification is carried out for the configured
lines. When a domain, line or station is selected the expanded
settings are shown in the lower area of the dialog box.
Domains selected: - See "3.4.1 Verification Settings for Do-
mains" [ ➙ 33]
Line selected:- See "3.4.3 Verification Settings for Lines"
[ ➙ 37]
Station selected: - See "3.4.5 Verification Settings for Stations"
[ ➙ 38]
Settings Meanings
UID refill enabled Active: simplified refilling of unique packaging unit IDs is permitted. Dur-
ing refilling, you only need to select the function Refill Packaging Unit in
the scanner menu and then scan in the Packaging ID for the previous
reel, followed by the Packaging ID for the next reel. Instead of using the
menu function, you can also scan in the UID Refill control barcode.
This simplified refilling can be used universally, in the pre-setup area as
well as on the line and you can even generate packaging unit chains in
the warehouse area.