00197195-02-UG SetupCenter 5.1_en.pdf - 第86页
Barcode Barcode Labels P ractical Example 86 User Guide SIPLACE Setup Center 5.1 5.1.3.4 Unique Barcodes (as Single Fragment) If the packaging units to be used have a unique bar code , these can then be pr ocessed in Set…
Barcode
Practical Example Barcode Labels
User Guide SIPLACE Setup Center 5.1 85
5.1.3.3 Creating Quantity Barcodes
The packaging unit quantity is generally scanned in at the same time and is used for a component level
check at the station. However, it is not essential for the actual setup verification process.
Step 2
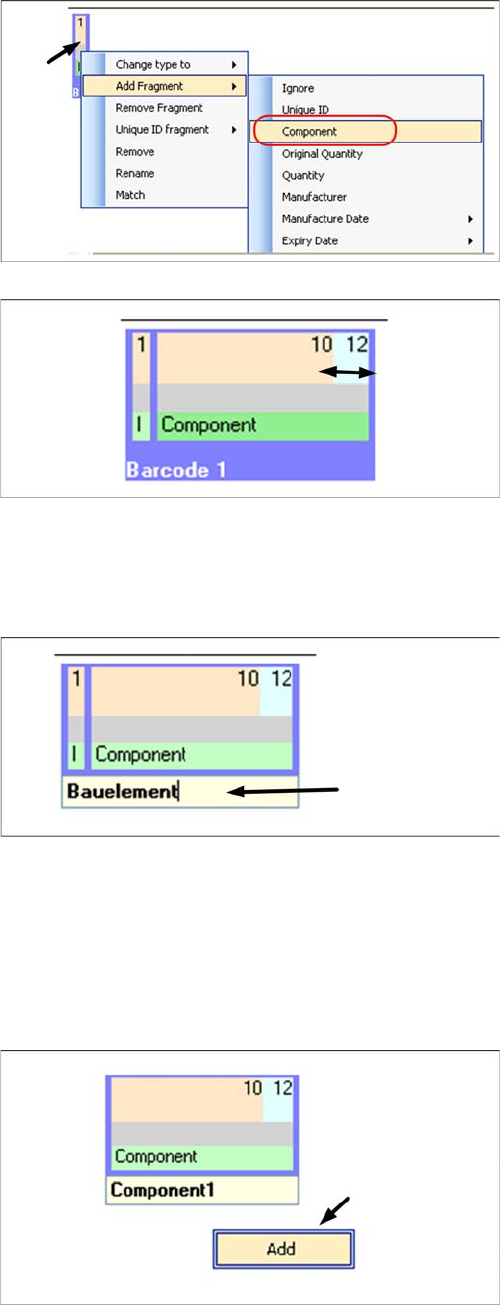
In the same way as step 1, add the fragment type Com-
ponent:
▪ Right-click with the mouse in the green field.
▪Go to Add fragment: and select the fragment Compo-
nent.
Step 3
The two fragments Ignore and Component must now be
set to the required character length; (ignore character 1
and set component length to 10 to 12 characters):
▪ Move the mouse to the right-hand edge of the respec-
tive fragment, then right-click with the mouse and
hold.
▪With the right mouse button pressed down, set the Ig-
nore length to 1 character.
▪ With the right mouse button pressed down, set the
Component length to 10 to 12 characters.
Step 4
The name of the barcode can be changed and will appear
later on the scanner display.
▪ Doubleclick in the yellow field.
▪ Now enter the required name.
Step 1
The quantity is added as a second barcode for the first
rule:
▪ Right-click with the mouse in the white field to open
the context menu Add barcode.
Barcode
Barcode Labels Practical Example
86 User Guide SIPLACE Setup Center 5.1
5.1.3.4 Unique Barcodes (as Single Fragment)
If the packaging units to be used have a unique barcode, these can then be processed in Setup Center.
You need to add another barcode with the fragment type UniqueID.
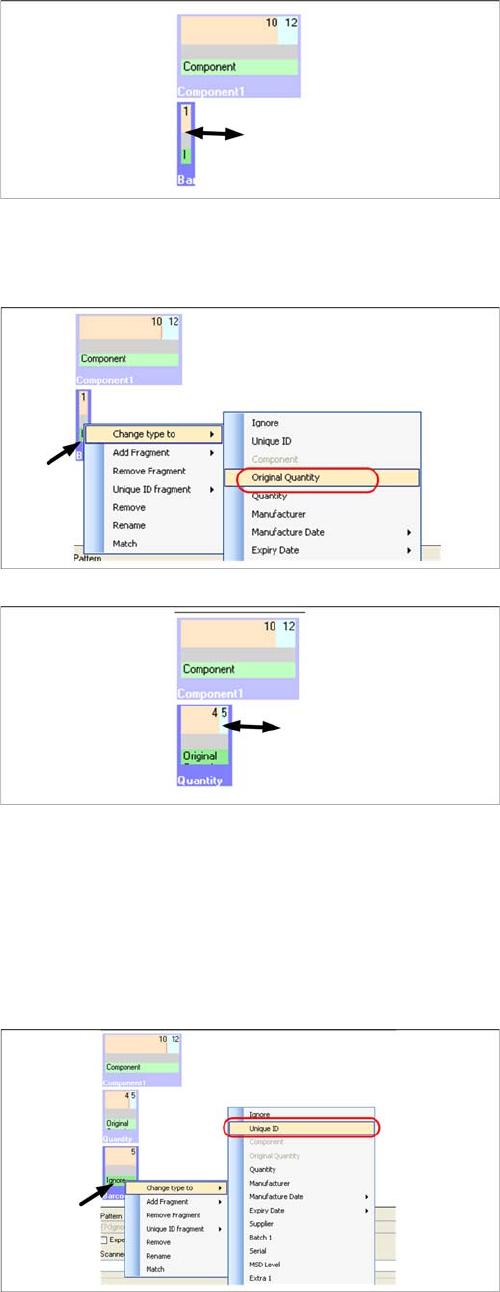
Step 2
A barcode with fragment type Ignore is created automat-
ically. This fragment type will not be changed, since all
quantity barcodes start with the character "Q" (e.g.
Q
10000) and this character should not be evaluated any
further.
▪ Move the mouse to the right-hand edge and then
right-click with the mouse and hold.
▪ With the right mouse button pressed down, set the
length to 1 character.
Step 3
The new fragment type OriginalQuantity is now added.
▪ Right-click with the mouse in the green field.
▪ Go to Add fragment: and select the fragment type
OriginalQuantity.
Step 4
The quantities are between 1000 and 20000, meaning
that the fragment length is between 4 and 5 characters.
The barcode name can also be changed.
▪ Move the mouse to the right-hand edge, then right-
click and hold.
▪ With the right mouse button pressed down, set the
length to 4 to 5 characters.
▪ Double-click on the blue field. Now enter the required
name.
Step 1
▪ Right-click with the mouse in in the white field. The
Add barcode context menu opens.
▪ Right-click with the mouse in the green field.
▪ Go to Change type to: and select the fragment type
Unique ID.
Barcode
Practical Example Barcode Labels
User Guide SIPLACE Setup Center 5.1 87
If a packaging unit is scanned-in for the first time, the unique barcode, the component barcode and the
quantity barcode must be scanned. At the same time, a data set will be created in the Setup Center da-
tabase. This remains in the database, even after tear down. If this packaging unit is used again at a later
date, you will only need to scan in the unique barcode.
5.1.3.5 Unique Barcode (as Multiple Fragments)
If the packaging units to be processed have no explicit unique barcode but can be clearly identified by
looking at multiple fragments (e.g. supplier and serial), these can then be processed in Setup Center.
You need to mark the supplier and serial fragments accordingly.
Step 2
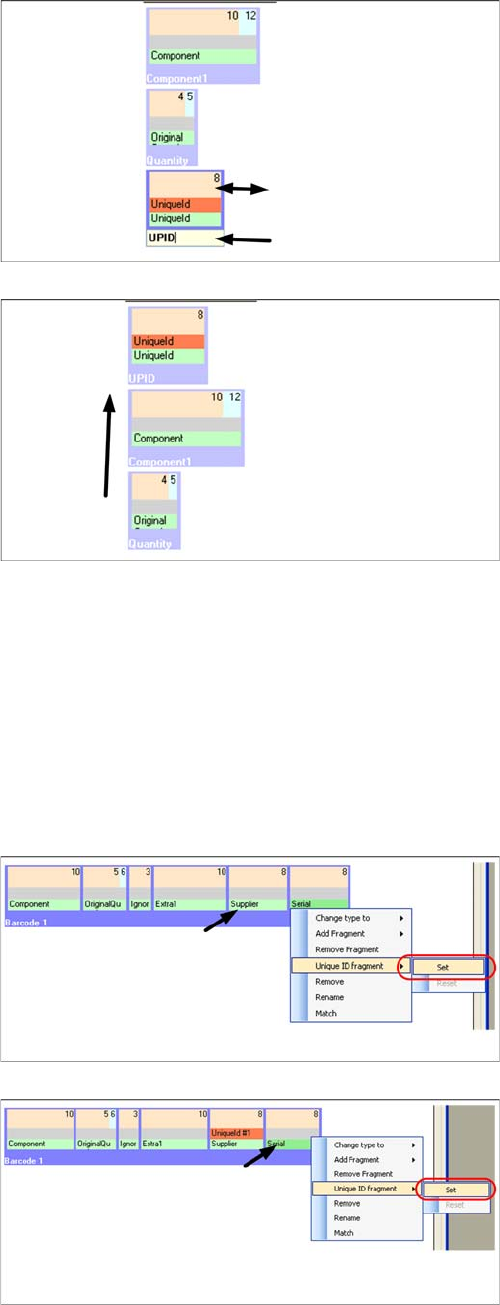
The unique packaging unit barcode has 8 characters.
▪ Move the mouse to the right-hand edge and then
right-click and hold.
▪ With the right mouse button pressed down, set the
length to 8 characters.
▪ Double-click in the blue field. Now enter the required
name.
Step 3
Next, you need to shift this barcode to position 1.
Step 1
▪Simply right-click with the mouse in the green Suppli-
er field to open the Unique ID Fragment context
menu.
▪ Select Set to define the "supplier" fragment as the
first part of the UniqueID.
Step 2
▪Simply right-click with the mouse in the green Serial
field to open the Unique ID Fragment context menu.
▪ Select Set to define the "serial" fragment as the sec-
ond part of the UniqueID.