00195372-0102_AI_Vakuumpumpe_D1D2_DE EN - 第41页
D1 / D2 2 Assembly instructions for vacuum pump 11/2006 Edition 41 2.9 Finishing W ork 2.9.1 Conditions for th e power-on procedure 2 Before the power-on procedur e the following examinations must be carried out, in orde…

2 Assembly instructions for vacuum pump D1 / D2
11/2006 Edition
40
2.8 Technical information for the re-fitting of the
vacuum pump operation.
A water ring vacuum pump can supply maximally four C&P6/12 heads. 2
A modified vacuum generator has been built into the
placement head in the C&P6/12. Thus the
pickup circuit through Venturi nozzles and the latch are carried out by the vacuum pump. 2
2
2
During normal operation the vacuum at the vacuum distribution block machine entrance should
not fall under -800 mbar. 2
2
Mutual influence of several mounting machines on a common pump: 2
Several mounting machines are tied to a vacuum pump; it is therefore advisable for the case of
mainte
nance, to build an additional stop valve into the vacuum inlet before each placement ma-
chine. 2
Only when the nozzles of all switched off mounting mach
ines are perpendicular is there no recip-
rocal effect under the mounting machines connected by the vacuum pump – even without (closed)
stop valv
es. 2
If the placement head is in the waiting position, the star
is between two star positions (half cycle).2
In this intermediate position the holding and pickup circuit are connected by the cross section. If
a placement machin
e is switched off in this parked position, it wastes the vacuum. – The vacuum
pump sucks in false air backwards over the muffler of the pickup circuit. This affects the compo-
nent heads of all attached mounting machines
, if no stop valves are inserted. 2
So that the Venturi pickup circuit maintains the vacuum, all mounting machines must run during
the e
ntire operation. 2
If the vacuum pump is switched off in this position, the
placement head sucks over the holding
circuit humidity and/or water from the vacuum pump. The water acts as a sealing medium for wa-
ter ring vacuum pumps. Therefore a check valve is insert
ed in the series pump with a noise reduc-
tion cover. Additionally an entrance air cleaner prevents a contamination of the vacuum pump.
Desp
ite these measure to prevent any damage to the property do not shut off the vacuum pump
whilst the placement machine is running. 2
2
2
D1 / D2 2 Assembly instructions for vacuum pump
11/2006 Edition
41
2.9 Finishing Work
2.9.1 Conditions for the power-on procedure
2
Before the power-on procedure the following examinations must be carried out, in order to prevent
the risk of injury or a larger damage to the equipment: 2
Ensure before restarting the com
pressed air, that 2
– all hose connectors/ - connections ar
e correctly assigned (thus also no compressed air gets
into the pressure tubing)
– all of the conditions for the switching on
of the vacuum pump and the attached mounting ma-
chines are kept, as indicated in the manuals
– The vacuum pump should always be switched on before the placement machine.
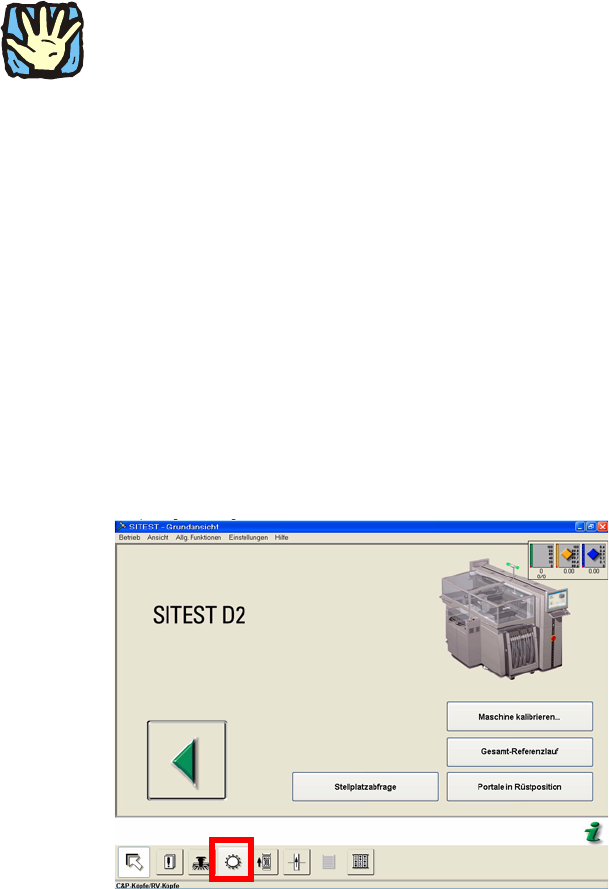
2.9.2 Checking the system for pressure tightness
2.9.2.1 Measuring with SITEST
(Checking as an example one of the component heads)
This test checks whether everything is correctly mounted. 2
Fig. 2.9.1 SITEST Head Function
2
2
2
2
2 Assembly instructions for vacuum pump D1 / D2
11/2006 Edition
42
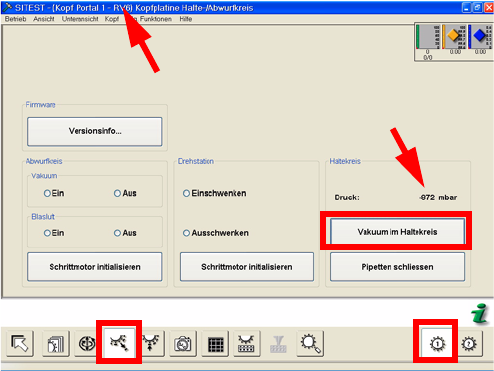
: Carry out a vacuum measurement in the holding circuit.
Fig. 2.9.2 Example: Measurement holding circuit (note: only with closed nozzles)
2
2
2
2
2
2
2
2
2
2
2
2
2
2
2
2
2
2
2