00197543-01_SM_JTF-S_ JTF-M_en - 第28页
Service Works Service Conveyor Unit 2.2.2 Remove Side Covers from Base Unit 28 Service Manual SIPLACE JEDEC Tray Feeder 2.2.2 2 . 2 . 2 R e m o v e S id e C o v e r s f r o m B a s e U n it Remove Side Covers from Base U…
Service Works
2.2.1 Dismounting Conveyor Section from Base Section Overview SIPLACE JTF-Sections
Service Manual SIPLACE JEDEC Tray Feeder 27
2.2.1.2
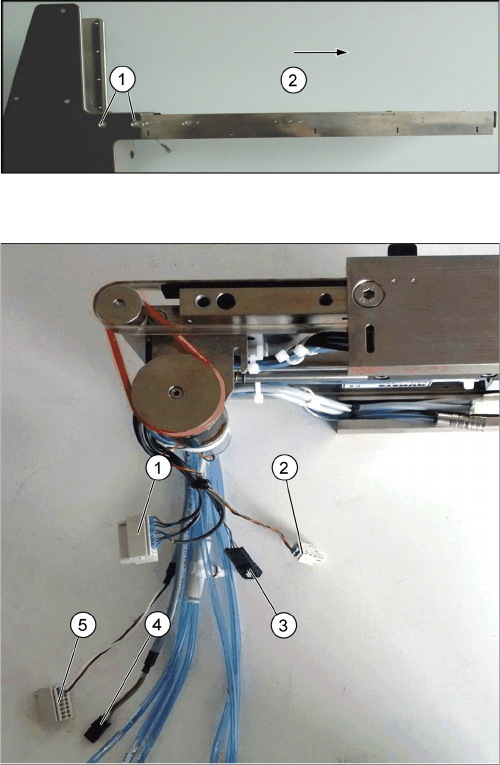
2.2.1.2 Disconnection Conveyor from Base
Disconnection Conveyor from Base
Disconnection Conveyor from Base
► Remove the screws holding the conveyor to the base
(1).
► The conveyor is mounted with two screws on each
side of the base.
► Slide the conveyor from the base (2) and place it
carefully on a bench.
Disconnected conveyor connection
1. P1
2. P3
3. P18
4. P9 (in case)
5. P2

Service Works
Service Conveyor Unit 2.2.2 Remove Side Covers from Base Unit
28 Service Manual SIPLACE JEDEC Tray Feeder
2.2.2
2.2.2 Remove Side Covers from Base Unit
Remove Side Covers from Base Unit
Both side covers must be removed from the base unit to get access to all mechanics and sensors in the
side plates (“ears”).
2.3
2.3 Service Conveyor Unit
Service Conveyor Unit
2.3.1
2.3.1 Replacing Conveyor Belts (SIPLACE JTF-S / SIPLACE JTF-M)
Replacing Conveyor Belts (SIPLACE JTF-S / SIPLACE JTF-M)
Used parts:
▪ Conveyor belt 1.27 x 9.65 x1646, Right_15001060 (Pos 50) [03111679-xx]
▪ Conveyor belt 1.27 x 9.65 x1680, Left_15001061 (Pos 60) [03111680-xx]
The JEDEC Tray Feeder must be prepared according to the maintenance and replacement procedures
to perform the retrofit of the belts.
Remove side cover
► Remove all twelve sink screws (1) from the side cov-
er.
► If access is required, do this also on the other side.
Service Works
2.3.1 Replacing Conveyor Belts (SIPLACE JTF-S / SIPLACE JTF-M) Service Conveyor Unit
Service Manual SIPLACE JEDEC Tray Feeder 29
2.3.1.1
2.3.1.1 Replacing Conveyor Belt Right [03111679-01] (Pos 50)
Replacing Conveyor Belt Right [03111679-01] (Pos 50)
2.3.1.2
2.3.1.2 Replacing Conveyor Belt Left [03111680-01] (Pos60)
Replacing Conveyor Belt Left [03111680-01] (Pos60)
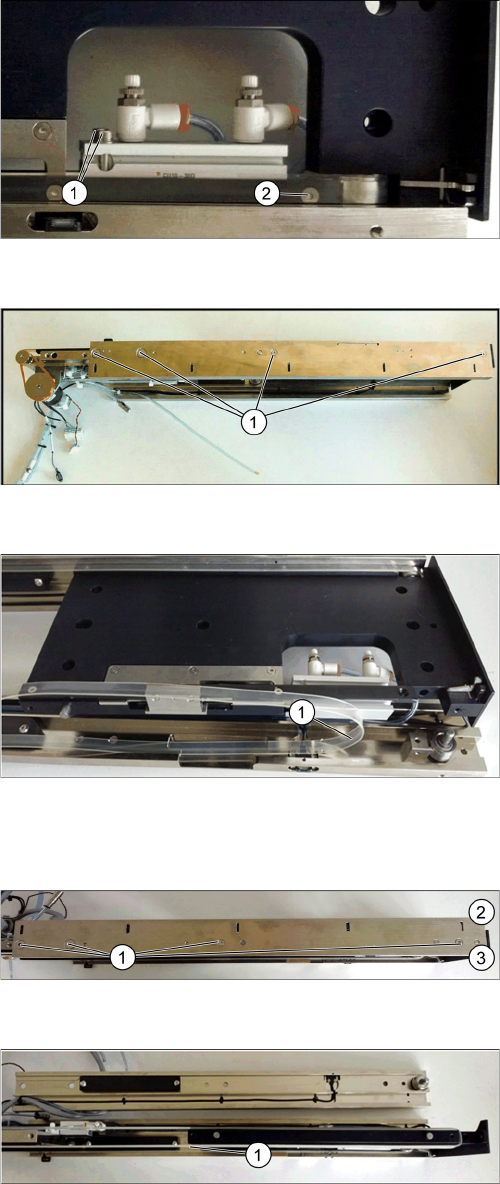
Remove Tray Clamp Screw Right Side
► Remove the Tray Guide Screw (1).
► Remove the two cylinder mounting screws (2).
Conveyor Remove Right Side
► Remove four screws (1) holding the conveyor rail.
► Take off the right conveyor rail from the conveyor
base.
Replace Belt Right Side
► Replace the conveyor right belt (1) by using the Con-
veyor belt 1.27x9.65x1646, Right_15001060
[03111679-01]. Be aware that the right belt and the
left belt do have different lengths.
► Reinstall the Conveyor Rail Right Side in reverse se-
quence.
Remove mounting screws conveyor left
► Remove the four screws (1) at the conveyor left rail.
Opposite view in picture - Bottom (2) and top (3).
Replace belt left side
► Remove the left conveyor rail.
► Replace the conveyor left belt (1) by using the Con-
veyor belt 1.27x9.65x1680, Left_1500106
[03111680-01]. Be aware that the right belt and the
left belt do have different lengths.
► Reinstall the conveyor rail left side in reverse se-
quence.