00197543-01_SM_JTF-S_ JTF-M_en - 第42页
Service Works Setup and Adjustment Conveyor Unit 2.5.4 Tray Slow-Down Delay Ad justments 42 Service Manual SIPLACE JEDEC Tray Feeder Conveyor and stack sl ow down adjustments. Return to stack conveyor slo w down delay ad…

Service Works
2.5.4 Tray Slow-Down Delay Adjustments Setup and Adjustment Conveyor Unit
Service Manual SIPLACE JEDEC Tray Feeder 41
2.5.4
2.5.4 Tray Slow-Down Delay Adjustments
Tray Slow-Down Delay Adjustments
During a tray index, the "forward" slow down delay adjustment must slow the tray's forward motion
enough to prevent the tray from “bouncing” when it reaches the end of the conveyor. The "return to stack"
slow down delay adjustment must slow the tray's forward motion as it enters the base. This delay adjust-
ment is set so the back edge of the tray slows down just as it passes the slowdown sensor. If there is
too much delay time, the tray will be moving too fast as it enters the base, possibly causing components
in the tray to be “upset.” The return pusher may not have time to assist the tray, causing uneven stacking
of trays. If there is not enough delay time, the tray will start slow speed before the back edge of the tray
passes the slowdown sensor, increasing the overall tray ex- change cycle time.
Use the following procedures to set the correct slow down delays and get the maximum ef fi ciency from
the feeder. Before adjusting, set the feeder to operate in fast mode.
Tray "FORWARD" SLOW DOWN DELAY ADJUSTMENT:
► (1) Turn the "forward" slowdown delay potentiometer all the way clockwise (increase the delay) as
shown in figure "Conveyor and Stack Slow Down Adjustments".
► (2) Index a tray and observe the tray as it stops at the end of the conveyor.
⇨ If the tray reaches the end of conveyor and is clamped without “bouncing” off the end, the adjustment
is set correctly.
► If the tray does “bounce” off the end, turn the "forward" slowdown potentiometer counter-clockwise
(decrease the delay) until the tray does not “bounce.
► Make a small adjustment, and then test the setting.
Tray "RETURN TO STACK" SLOW DOWN DELAY ADJUSTMENT:
► (1) With a tray at the end of the conveyor, initiate a tray index and observe the back edge of tray in
relation to the slowdown sensor.
⇨ The tray should start the slowdown speed after the rear edge of the tray passes by the "return" slow
down sensor.
► If the tray slows down before the rear edge passes the "return" slow down sensor, see step 2.
► If the tray slows down too far after passing the "return" slow down sensor, see step 3.
► (2) If the slowdown speed begins with back edge of tray positioned before the "return" slow down
sensor, turn the "return to stack" potentiometer clockwise and repeat step (see figure "Incorrect: Tray
Starts Slow Down Before Passing Sensor").
► If necessary, make repeated small changes, and test after each change until you reach the correct
adjustment.
► (3) If the slowdown speed begins with the back edge of the tray positioned too far past the "return"
slow down sensor, turn the "return to stack" potentiometer counter clock- wise and repeat step 1 (see
figure "Correct: Tray Starts Slow Down After Passing Sensor").
► If necessary, make repeated small changes, and test after each change until you reach the correct
adjustment.
NOTICE
Too much force
If you turn the potentiometer with too much force, it can be “stripped” so that it will not work cor-
rectly. To avoid this problem, be careful when adjusting the potentiometer.
NOTICE
Turning range
Potentiometer only have an overall turning range of 270 degrees (3/4).
Service Works
Setup and Adjustment Conveyor Unit 2.5.4 Tray Slow-Down Delay Adjustments
42 Service Manual SIPLACE JEDEC Tray Feeder
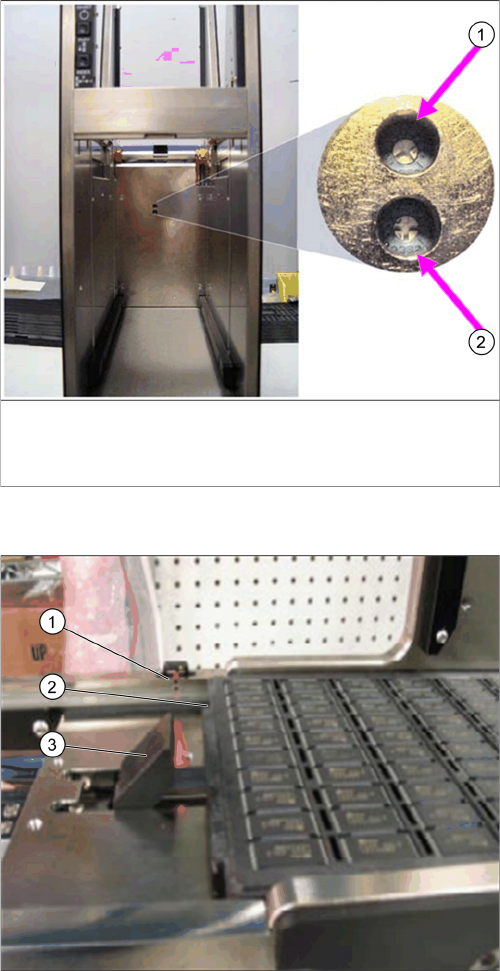
Conveyor and stack slow down adjustments.
Return to stack conveyor slow down delay adjustment –
reverse.
1. CW = increase delay time for slow down
Conveyor forward slow down delay adjustment – forward.
1. CW = increase delay time for slow down
Correct: Tray starts slow down after passing sensor.
1. Return slow down sensor
2. The rear edge of the tray has passed the return slow
down sensor.
3. Tray return pusher
Service Works
2.5.5 Tray Clamp Pneumatic Adjustment Setup and Adjustment Conveyor Unit
Service Manual SIPLACE JEDEC Tray Feeder 43
2.5.5
2.5.5 Tray Clamp Pneumatic Adjustment
Tray Clamp Pneumatic Adjustment
▪ The pneumatic tray clamp performs two functions. One function is to secure the tray at the end of
the conveyor (the "clamping" function). The fl ow control for this function must be set so the clamping
action does not dislodge components from the tray.
▪ The second function pushes the tray back onto the conveyor to return a tray to the stack (the "push-
ing" function). The fl ow control for this function must be set so the tray is pushed onto the conveyor
without dislodging components.
The following steps outline how to adjust the pneumatics for each function. Before performing these ad-
justments, check that the input pressure to the feeder is 60 psi (see section "2.6.1 Main Air Regulator
Adjustment" [ ➙ 47]).
► To adjust the speed of the clamping function, unlock the adjustment screw by loosening locking nut
A, shown in figure "Flow Control Locations - Tray Clamp".
► To increase the speed of the clamping function, turn adjustment screw A counter- clockwise.
► To decrease the speed of the clamping function, turn adjustment screw A clockwise.
► Tighten locking nut A when adjustment is complete.
► To adjust the speed of the pushing function, unlock the adjustment screw by loosening locking nut
B, also shown in figure "Flow Control Locations - Tray Clamp".
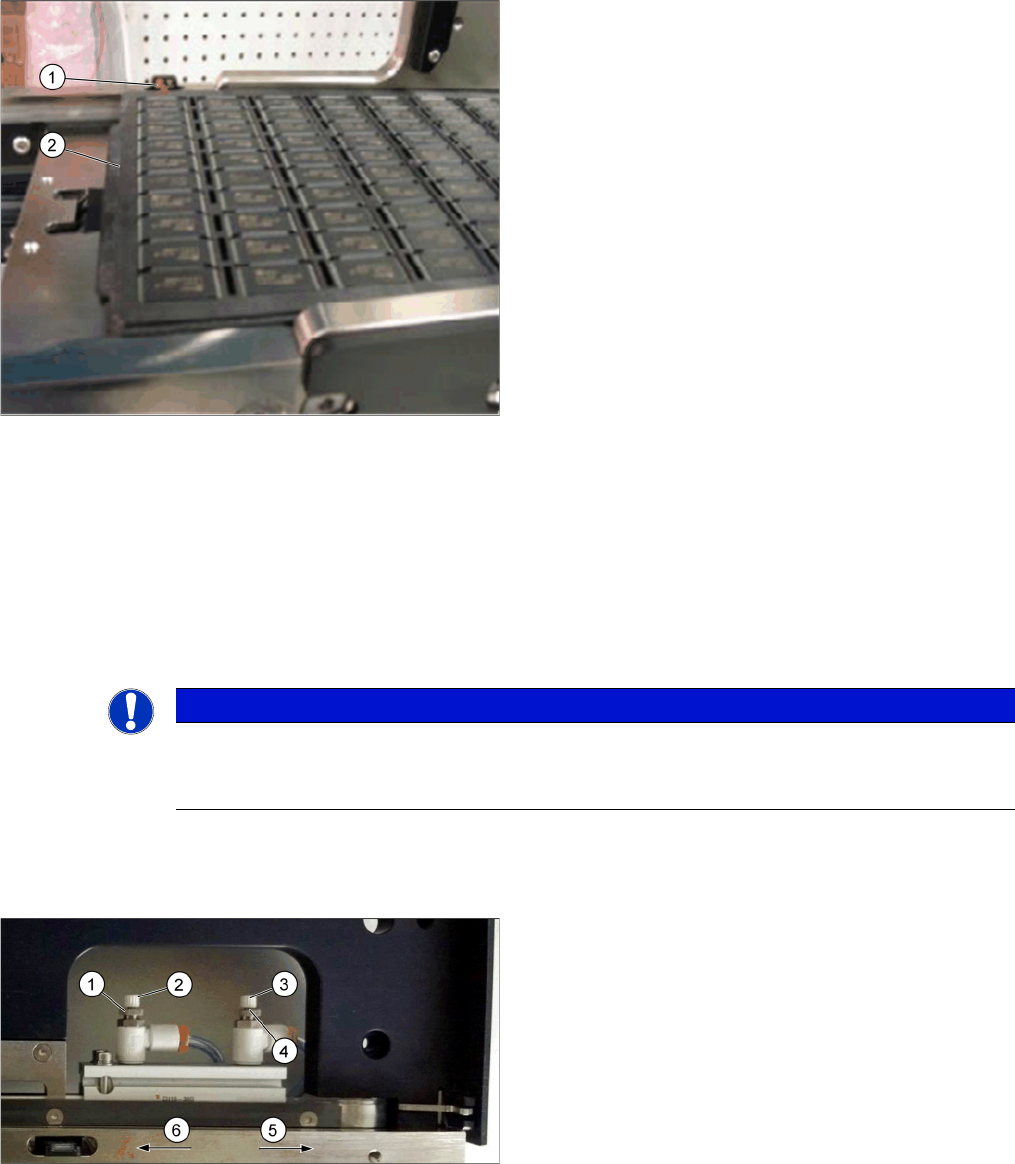
Incorrect: Tray starts slow down before passing sensor.
1. When the sensor sees the tray, the orange LED is
lighted.
2. The slowdown period starts before passing the return
slow down sensor.
NOTICE
Tray clamp mechanical adjustments
Before adjusting the fl ow controls, be certain the tray clamp mechanical adjustments are cor-
rect.
Flow control locations - Tray clamp
1. Tray Push function locking nut B
2. Pushing function adjustment screw B
3. Tray Clamp function adjustment screw A
4. Tray Clamp function locking nut A
5. Tray clamp direction
6. Tray push direction