YSi-V_Ope_E - 第88页
4-24 4 Maintenance 8.1.3 Cleaning and greasing the hexagon spline n Required tools • Lent-free cleaning wipe • Specified grease (NSL) • Protective glasses • Protective glo ves c CAUTION W ear protective glasses and glove…
4-23
4
Maintenance
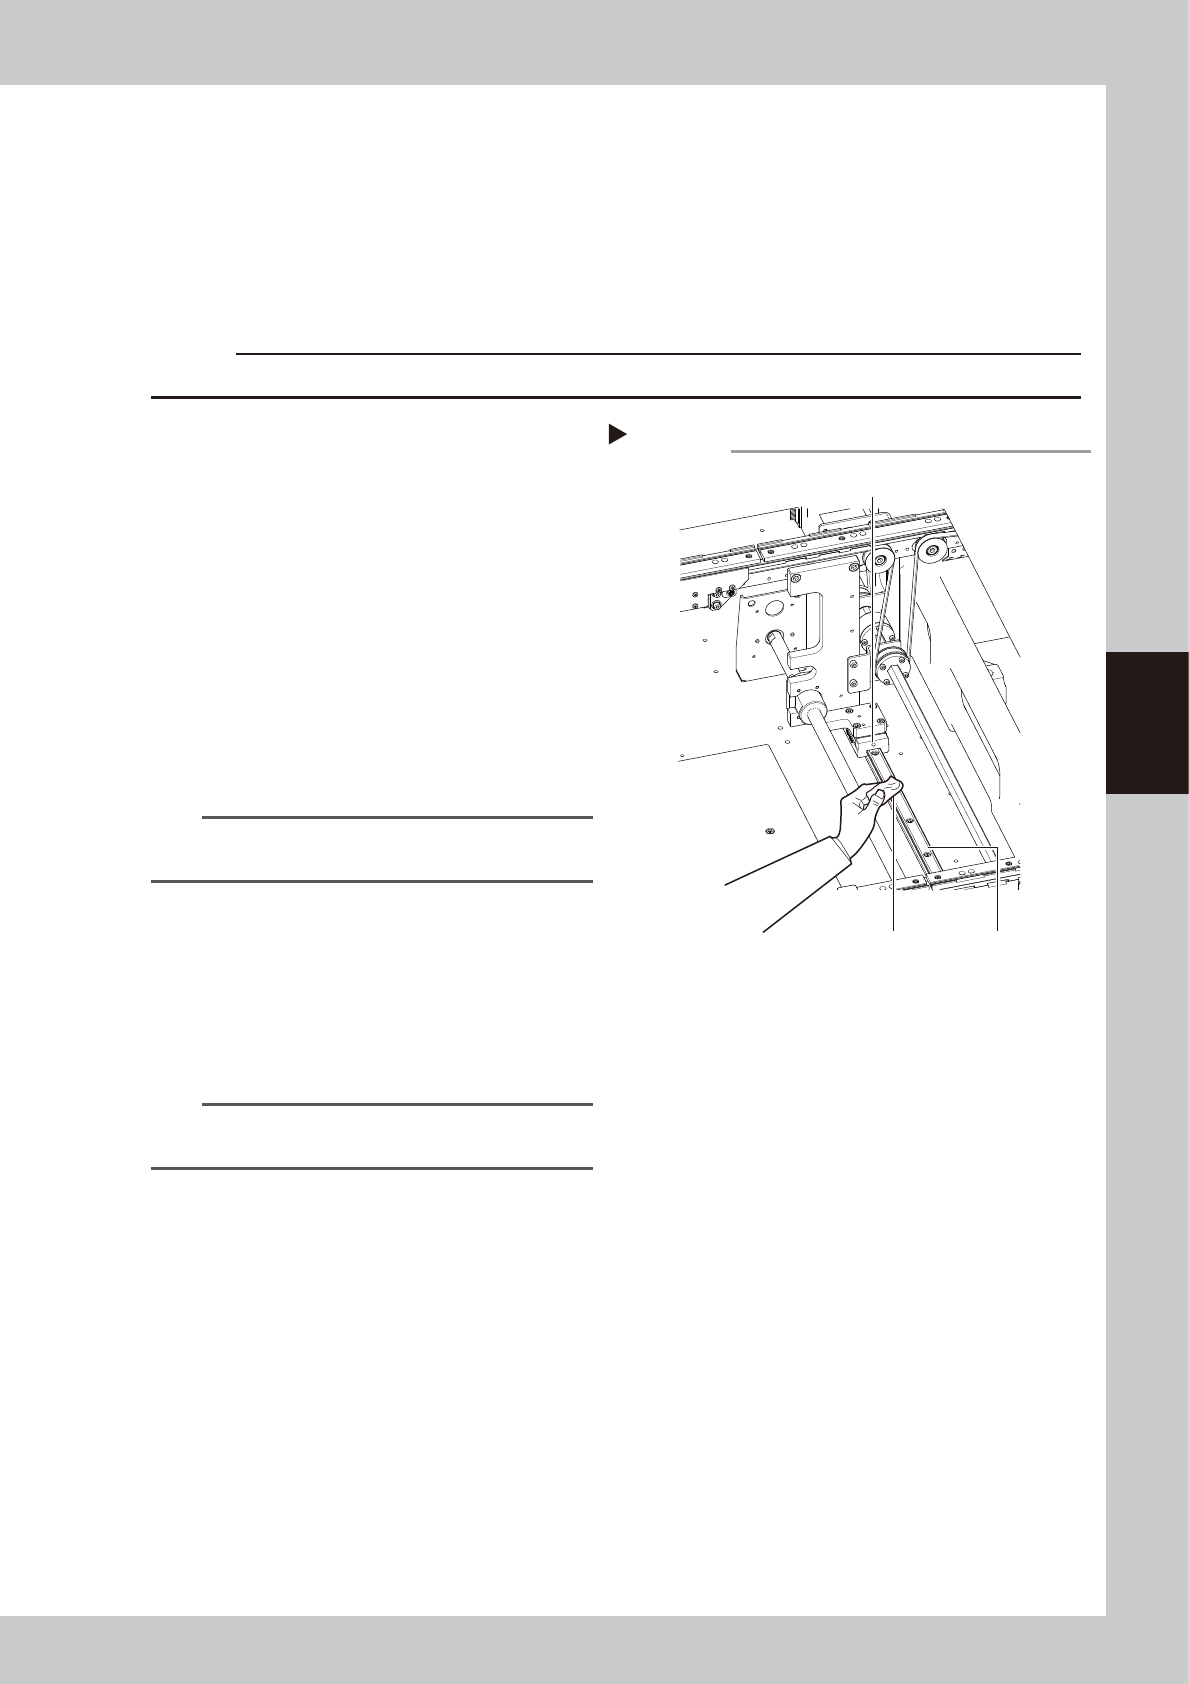
8.1.2 Cleaning and greasing the W axes guides
n
Required tools
• Lent-free cleaning wipe
• Grease gun
• Specified grease (NSL)
• Protective glasses
• Protective gloves
c
CAUTION
Wear protective glasses and gloves when handling grease.
e
1
Clean the guide.
1. Operate the [Width] button on the “Unit”
– “Conveyor” screen to set the conveyor
width to the maximum. Put the YSi-V in
the state of emergency stop.
2. Use lint-free cleaning paper (for clean
room application) or a similar one to
wipe off old grease and dirt on the entire
guide.
e
3. Reset the state of emergency stop.
Narrow the board width. Then, press the
emergency stop button to clean the rest
of the area.
53423-M9-00
n
NOTE
Wipe away thoroughly the old grease in the grooves of
the guide rails.
2
Inject new grease.
Prepare a grease gun and inject the
specified grease (NSL) from the right grease
nipple.
The grease nipple is provided at one
location on each of the left and right guides
(two locations in total).
n
NOTE
See "Chapter 5 Lubrication points", for details on the
lubrication points and grease gun nozzles.
3
Wipe away excess grease
.
1 Widen and narrow the conveyor width
several times.
e
2 Press the emergency stop button again
and wipe away excess grease with a
lint-free cloth.
Cleaning and greasing the W axes guides
Step 1,2
W-axis guidesCleaning cloth
Grease nipple for W-axis guides

4-24
4
Maintenance
8.1.3 Cleaning and greasing the hexagon spline
n
Required tools
• Lent-free cleaning wipe
• Specified grease (NSL)
• Protective glasses
• Protective gloves
c
CAUTION
Wear protective glasses and gloves when handling grease.
e
1
Clean the hexagon spline.
1. Operate the [Width] button on the “Unit”
– “Conveyor” screen to set the conveyor
width to the maximum. Put the YSi-V in
the state of emergency stop.
2. Wipe away the old grease and dirt from
the entire hexagon spline with a lint-free
paper wipe (for clean room).
e
3. Cancel the emergency stop state. After
narrowing the board width, press the
emergency stop button again and wipe
the remaining parts.
53448-M9-00
2
Apply the grease.
Apply the specified grease (NSL) by hand
uniformly over the entire surface of the
hexagon spline.
53449-M9-00
n
NOTE
Adjust the board width in the same manner as
described in Step1, and then apply the grease over the
hexagon spline.
Cleaning the hexagon spline
Step 1
Paper wipe
Hexagon spline
Applying the grease
Step 2
Apply the grease thinly
and uniformly.
Grease

4-25
4
Maintenance
8.2 Inspecting and cleaning the air/mist filters
Air/mist filters are used to prevent oil, mist and other impurities in the air compressor from penetrating into the
YSi-V. These filters should be inspected and cleaned periodically as instructed below.
c
CAUTION
Remove the coupler to ensure safety during work. At this time, pay special attention so that oil, water, or impurity does
not scatter.
Additionally, be aware that a large air exhaust sound is heard when removing the coupler.
n
Required tools
• Neutral detergent
• Air blow tool (Option tool to be purchased)
• Cloth rag
• Slotted precision screwdriver
• Hex wrench (2.5mm)
• Dust-proof goggles
• Dust-proof mask
c
CAUTION
The cleaning blow air may be in contact with your face. So, be sure to wear dust-proof goggles and dust-proof mask
before starting the air blow.
1
Check the inside of the filter cup.
Check the inside of the cup for oil or water.
If the inside of the cup is contaminated,
follow the steps below to clean it.
2
Separate the air and mist filters.
1. Using the hex wrench (2.5), loosen the
bolts.
2. Slide the pin downwards. Remove the
bracket. Separate the air filter and mist
filter.
53431-M9-00
3
Remove the filter cup.
Air filter
1. Turn the air filter counterclockwise as
shown in the figure at right to pull it
downward.
2. Put the slotted precision screwdriver in
the groove close to the snap fit of the
deflector and remove the element
assembly from the filter cup.
Mist filter
Turn the filter cup counterclockwise as
shown in the figure at right to pull it
downward.
53432-M9-10
4
Remove the contamination inside
the filter cup.
1. Lightly wash the cup with water.
2. Further wash the inside of the cup with
neutral detergent diluted with water.
3. After blowing the air with the air blow
tool, wipe away water with a cloth rag.
Removing the filter cup
Step 2,3
Filter cup
Remove the air coupler.
Air filter
Pin
Bolt
Bracket
Oil mist filter
Removing the element assembly
Step 3
Deflector
Snap fit
Filter cup
Air filter
Slotted precision screwdriver