F4000N_revD.pdf - 第30页
F4000N Series Operating Manual Section 4: Programming Example Part # 562187N - 1 Rev . D Sep 2012 29 © 20 12 Fisnar Inc. 2. Good Programm ing Practices It is recommended to register the setup commands at the beginning of…

F4000N Series Operating Manual
Section 4: Programming Example
Part # 562187N-1
Rev. D Sep 2012
28
© 2012 Fisnar Inc.
Instruction
Display Shows
10
Jog the tip to the location of the fourth point
(4: Line Passing). When the location is correct,
press the F1/ENTER key, then 3 key to register
the location as a Line Passing point.
ADDR:6 PROG:10
EMPTY
11
Jog the tip to the location of the fifth point
(5: Line Passing). When the location is correct,
press the F1/ENTER key, then 3 to register the
location as a Line Passing point.
ADDR:7 PROG:10
EMPTY
12
Jog the tip to the location of the sixth point
(6: Line Passing). When the location is correct,
press the F1/ENTER key, then 3 to register the
location as a Line Passing point.
ADDR:8 PROG:10
EMPTY
13
Jog the tip to the location of the seventh point
(7: Line End). When the location is correct, press
the F1/ENTER key, then 6 to register the location
as a Line End point.
ADDR:9 PROG:10
EMPTY
14
The line is now complete. The next step is to
register the dispense settings for the dots.
Press the F4 (Setup) key, then 3 to register the
dot dispensing time.
Point Dispense Setup
--------------------
Dis. Time:
Tail Time:
unit: sec
15
Type 0.5 to register a dispensing time of 0.5
seconds, and then press ENTER.
Type 0.1 to register a waiting time after
dispensing of 0.1 seconds, and then press
ENTER.
ADDR:10 PROG:10
EMPTY
16
Jog the tip to the location of first dispense dot
(8: Dispense Dot). When the location is correct,
press the F1/ENTER key, then 1 to register the
location as a Dispense Dot.
ADDR:11 PROG:10
EMPTY
17
Jog the tip to the location of second dispense dot
(9: Dispense Dot). When the location is correct,
press the F1/ENTER key, then 1 to register the
location as a Dispense Dot.
ADDR:12 PROG:10
EMPTY
18
Jog the tip to the location of third dispense dot
(10: Dispense Dot). When the location is correct,
press the F1/ENTER key, then 1 to register the
location as a Dispense Dot.
ADDR:13 PROG:10
EMPTY
19
The program is now complete.
Press F1/ENTER, then 7 to register address 13
as the END of the program.
ADDR:14 PROG:10
EMPTY
20
To run the program, press the RUN key.

F4000N Series Operating Manual
Section 4: Programming Example
Part # 562187N-1
Rev. D Sep 2012
29
© 2012 Fisnar Inc.
2. Good Programming Practices
It is recommended to register the setup commands at the beginning of every program.
The following setup commands are the most commonly used:
Dispense End Setup
Point Dispense Setup
Line Dispense Setup
Line Speed
Z Clearance
Retract Setup
Adjust Position Setup
For a complete list and description of all the different setup commands, refer to
SECTION 3:3.5 Setup Menu (F4) and SECTION 5:5 F4 (Setup Menu)
F4000N Series Operating Manual
Section 4: Programming Example
Part # 562187N-1
Rev. D Sep 2012
30
© 2012 Fisnar Inc.
3. Editing a Program
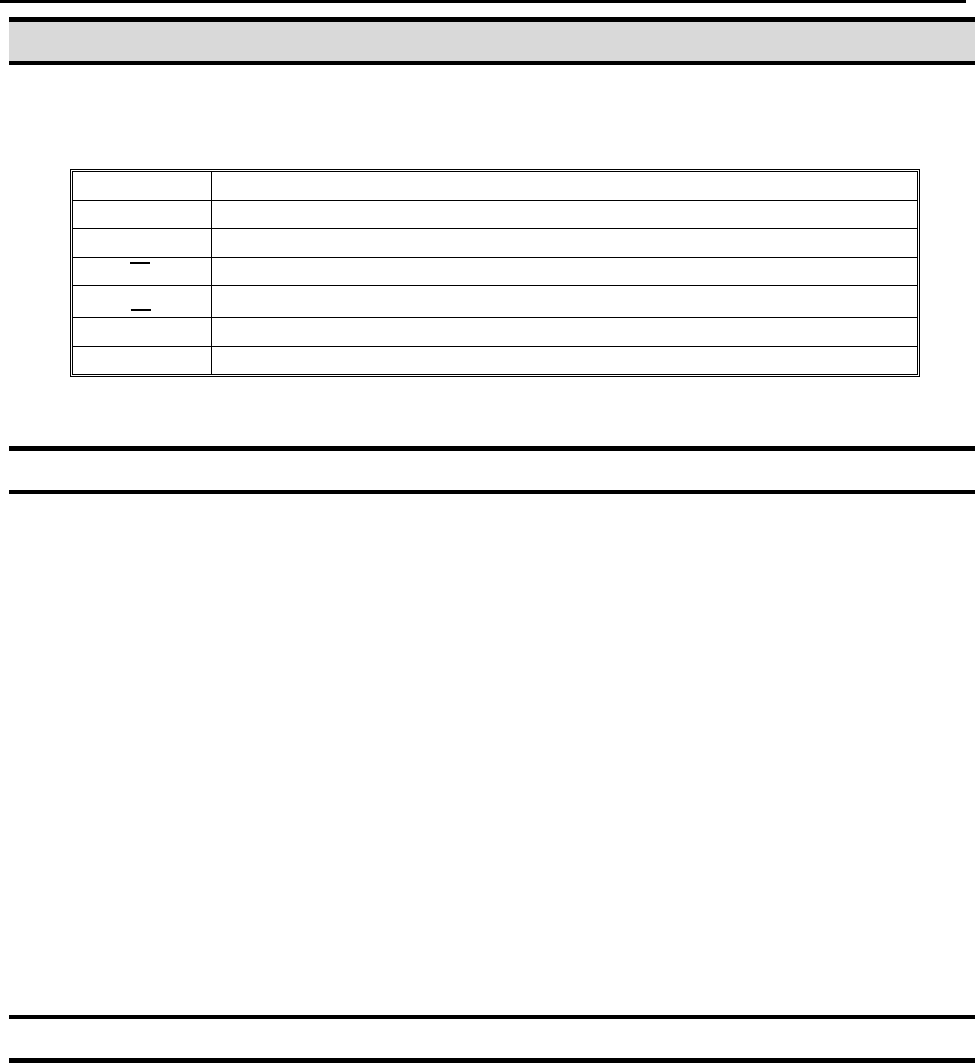
You can move through the instructions in an existing program by using the following keys:
Key
Function
▲
Moves forward (1) memory address
▼
Moves backward (1) memory address
▲
Moves to the first memory address in the program
▼
Moves to the last programmed memory address in the program
MOVE
Moves the tip to the XYZ point location of the selected point
JUMP
Jumps to display the specified memory address
3.1 Changing a Point’s XYZ location
To change the XYZ location of a point, press the ▲ or ▼ key until the point you want to
change is shown in the display.
You can confirm that the correct point is in the display by pressing the MOVE key. This will
cause the tip to move to the XYZ position shown in the display.
Now use the jog keys X, X, Y and Y and the Z / Z keys to jog the tip to the new
location.
Once the location is correct, simply re-register the point as you did when it was first
taught, by pressing the F1/ENTER key and selecting the point type. The point will be re-
registered at the new location.
3.2 Insert / Delete an Instruction
To insert an instruction, press the INS key. The point currently shown in the display
will be moved forward one memory address. A new, empty memory address will be
inserted at the current memory address.
To delete the instruction currently shown in the display, press the DEL key, and
then press the F1 (Yes) key.