00192377-02.pdf - 第113页
SIPLACE S-23 HM 2 Retrofitting Instruct. S-23 HM to SW V 502.xx incl. RV6-DLM 1 Head (Option) 07/01 Issue 2.10 SITEST: Adjust Configuration, Entry Zero Point Compens. Values RV6 Head 113 2.10.3 Configuration: Nozzle chan…
2 Retrofitting Instruct. S-23 HM to SW V 502.xx incl. RV6-DLM1 Head (Option) SIPLACE S-23 HM
2.10 SITEST: Adjust Configuration, Entry Zero Point Compens. Values RV6 Head 07/01 Issue
112
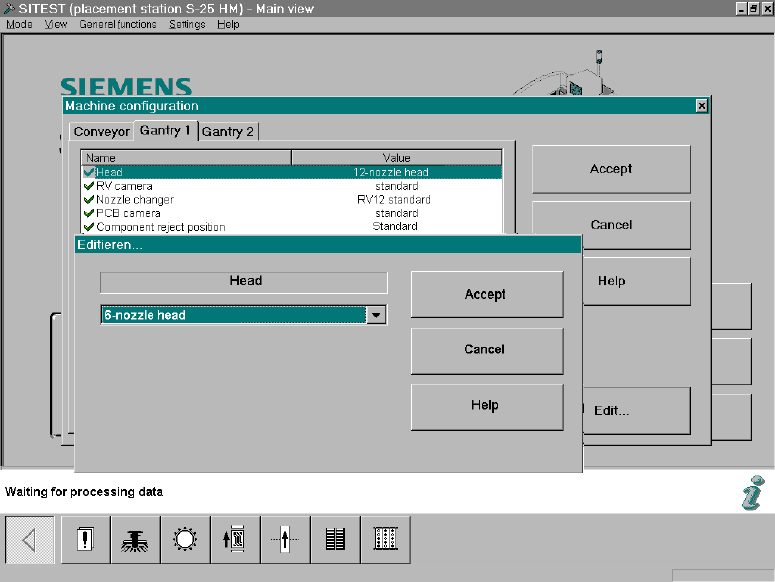
2.10.2 Configuration: RV6-DLM1 Head
In the SITEST main view select -> "Settings" ->The menu "Machine Configuration" will appear: 2
Fig. 2.10.1 SITEST: Machine Configuration, Selecting the RV Head
Å Select the "Gantry 1/2" (registration card) -> Click on the DLM1, head 6-/12-segment) mounted
on the gantry -> Select "Accept".
SIPLACE S-23 HM 2 Retrofitting Instruct. S-23 HM to SW V 502.xx incl. RV6-DLM1 Head (Option)
07/01 Issue 2.10 SITEST: Adjust Configuration, Entry Zero Point Compens. Values RV6 Head
113
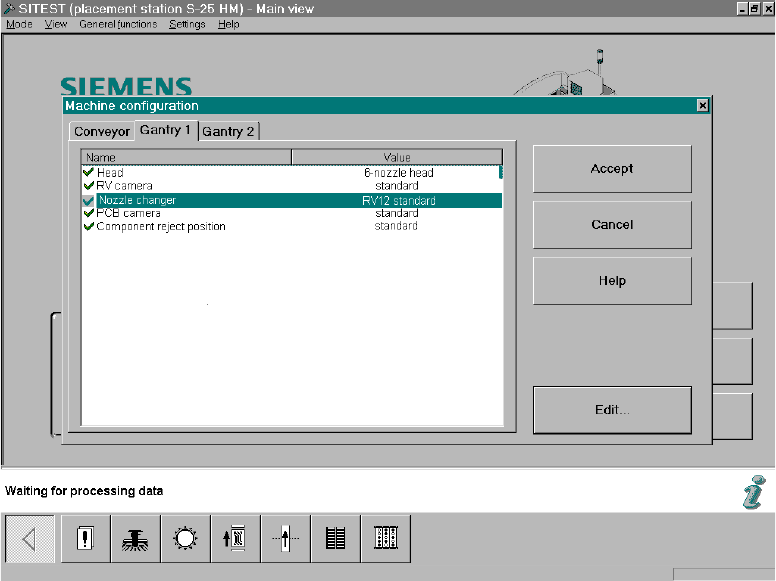
2.10.3 Configuration: Nozzle changer RV6 Standard
Å
Change to the SITEST program.
Å The main view will appear.
Å Starting from the main view, select -> Settings -> Machine configuration -> "Gantry 1" or "Gan-
try 2", depending on which feeder location the nozzle changer RV6 was installed at.
The following screen will appear:
2
Fig. 2.10.2 SITEST Screen "Machine Configuration"
Å Click on "Nozzle changer" -> Edit (button).
The following screen will appear:
2 Retrofitting Instruct. S-23 HM to SW V 502.xx incl. RV6-DLM1 Head (Option) SIPLACE S-23 HM
2.10 SITEST: Adjust Configuration, Entry Zero Point Compens. Values RV6 Head 07/01 Issue
114
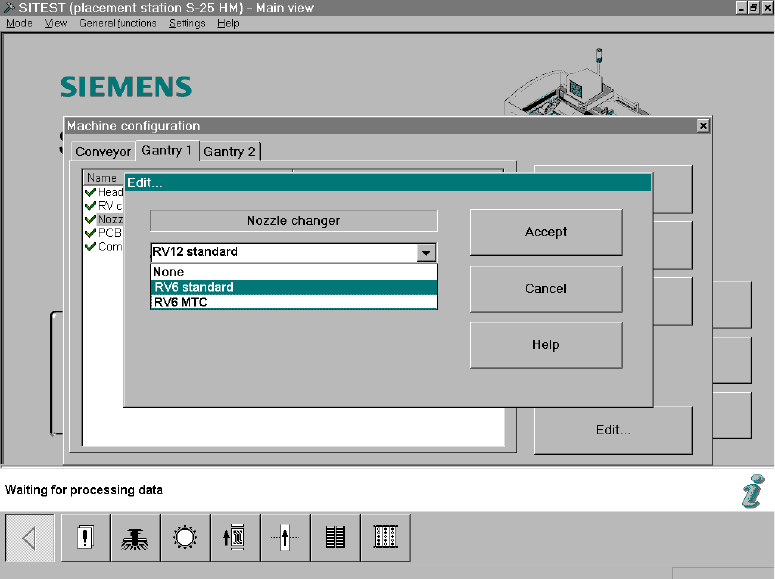
Fig. 2.10.3 SITEST Screen Machine Configuration, Edit
Å Click on "RV6 Standard" (long nozzle changer for the RV6 head) -> Select "Accept" (button).
Note:
If an MTC was retrofitted during the upgrading process, select the nozzle changer "RV6 MTC"
-> "Accept" (button) -> again "Accept".
After the overall reference run, the nozzle changer MTC is configured and measured in accor-
dance with the retrofitting instructions for MTC, Item no. see: Section 2.7.
Å Calibrate the nozzle changer after the dynamics adjustment and the calibration of the heads,
i.e., after taking the steps below (see: Section 2.13).
2.10.4 Configuration: Conveyor, Component Reject Box, etc.
Å Select "Conveyor" (registration card):
The configuration that was current prior to the software upgrade will appear.
If the configuration has to be changed, click on the menu option to be adjusted -> "Edit" ->
Change the configuration (e.g., dual/single conveyor, etc.)
-> "Accept".
Å If an MTC was installed during the upgrading process, select the type of component reject box
that was installed ("Component reject box MTC" or "Component reject table") -> Accept
For details -> Retrofitting instructions MTC (Item no. see: Section 2.7), from issue status 02.