PSV5000_OwnersManual.pdf - 第43页
■ Applying Power f or the First Time □ (Optional) Network Settings PSV5000 O wner ’s M anual - 39 - IP A DDRESS A ND P ORT N UMBER If you need the IP A ddre ss for c ommun icating w ith othe r Data I/O software, they are…

Setup ■ Applying Power for the First Time
- 38 - Data I/O ■ 096-0465-001C
Shutting Down the PSV5000 System
1. Finish and Exit any job that is running.
2. (Optional) Remove all devices from the system.
3. Exit CH700 and TaskLink and any other software that you have
running.
4. Shut down the Handler Computer PC with the Windows Start
menu.
5. (Optional) Save and exit the Laser Marker software.
6. (Laser Option) Turn OFF (0) the key-switch (counterclockwise) on
the laser PC.
7. WAIT UNTIL WINDOWS COMPLETES SHUTTING DOWN, then
rotate the main power switch (on the Power Panel)
counterclockwise to the OFF (vertical) position.
If the PSV5000 Machine will not be used for several days, the shop air
should also be removed or turned off at the Power Panel. (Optional)
Padlock the main air pressure valve so that it cannot be turned back ON
while the lock is in place
(Optional) Installing Antivirus Software
The PSV5000 System has no antivirus software installed from the factory.
It is highly recommend that customers install their own antivirus
software. The software should be set to run virus scans manually rather
than at a scheduled time unless you are sure that the PSV5000 System
will not be running jobs at that time.
Note: An antivirus program may affect performance.
The PSV5000 System runs Windows 7 Professional 32-bit operating
system. Follow instructions for your antivirus software. Contact Data I/O
Service with specific questions. See Contacting Data I/O on page - 6 - (in
Preface).
(Optional) Network Settings
After starting up the PSV5000 System and logging on, double-click
Computer > Map Network Drive (Windows 7).
■ Applying Power for the First Time □ (Optional) Network Settings
PSV5000 Owner’s Manual - 39 -
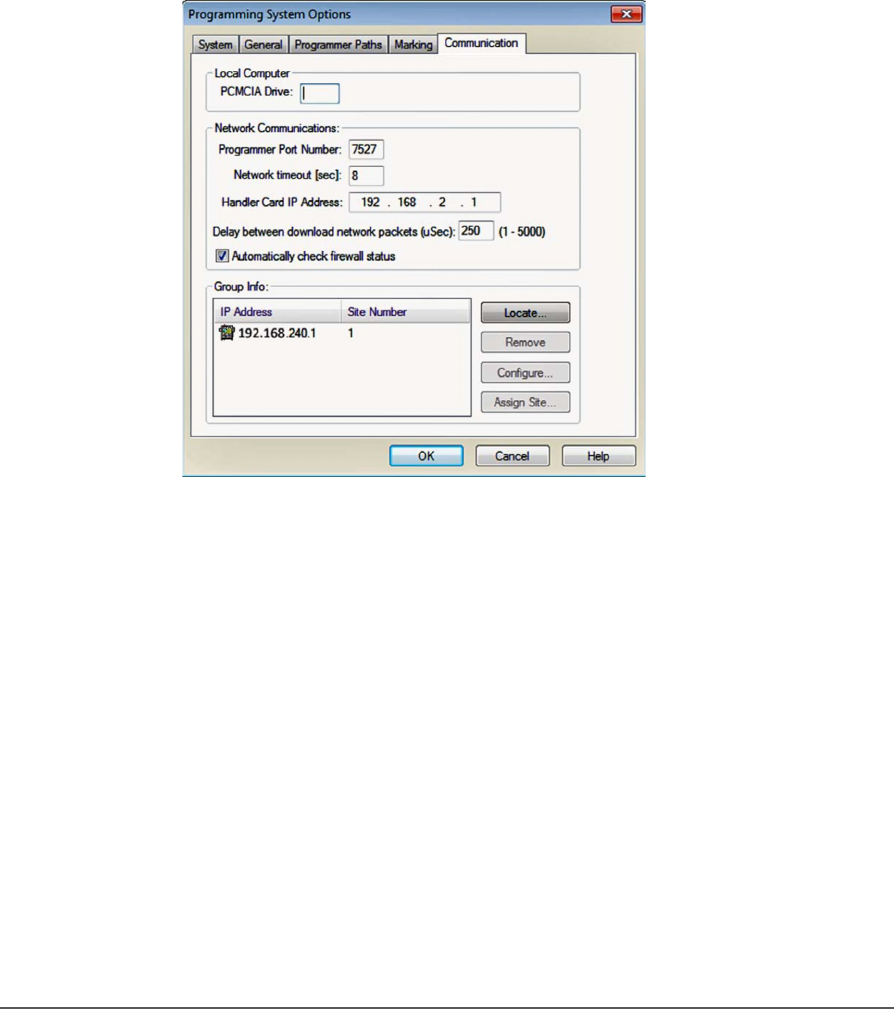
IP ADDRESS AND PORT NUMBER
If you need the IP Address for communicating with other Data I/O
software, they are available via TaskLink. The Port numbers are also
displayed. (Port numbers are the same for all programmers on a PSV5000
Machine.)
Addresses and Port numbers can be found as follows.
1. Start TaskLink on the target PSV5000 System. (Closing CH700
will return to TaskLink.)
2. Click System > Options > Communication tab. The IP Address
and site numbers are listed in the lower left corner.
Figure 17: TaskLink Communication Tab displays IP Addresses and
site numbers.

Setup ■ Setting Up Input and Output Media
- 40 - Data I/O ■ 096-0465-001C
Setting Up Input and Output
Media
There are many options for device input and output. One option for
input and one for output must be set up on the PSV5000 Machine for
your target job. Further, the setup must correspond with the current
software, such as the Job file, winAH400.ini file.
These input/output media are described in this section:
• Static Tray (below)
• Reject bin
• Auxiliary tray
• Automatic Tray Feeder, page 43
• Tape Output Module, page 47
Note: The Tape Input feeder installation is covered in the PSV5000
Operator’s Manual.
About Static Tray Input and Output
The standard configuration for the PSV5000 System is static tray input
and static tray output media. The latest tray mounting configuration
uses two rows of locating pins and a magnet. Specific steps for installing
trays are described in the PSV5000 Operator’s Manual.
Note: Make sure that the correct devices for the target job are loaded into
the input tray and that they have the correct pin 1 orientation. (If pin 1
orientation doesn’t match pin 1 that is set in the Package File it must be
corrected). Pin 1 on Data I/O sockets is almost always toward the far side
of the Socket Adapter (the back of the machine).
Remember that tray arrangement affects:
• The Setup window > Options tab which must be set to match the
workspace setup (covered in the Operator’s Manual).
• The Package File which must be taught the Tray locations (covered
later in Chapter 3 of this manual).
REMOVING TRAY PLATFORMS
Static Tray Platforms can be removed to support different mediums such
as to install an automatic tray feeder.
Note that the work
surface layout is
affected by what
programmer models
are installed.