Maintenance Manual.pdf - 第133页
AV131 MAINTENANCE MANUAL 7.1 I ntroduc tion D79MEC- Z0-010- A0 7.1- 2 7.1. 2 S y mbol s in the Dra wi ngs The f ollowi ng i cons are used to descri be the t asks f or eas y r eadabil it y. Ico n T ask Indi cat es check f…
AV131
MAINTENANCE MANUAL
7.1 Introduction
D79MEC-Z0-010-A0
7.1-1
7.1. Introduction
D79MEC-Z0-010-A0
This chapter explains routine inspection for keeping your AV131 in proper working condition.
This chapter is composed of the chief maintenance work, namely ‘Inspection’ and ‘Lubrication’.
7.1.1 Safety Precautions
Before conducting inspection, read ‘Maintenance Manual / SAFETY PRECAUTIONS’ thoroughly.
AV131
MAINTENANCE MANUAL
7.1 Introduction
D79MEC-Z0-010-A0
7.1-2
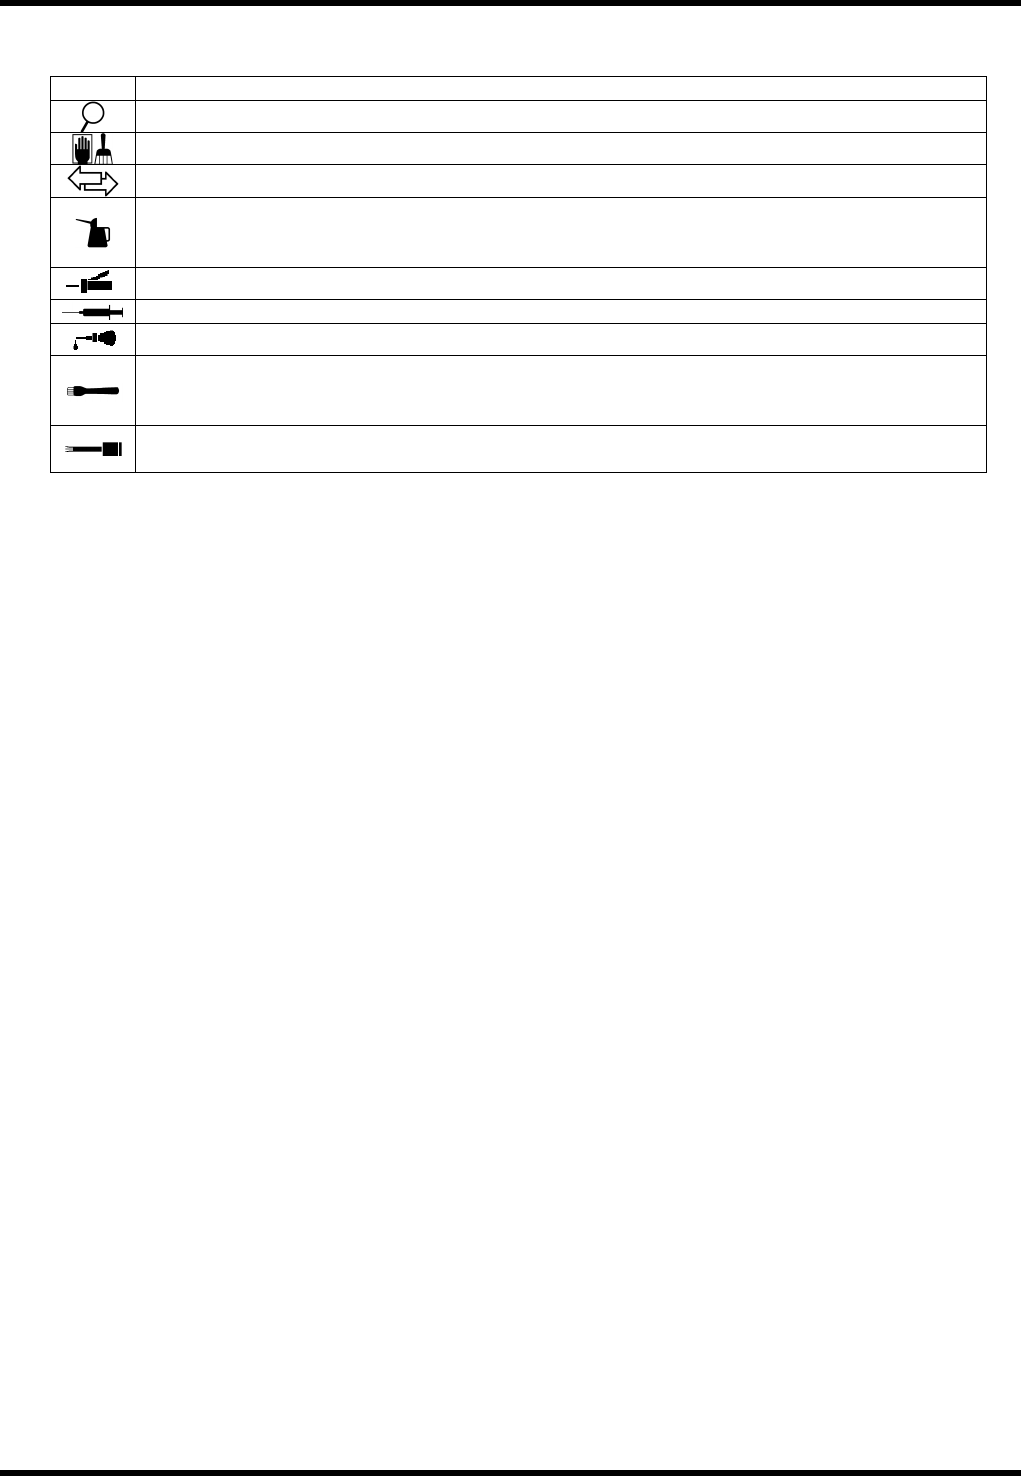
7.1.2 Symbols in the Drawings
The following icons are used to describe the tasks for easy readability.
Icon Task
Indicates check for proper machine operation/adjustments.
Indicates cleaning.
Indicates parts replacement.
Indicates lubricant replacement.
Drain the used oil from the drain port and inject adequate amount of new lubricant from the
injection port.
Indicates lubrication with a grease gun unit.
Indicates lubrication with a syringe.
Indicates lubrication of machine oil with an oiler.
Indicates grease application with a brush.
Remove dust or old oil adhered to the surface of the part completely and apply a thin coat of
grease.
Remove dust or old oil adhered to the surface of the part completely and apply a thin coat of
grease.
Oiling Period
The period of oiling is set as a premise in the following.
One day: for 20 hours, one week: for six days, and one month: for 25 days
Recommended Lubricants
== Refer to ‘Mtn. / PREPARED MATERIALS / Recommended Lubricants’.
=REMARKS=
Use oil equivalent to ISO VG32 for the machine oil to be supplied to the lubricator.
AV131
MAINTENANCE MANUAL
7.2 Periodic Inspection Items
D79MEC-Z0-020-A0
7.2-1
7.2. Periodic Inspection Items
D79MEC-Z0-020-A0
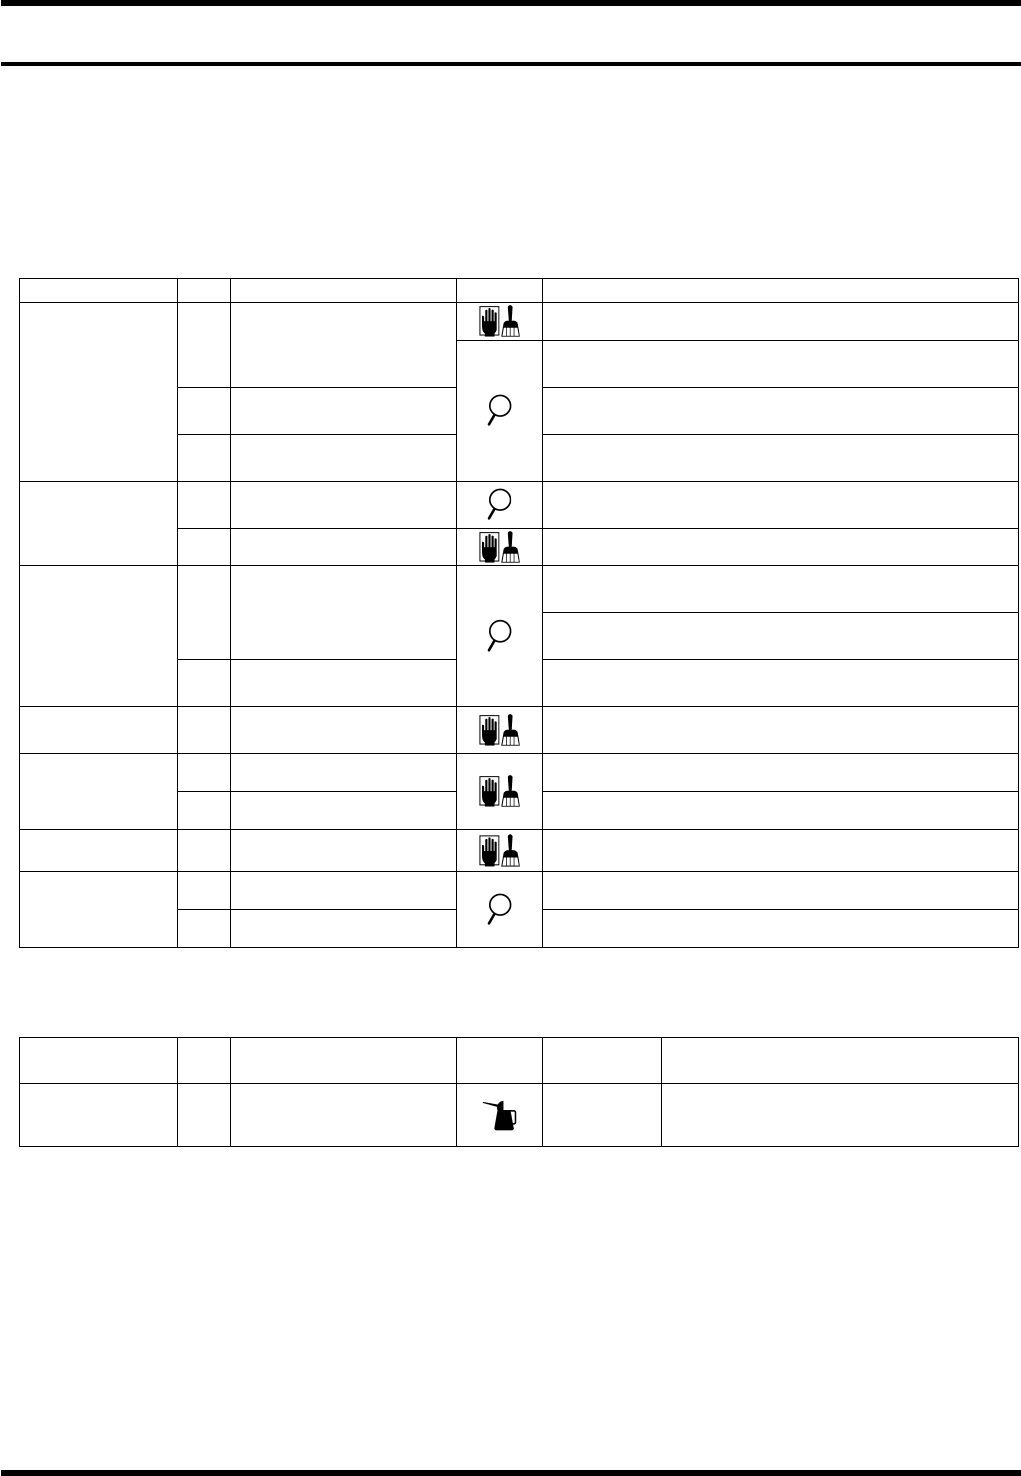
7.2.1 Daily Check Items
The following tables summarize the periodic inspection items that are to be performed daily.
For the details of inspection positions and lubrication method, refer to the subsequent sections.
Numbers in the Unit column show the relevant sections to be referred to.
Inspection (Daily)
Unit No. Item Task Description
Remove foreign matter or dust.
a. Cutter blade
Make sure that the cutter blade is not worn or
damaged.
b. Insertion guide
Make sure that the insertion guide is not worn or
damaged.
7.6.2
Insertion Unit
c. Bending die
Make sure that the tip of the bending die is not
worn or damaged.
a. Groove cam
Make sure that the groove cam slides smoothly
and there is no abnormal noise at the joint.
7.8.2
Transfer Chuck
b. Piston & chuck
Remove dirt or dust.
Make sure that the tip of the cutter & clincher blade
is not worn or damaged.
a. Cutter & clincher
Make sure that the cutter & clincher moves
smoothly without abnormal noises.
7.9.1
Upper Anvil
b. Clinch base
Make sure that the tip of the clinch base blade is
not worn or damaged.
7.10.1
Tape Cutter
a.
Component detection
sensor
Remove oil or dust.
a. Dust collecting box Dispose of cut waste.
7.10.2
Dust Collecting
Box
b. Filter
Remove dirt or dust.
7.11.1
Vacuum Pump
c. Waste receptacle
Dispose of cut waste.
b. Main pressure Make sure that air pressure is at 0.5 MPa.
7.11.2
Pneumatic
Circuit
c. Pneumatic circuit
Make sure that there is no air leakage.
Oiling (Daily)
Unit No. Item Work
Oiling
volume
Description
7.11.2
Pneumatic
Circuit
1. Pneumatic circuit
10 drops
Refer to instructions in 7.11.2 for
details.