QP-242E 工程师培训手册 (6.0).pdf.pdf - 第39页
FK-9F98-07 QP242E Training Text for Service Engineers 6th edition 5. Before Beginning the Proper Data Measurements [ 4 / 6 ] Fuji Machine Mfg. Co., Ltd. Okazaki SMT Equipment Quality Assurance Dept. Technical Support Div…
FK-9F98-07 QP242E Training Text for Service Engineers
6th edition 5. Before Beginning the Proper Data Measurements [3/6]
Fuji Machine Mfg. Co., Ltd. Okazaki
SMT Equipment Quality Assurance Dept.
Technical Support Div. Section No.2
5-3
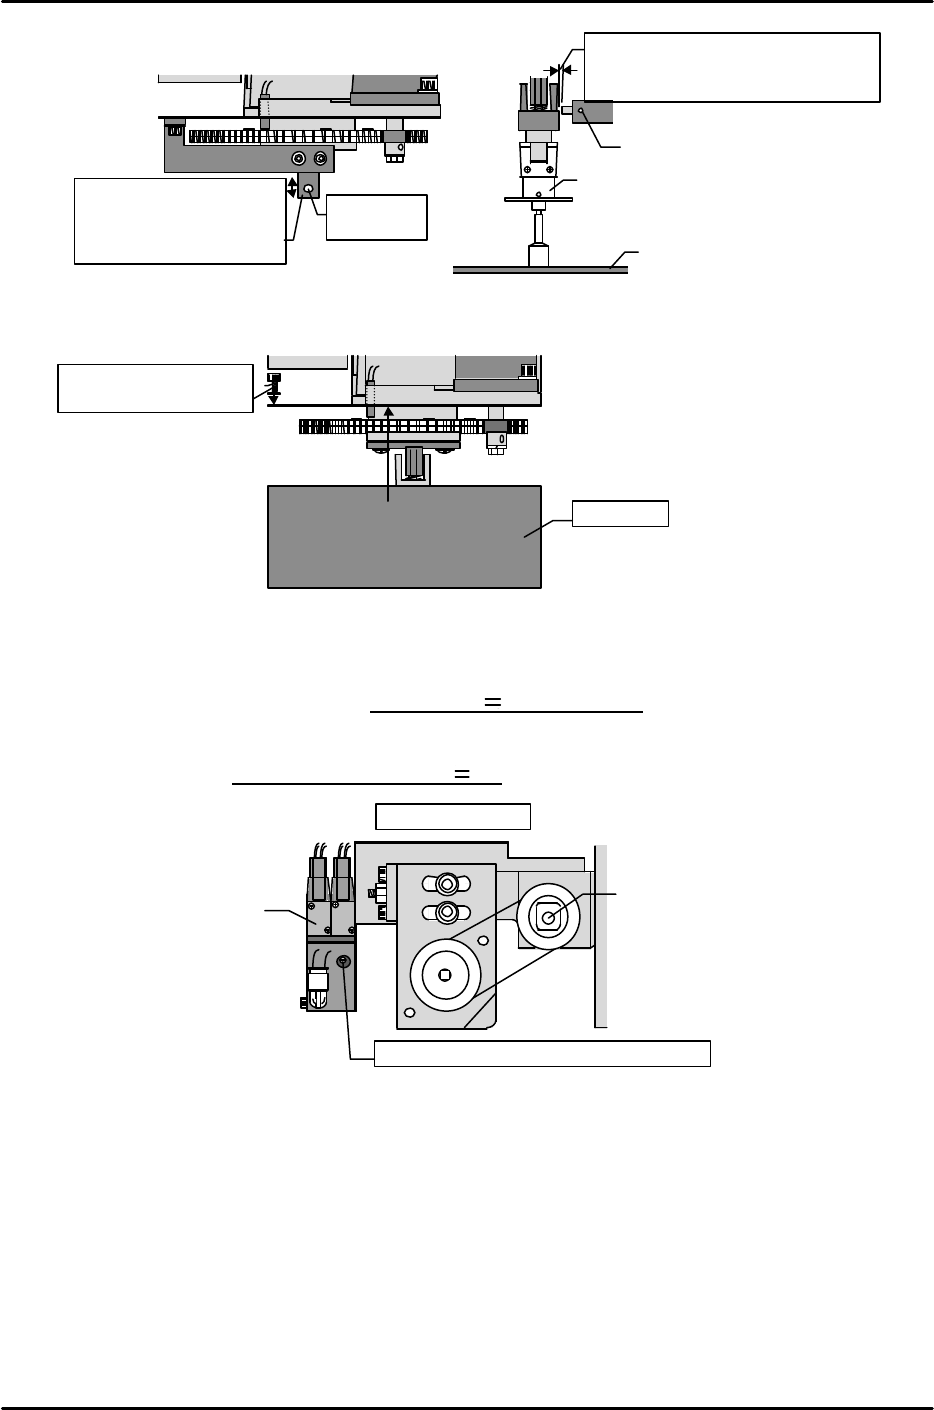
[5-6] Attaching the Single Nozzle Q-Cover
Mount the single nozzle Q-cover on the bottom of the placing head using the M3 x 5 bolts and spring
washers.
[5-7] Measuring the Nozzle Vacuum Pressure
1) Mount a 2.5mm nozzle at the holder and shaft.
2) Attach a vacuum gauge to the end of the nozzle, then switch on the "Y002 NOZZLE VACUUM"
I/O at the relevant module and measure the vacuum pressure.
3) Verify that the vacuum pressure is – 79.8kPa ( – 600 mmHg) or less at each module.
4) Switch on the "Y003 NOZZLE BLOW" I/O to break the vacuum. Adjust the vacuum break
pressure adjusting screw on the solenoid valve (at top side of placing head) so that the measured
vacuum pressure is +6.65kPa ( +50mmHg).
Adjust this bracket up
and down until the
sensor switches on at
0.15 ~ 0.015.
Pressure
sensor
Standard nozzle
Standard PCB
Loosen hollow bolt and move
sensor until this dimension is
0.3mm
Hollow bolt
Z-axis ball screw
Solenoid valve
Vacuum break pressure adjusting screw.
Top of placing head
Q-cover
M3 x 5 / spring washers
FK-9F98-07 QP242E Training Text for Service Engineers
6th edition 5. Before Beginning the Proper Data Measurements [4/6]
Fuji Machine Mfg. Co., Ltd. Okazaki
SMT Equipment Quality Assurance Dept.
Technical Support Div. Section No.2
5-4
[5-8] Lighting Unit Operation Check
* Execute I/O commands to enable early detection of incorrect mounting conditions and operation
problems.
* At 2-camera systems, turn the "Y008 CAMERA CHG1,2" I/O on and off to switch between cameras
1 and 2.
X : Camera1 O : Camera2
1) For camera types 2 and 3 (CCD cameras), with front lighting:
* Back lighting is always activated at power on. (Camera 1 uses only back lighting.)
Camera Type2 Camera Type 3
I/O “Y006 F.LIGHT 1” ON Black circle "B" lights, C White circle "B" lights, C
I/O “Y007 F.LIGHT 2” ON White circle "B" lights Black circle "B" lights
I/O “Y00B F.LIGHT B” ON "A" lights "A" lights
2) For camera type 4 (line scan camera), with front lighting:
When the "Y007 F.LIGHT 2" I/O is turned on, the top shutter closes and the halogen lamp shines
at 70%.
If the "Y006 F.LIGHT 1" I/O is turned on while the Y007 I/O is on, the bottom shutter opens and
the halogen lamp shines at full intensity.
* (The two shutters are located above the halogen lamp. The top shutter has a reflector plate and the
bottom shutter has a plate.)
The front light remains off if only the Y006 I/O is turned on.
The ring light turns on when the "Y00B F.LIGHT B" I/O is switched on.
* When the "Y006 F.LIGHT 1" I/O is turned on, the top shutter opens and the fiber light remains off.
When the "Y007 F.LIGHT 1" I/O is turned on, the bottom shutter opens and the fiber light shines
at 100% if "F.LIGHT 1" is on. If "F.LIGHT 1" is off, the fiber light brightness is reduced.
The ring light turns on when the "Y00B F.LIGHT B" I/O is switched on.
* After verifying that the dip switch is at the upper position (MANUAL), set the halogen lamp
adjusting volume to "1.8".
Light Source A
Light Source B
Light Source C
Light Source C
Light Source B
Light source top face
Machine rear
face Control
box interior
Turn the dial until
"1" is visible
Pull the dial upward to turn
it, and push it down to lock
it.
Set to the "80" thick line
Halogen lamp adjusting
volume
Dial
Set the dip switch to
the MANUAL position
MANUAL
REMOTE

FK-9F98-07 QP242E Training Text for Service Engineers
6th edition 5. Before Beginning the Proper Data Measurements [5/6]
Fuji Machine Mfg. Co., Ltd. Okazaki
SMT Equipment Quality Assurance Dept.
Technical Support Div. Section No.2
5-5
3) For camera type 6 (line scan camera), with front lighting:
* When the "Y006 F.LIGHT 1" or "Y007 F.LIGHT 2" I/O is on, the shutter opens and the halogen
turns on. (Operation is the same for either "F.LIGHT 1" or "F.LIGHT 2".)The halogen lamp does
not light when the "Y00B F.LIGHT B" I/O is switched on.
* When the "Y006 F.LIGHT 1" I/O is on, the shutter opens and the bottom halogen lamp turns on.
When the "Y007 F.LIGHT 1" I/O is on, the shutter opens and the top halogen lamp turns on.
When the "Y00B F.LIGHT B" I/O is on, the ring light (fluorescent light) turns on.
* After verifying that the dip switch is at the upper position (MANUAL), set the halogen lamp
adjusting volume to "2.8".
4) For camera type 7 (line scan camera), with front lighting:
* When the “Y006 F.LIGHT 1” I/O is on, the shutter opens and the bottom halogen lamp turns on.
When the “Y007F. LIGHT 1” I/O is on, the shutter opens and the halogen lamp turns on.
When the “Y00B F. LIGHT B” I/O is on, the ring light (fluorescent light) turns on.
* After verifying that the dip switch is at the upper position (MANUAL), set the halogen lamp
adjusting volume to “1.8”.
* After verifying that the exchange switch is at the bottom position (MANUAL), set the upper halogen
ring light adjusting volume to 8 (MAX is 10).(Exchange switch is on back upper.)
5) When creating programs, be sure to select the Camera_Lighting (in Part Data) which is
appropriate for the part which is to be placed.
Camera types 2 and 3 (CCD cameras)
Applicable part Top light Bottom light (inner) Bottom light (outer)
Front_Light_A Parts with leads ON OFF ON
Front_Light_B Black BGA ON OFF OFF
Front_Light_AB White BGA OFF ON ON
Camera type 4 (line scan camera)
Applicable part Halogen light Ring light
Front_Light_A Parts with leads 70% ON
Front_Light_B Black BGA Full open ON
Front_Light_AB White BGA Full open OFF