00197366-02_IM_WES7_DE_EN.pdf - 第11页
W indows Em bedded Stand ard 7 / Installa tion Manu al Ausgabe 11/2014 Edit ion 11 4.3.2 Choosing the C omputer C onfigura tion ► Open W indows Expl orer an d navigat e to the DVD dr ive. ► Double - cl ick on the start .…

Windows Embedded Standard 7 / Installation Manual Ausgabe 11/2014 Edition
10
4.3 Installing the Windows Embedded Standard 7 Operating System
NOTICE
Before you start work, ensure that the DVD drive is set as the first boot device in the
BIOS to allow the computer to be booted from DVD.
► If necessary, back up the machine data manually.
If you install Windows Embedded Standard 7 on a Vision computer, the following steps have to
be performed:
► Disconnect the keyboard from the machine computer and connect it to the Vision computer.
► Switch the video multiplexer to the Vision computer.
► Unplug the USB cable for the DVD drive from the machine computer and plug it into the Vision
computer.
4.3.1 Installing the Installation DVD
► Insert the "Win.Emb.Std.7 627C/827C" installation DVD into the DVD drive.
► Switch on the computer to start it from the DVD or reboot the computer, if it was already
switched on.
► Press any key, when the message Press any key to boot from CD Rom is displayed.
► Follow the instructions of the Restore Installation procedure.
Selection of Restore options:
If the system partition size is too small on the hard disk, it is only possible to delete or re-partition
the complete hard disk (message Complete hard disk recovery).
It the system partition is big enough, the Choose Recovery Option message is displayed and
one of the following options may be selected:
1. Restore existing system partition only
The system partition will be restored only.
2. Restore complete system disk
The complete hard disk will be restored.
► Select an option and confirm your selection with OK (or cancel your selection with Cancel).
The operating system is installed (may take some minutes) and thereafter the computer is
automatically rebooted several times.
When the Windows login window is displayed, the installation is completed (the first reboot may
take some minutes).
► Remove the DVD from the DVD drive.
► Insert the "SIPLACE WES7 Configurator" software CD into the DVD drive.
► Log on as "ASM_Admin" and enter a password.
Windows Embedded Standard 7 / Installation Manual Ausgabe 11/2014 Edition
11
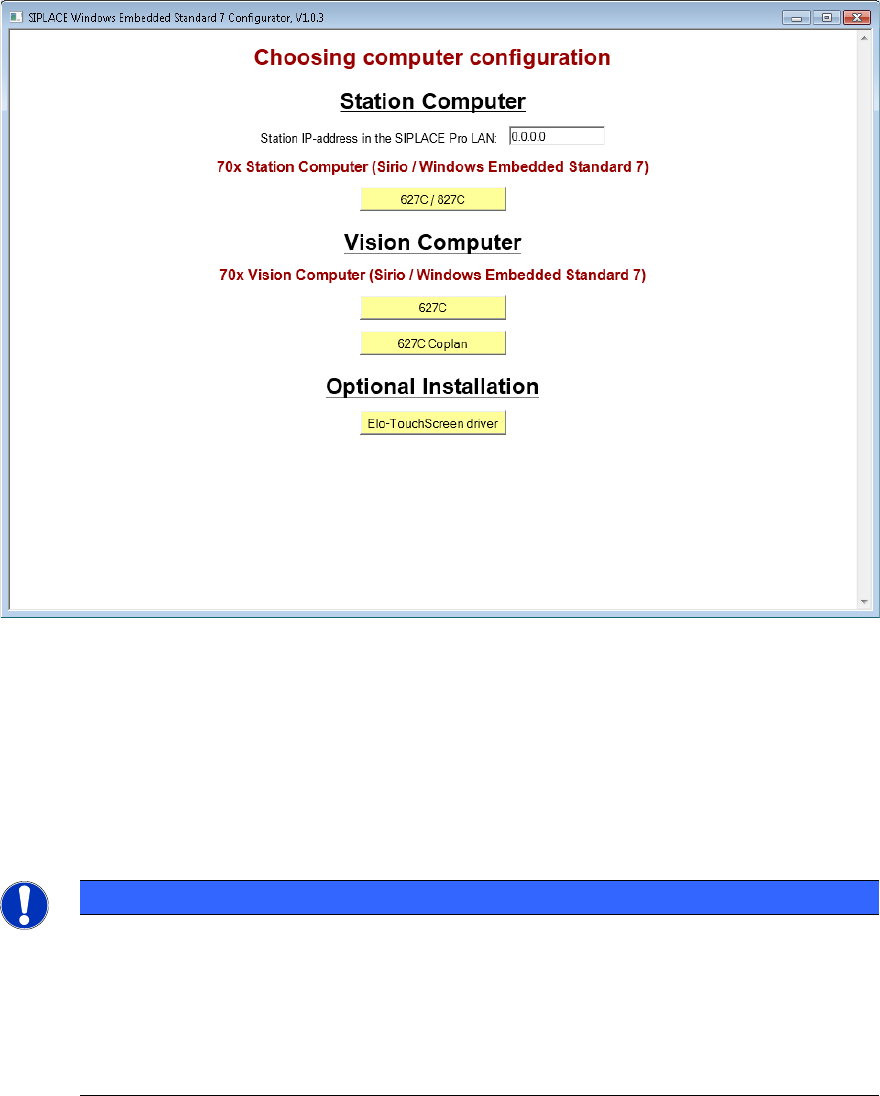
4.3.2 Choosing the Computer Configuration
► Open Windows Explorer and navigate to the DVD drive.
► Double-click on the start.hta file from the software CD to start the "SIPLACE Windows
Embedded Standard 7 Configurator".
The following window is displayed:
Figure 4-1: Window SIPLACE Embedded Standard 7 Configurator
► Enter the station IP-address for SIPLACE Pro LAN (required for a station computer only) and
choose the suitable computer configuration.
The SIPLACE settings are automatically performed and the computer reboots.
After the reboot, you are logged on as Operator (station computer) or the Windows login window is
displayed (Vision computer).
► If no touch screen is used (Vision computer), remove the software CD from the DVD drive.
NOTICE
For Windows Embedded Standard 7:
When shutting down a machine via the machine software GUI, the computer will be
switched off at the end and no further switch off message will be displayed (like It is
now save to turn off the Computer).
Only the short No signal input or kein Eingangssignal monitor message is
displayed, thereafter the monitor LED starts flashing or changes from green to red.
Windows Embedded Standard 7 / Installation Manual Ausgabe 11/2014 Edition
12
5 Installing and Calibrating the Touch Screen
Now the touch screen has to be installed and calibrated (station computer only). For this, perform
the following steps:
► Log on as ASM_Admin and enter a password.
► In the "SIPLACE Windows Embedded Standard 7 Configurator", click on the Elo-TouchScreen
driver button under Optional Installation to install the touch screen driver and follow the
installation instructions.
► After installation, calibrate the touch screen as described in the installation manual for the
station software.
► Remove the software CD from the DVD drive.
If you have installed Windows Embedded Standard 7 in one-computer operation or on a machine
computer in two-computer operation, the installation is completed now.
► Install the SIPLACE machine software as described in the installation manual for the station
software.
If you have installed Windows Embedded Standard 7 on a Vision computer in two-computer
operation:
► Perform the steps in chapter 6.