bnp-b2365(eng)b.pdf - 第197页
3. Setup 3 - 110 3-6-2 Z phase automatic adjustment Z-phase automatic adjustment is a function that autom atically adj usts the relative position of the IPM spindle motor pole and the PLG Z-p hase pulse signa l input int…
3. Setup
3 - 109
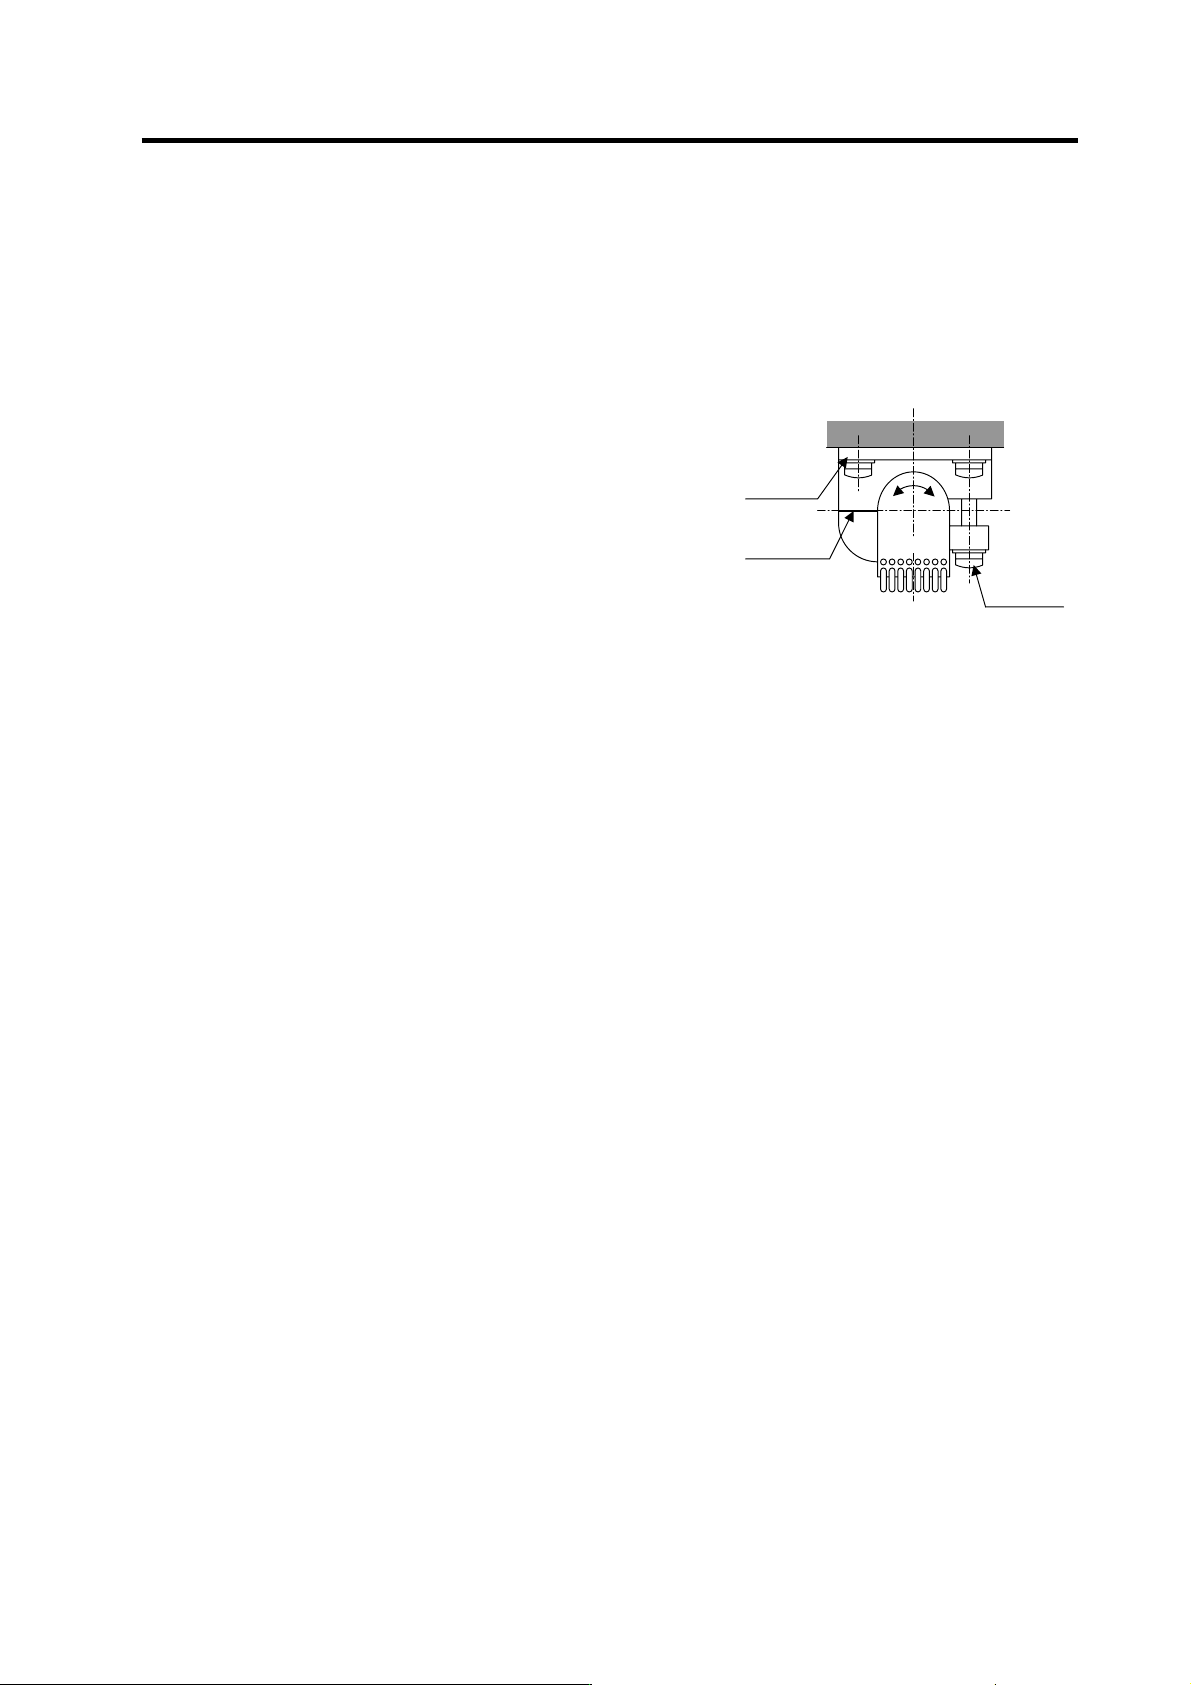
(8) Adjusting the Z phase and A phase differ ence
[1] Stop the motor, and make sure that the detection gears are not rotating. The sensor could be
damaged if adjustments are carried out while the gears are rotating.
[2] Using a clearance gauge, adjust so that the gap between the sensor direction surface and the
detection gears’ circumference is 0.15±0.01mm, and loosen the sensor fixing screw.
[3] The phase difference of the Z phase to the A phase can be adjusted by rotating the sensor as
shown on the right. At this time, rotate the sensor a little bit while using the marking lines on
the sensor and installation seat as a guide.
[4] Tighten the sensor fixing screw so that the sensor
does not move, and confirm that the gap between the
sensor detection surface and detection gears'
circumference is 0.15 ± 0.01mm. Then, rotate the
gears and confirm the phase difference as explained
above.
[5] When the phase difference is within the tolerable
range, apply a locking agent on the sensor fixing
screw, and then fix the sensor. Check the gap again
after fixing the sensor.
Always carry out the initial automatic adjustment when starting the spindle system up for the first
time or when the spindle drive unit has been replaced.
[1] MDS-C1-SPM : "3-6-2 Z-phase automatic adjustment" + "3-6-3 Motor end PLG
automatic adjustment"
[2] MDS-C1-SP/SPH : "3-6-3 Motor end PLG automatic adjustment"
[3] MDS-C1-SPX/SPHX : "3-6-4 Spindle end PLG automatic adjustment"
Marking
line
Rotate
Sensor
fixing
screw
Sensor
installation
seat
Adjusting the Z phase difference
3. Setup
3 - 110
3-6-2 Z phase automatic adjustment
Z-phase automatic adjustment is a function that automatically adjusts the relative position of the IPM
spindle motor pole and the PLG Z-phase pulse signal input into the spindle drive unit. The adjustment
data is saved in the drive unit, and is used to control the motor the next time the power is turned ON.
The motor cannot be started without completing this adjustment (alarm 16 will be detected), so always
carry out this adjustment when starting up the spindle system, when the spindle motor has been
replaced, when the PLG has been replaced or adjusted, or when the spindle drive unit has been
replaced.
<Adjustment methods>
[1] If SP205 is set to 1, change it to 0, and reboot the NC power. If it is already set to 0, go to step
[2].
[2] If the SP205 setting is 0, change it to 1.
[3] Input forward run start. The spindle motor will automatically rotate at the adjustment speed
(two stages for Z-phase pulse detection and pole position detection). (The control output
4/bitD is changed to 1 on the NC spindle monitor screen from startup until a restart occurs. In
the same manner, the control input 3/bit8 or bit9 status of 1 is established after the forward run
start input, and "D" is displayed for the drive unit until automatic adjustment is completed.)
[4] The adjustment results will be calculated and the operation will automatically stop approx. 90
seconds after forward run is started (may vary according to pole position). (When automatic
adjustment is completed, the drive unit display at the NC spindle monitor screen changes from
"D" to "C". Even though the motor is stopped while "D" is displayed, automatic adjustment is in
progress. Be sure to wait until "C" displays.)
[5] Turn forward run OFF. (The adjustment data will be saved.)
[6] Reboot the NC power.
No. Abbr. Parameter name Details
Setting range
(Unit)
Standard
setting
SP205
ZCHS
PLG Z-phase automatic
adjustment
<For MDS-C1-SPM>
This validates the PLG Z-phase automatic adjustment
function
0 to 1
0 → 1
POINT
1. If the NC power is turned ON when SP205 is set to 1, the adjustment data
saved in the drive unit will be used for control.
2. To readjust, or to turn the start OFF during the automatic adjustment when
"D" is displayed for the drive unit (see step [4] above), specify another
SP205=0 setting to restart the NC, then perform the above procedure,
beginning from step [2].
3. If operation is started without completing the adjustment, alarm 16 will occur.
CAUTION
1. The motor will automatically rotate at the adjustment speed during Z-phase
automatic adjustment. Do not touch the rotating sections as this is
hazardous.
2. Complete PLG adjustment before starting this adjustment. (Built-in motor)
3. Keep the spindle load inertia and friction load as small as possible when
using this function. (The maximum inertia is approx. 5-fold the motor
inertia.)
3. Setup
3 - 111
3-6-3 Motor end PLG automatic adjustment
Motor end PLG automatic adjustment is a function that automatically adjusts the gain and offset of the
spindle motor built-in PLG's A and B phase sine wave signals which are input into the spindle drive unit.
The adjustment data is saved in the drive unit, and is used to control the motor the next time the power
is turned ON.
Always carry out this adjustment when starting up the spindle system, when the spindle motor has
been replaced, when the PLG has been replaced or adjusted, or when the spindle drive unit has been
replaced. This function is used to improve the accuracy of the position data.
When using the IPM motor (MDS-C1-SPM), complete the "3-6-1 Z-phase automatic adjustment" before
starting this adjustment.
<Adjustment methods>
[1] If SP245 is set to 1, change it to 0, and turn the NC power ON again. If it is already set to 0, go
to step [2].
[2] If the SP245 setting is 0, change it to 1.
[3] Input forward run start. The spindle motor will automatically rotate at the adjustment speed
(two stages for offset adjustment and gain adjustment). (The control input 3/bit8 or bit9 is
changed to 1 after the forward run start input, and "D" is displayed for the drive unit until
automatic adjustment is completed. For C1-SPM, a control output 4/bitD status of 1 is
established on the NC spindle monitor screen from startup until a restart occurs.)
[4] The adjustment results will be calculated and the operation will automatically stop several
seconds after forward run is started. (When automatic adjustment is completed, the drive unit
display at the NC spindle monitor screen changes from "D" to "C". Even though the motor is
stopped while "D" is displayed, automatic adjustment is in progress. Be sure to wait until "C"
displays.)
[5] Turn forward run OFF. (The adjustment data will be saved.)
[6] Turn the NC power ON again.
After completing the PLG adjustment, carry out trial operation, and confirm that there is no abnormal
noise (knocking or scratching noise) during forward run or reverse run.
No. Abbr. Parameter name Details
Setting range
(Unit)
Standard
setting
SP245 PGHS
PLG automatic
adjustment
<For MDS-C1-SP/SPH/SPM>
This validates the automatic adjustment function for the
PLG
0 to 1
0 → 1
POINT
1. If the NC power is turned ON when SP245 is set to 1, the adjustment data
saved in the drive unit will be used for control.
2. To readjust, or to turn the start OFF during the automatic adjustment (when
"D" is displayed for the drive unit (see step [4] above)), specify another
SP205=0 setting to restart the NC, then perform the above procedure,
beginning from step [2].
CAUTION
1. The motor will automatically rotate at the adjustment speed during PLG
automatic adjustment. Do not touch the rotating sections as this is
hazardous.
2. Complete PLG adjustment before starting this adjustment. (Built-in motor)