Service Manual SIPLACE SmartFeeder.pdf - 第177页
8 Repairs to SmartFeeder 2x8 mm X / Xi 8.4 EDIF Service Manual SIPLACE SmartFeeder 4 - 8 mm X / Xi SIPLACE SmartFeeder 2 x 8 mm X / Xi 11/2020 177 8.4 EDIF Spare part required Fig.57: EDIF secondary assembly X Smart Fee…
8 Repairs to SmartFeeder 2x8 mm X / Xi
8.3 Side Covers
176 Service Manual SIPLACE SmartFeeder 4 - 8 mm X / Xi SIPLACE SmartFeeder 2 x 8 mm X / Xi 11/2020
8.3.4 Fitting the Right Side Cover
► Carefully place the feeder module with the left-
hand side down on a stable, level and clean sur-
face.
► Ensure the foil disposal cover is in place.
► Place the side cover onto the feeder.
► Make sure that the side cover is aligned flush
with the operating panel.
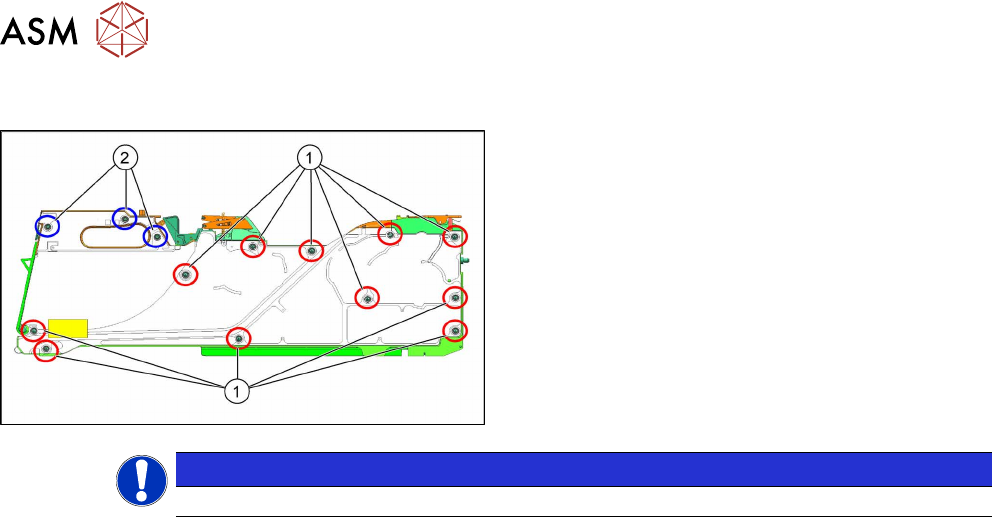
1. Blue circles show screws for which you need a
TORX screwdriver with a torque of 0.6Nm.
2. Red circles show screws, for which you need a
Phillips screwdriver with a torque of 0.6Nm.
NOTICE
When you tighten the screws, make sure that these are NOT distorted.
8 Repairs to SmartFeeder 2x8 mm X / Xi
8.4 EDIF
Service Manual SIPLACE SmartFeeder 4 - 8 mm X / Xi SIPLACE SmartFeeder 2 x 8 mm X / Xi 11/2020 177
8.4 EDIF
Spare part required
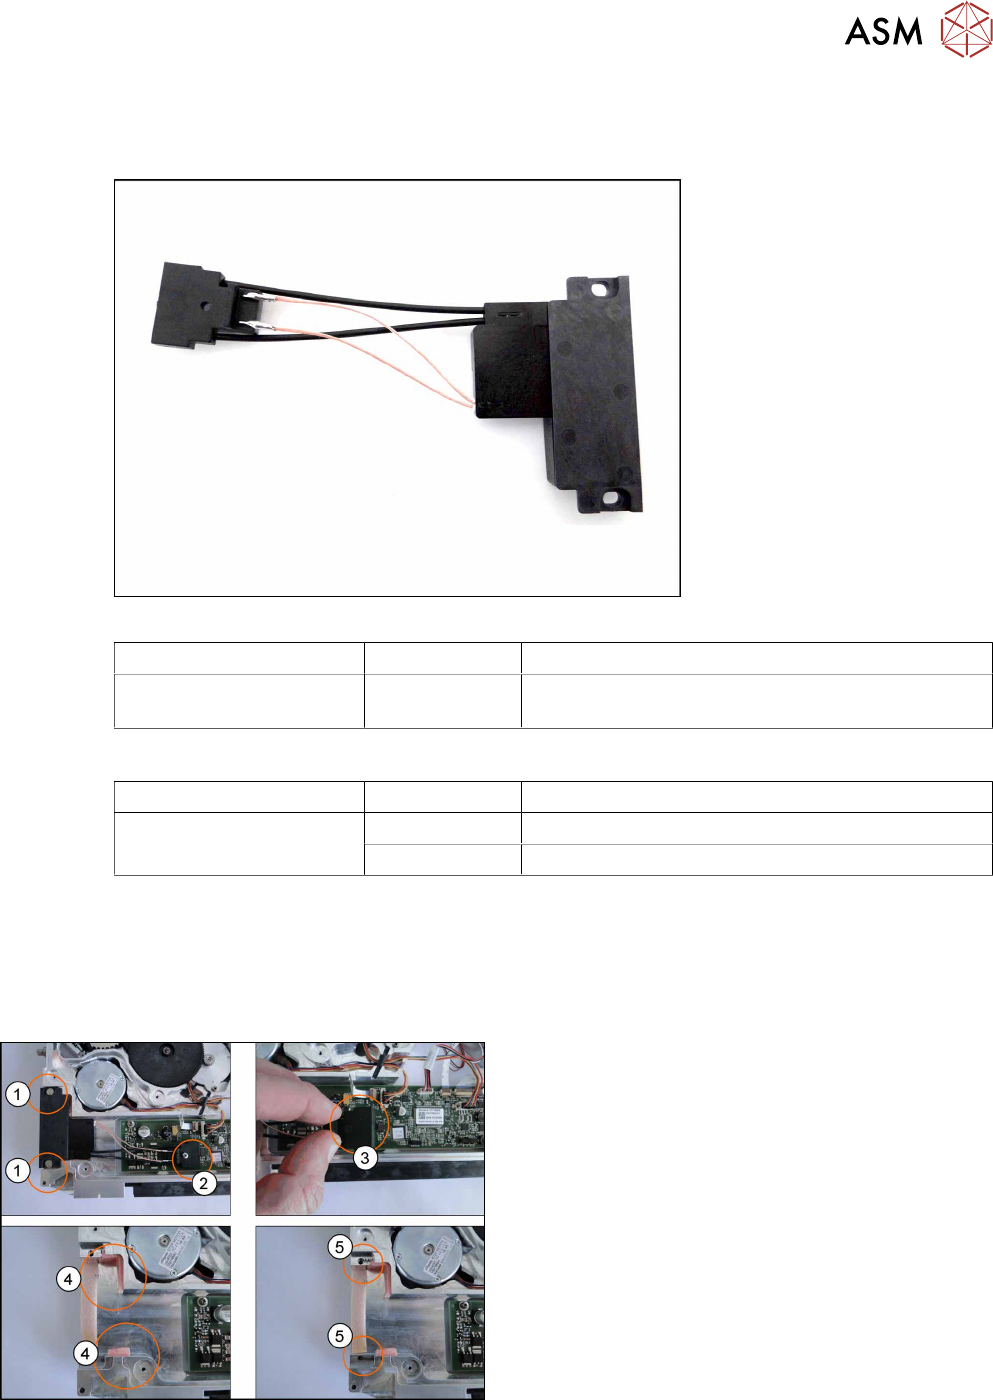
Fig.57: EDIF secondary assembly X Smart
Feeder module Item no. Designation
SmartFeeder 2x8mmX
SmartFeeder 2x8mmXi
03125222Sxx EDIF secondary assembly X Smart
Spare parts also available
Feeder module Item no. Designation
SmartFeeder 2x8 mm X
SmartFeeder 2x8mmXi
03012683-xx Pressure spring D-027
03068667-xx Collar screw ø4x4.5 M3 /X2x8
Tools required
●
Flat-bladed screwdriver
●
Phillips screwdriver
8.4.1 Removing the EDIF – secondary assembly X Smart
► Place the feeder on a stable, level and clean sur-
face.
► Remove the left side cover (see 8.3.1 "Removing
the Left Side Cover" [}174]).
► Loosen and remove the two collar screws(1).
► Loosen and remove the Phillips screw(2).
► Carefully lift the connector from the main
board(3)
.
► Remove any foam seals present (4).
► Check the pressure springs for damage and re-
place where necessary(5)
.
8 Repairs to SmartFeeder 2x8 mm X / Xi
8.4 EDIF
178 Service Manual SIPLACE SmartFeeder 4 - 8 mm X / Xi SIPLACE SmartFeeder 2 x 8 mm X / Xi 11/2020
8.4.2 Fitting the EDIF – secondary assembly X Smart
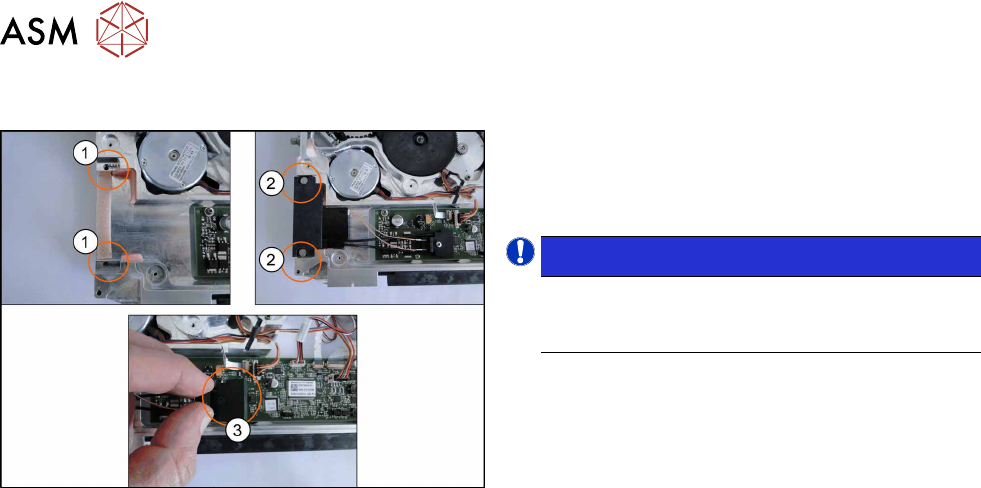
► Insert the two pressure springs(1) into the ducts
provided.
If the pressure springs are bent, these will need
to be replaced.
NOTICE!
During insertion, make sure that the two
pressure spring point forwards, to the EDIF
and are not distorted.
.
► Push the EDIF(2) into the recess at the front of
the feeder module.
► Fasten the EDIF with the two collar screws.
► Check whether the EDIF springs back to the front
if slight pressure is applied to it.
If the EDIF does not spring back, loosen the two collar
screws(2)
and make sure that the two pressure
springs(see 1 previous figure) are aligned towards the
front and are not bent.
► Place the connector on the main board, ensuring
the alignment pins are centered(3)
.
► Fix the connector to the board with the Phillips
screw and carefully tighten.
► Fit the left side cover (see 8.3.2 "Fitting the Left
Side Cover" [}175]).