Service Manual SIPLACE SmartFeeder.pdf - 第237页
8 Repairs to SmartFeeder 2x8 mm X / Xi 8.16 Handle with control panel Service Manual SIPLACE SmartFeeder 4 - 8 mm X / Xi SIPLACE SmartFeeder 2 x 8 mm X / Xi 11/2020 237 8.16.3 Individual parts on the handle Spare parts r…
8 Repairs to SmartFeeder 2x8 mm X / Xi
8.16 Handle with control panel
236 Service Manual SIPLACE SmartFeeder 4 - 8 mm X / Xi SIPLACE SmartFeeder 2 x 8 mm X / Xi 11/2020
8.16.2 Fitting the handle assembly
► Stand the feeder module up.
► Open the foil disposal flap.
► Push the handle from the right-hand side, as far
as the stop in the feeder module frame.
► Close the foil container flap.
► Place the feeder module carefully down on its
right side
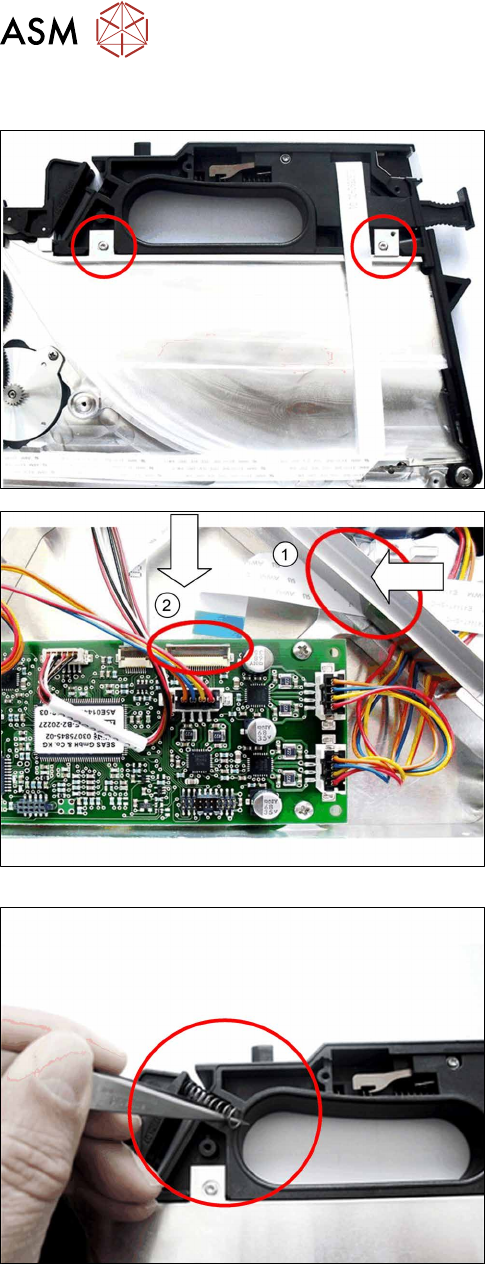
► Fasten the handle using the two marked (see dia-
gram) screws with 0.6Nm.
► Fold the flat ribbon cable in exactly the same way
as the old cable.
► Run the cable and press it into the cable duct and
onto the double-sided adhesive tape. Replace
the adhesive tape if required.
► Carefully insert the flat ribbon cable completely
through the feedthrough on the tape duct.(1)
When running the cable, make sure that the blue
side points upwards at the end of the cable.
► Insert the end of the flat ribbon cable (with the
blue side pointing upwards) as far as the stop in
the marked flat ribbon connection on the control
board.(2)
► Close the connection and make sure that the
cable it firmly fitted.
► Fit the two pressure springs into the rockers.
► Fasten the cover on the foil container.
► Fasten the left and the right side covers (see
8.3.2
"Fitting the Left Side Cover" [}175] and
8.3.4
"Fitting the Right Side Cover" [}176]).
8 Repairs to SmartFeeder 2x8 mm X / Xi
8.16 Handle with control panel
Service Manual SIPLACE SmartFeeder 4 - 8 mm X / Xi SIPLACE SmartFeeder 2 x 8 mm X / Xi 11/2020 237
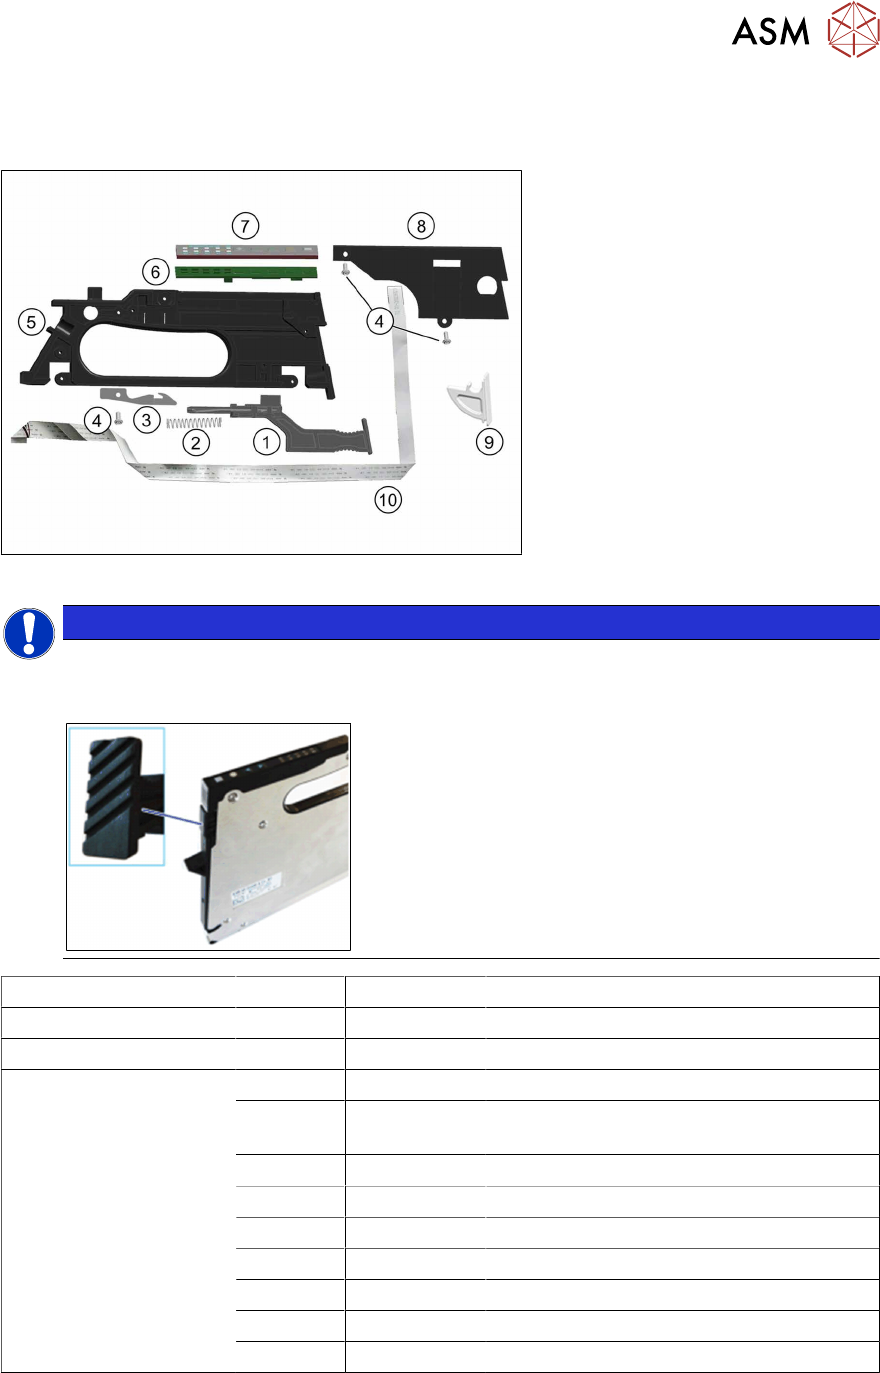
8.16.3 Individual parts on the handle
Spare parts required
Fig.78: Individual parts on the handle SmartFeeder 2x8 mm X/Xi
NOTICE
Other slide for SmartFeeder 2x8 mmXi
In order to visually differentiate Xi feeder modules from the "normal" X feeder modules, a
different slide is used, with a clearly corrugated surface on the outside.
Feeder module Position Item no. Designation
SmartFeeder 2x8mmX 1 03092491-02 Slide assy. X24-104
SmartFeeder 2x8mmXi 1 03172631-01 Slide assy. X2x8i
SmartFeeder 2x8mmX
SmartFeeder 2x8 mm Xi
2 03009150Sxx Pressure spring VD-090V
3 03147373-01 Sleeve retaining spring X24-104Smart
curved
4 03033796-01 RF-SN75-2.5 x 6-9.8
5 03113312-01 Handle base X24-104
6 03167407-02 PCBA control panel X2x8 v4
7 03167618-01 Assembly spacer control panel X2x8 V4
8 03113588-01 Cover, handle X24-104
9 03110496-01 Window for control panel
10 03063592-01 Cable control panel X2x8
Tools required
●
Phillips screwdriver 0.9Nm
●
TORX screwdriver 0.6Nm, size T8
●
Tweezers or flat pliers
8 Repairs to SmartFeeder 2x8 mm X / Xi
8.16 Handle with control panel
238 Service Manual SIPLACE SmartFeeder 4 - 8 mm X / Xi SIPLACE SmartFeeder 2 x 8 mm X / Xi 11/2020
8.16.3.1 Removing individual parts from the handle
► Carefully place the feeder module with the right side down on a stable, level and clean sur-
face.
► Remove the left side cover (see 7.3.1 "Removing the Left Side Cover" [}102]).
► Remove the operating panel (see 7.15.2.1 "Removing the Control Panel and Board" [}152]).
If you have removed the operating panel, the cover on the foil stuffing unit will be accessible and
can be replaced if necessary.
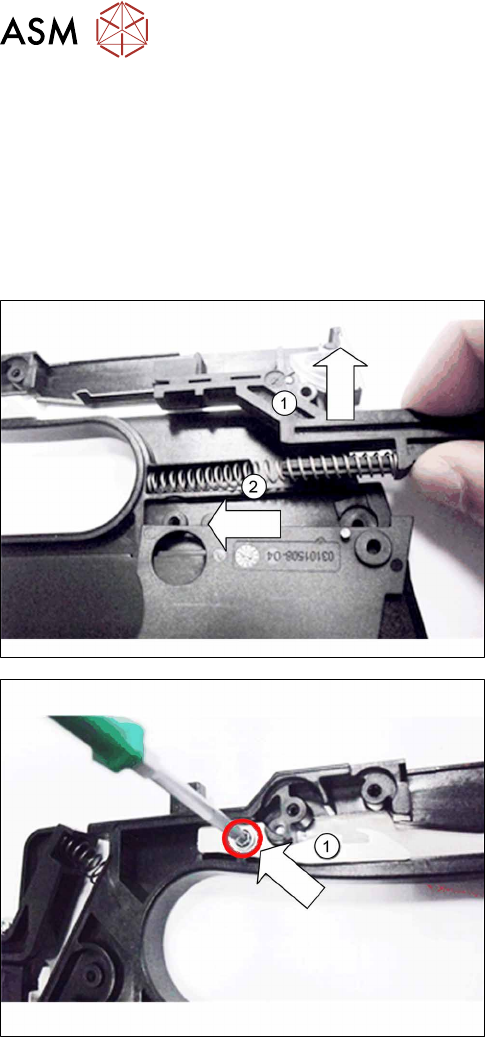
► Pull the slide up and out of the handle. (1)
► Remove the pressure spring. (2)
► Remove the screw which fastens the spring
hook(1)
to the handle.
► Remove the spring hook.