Service Manual SIPLACE SmartFeeder.pdf - 第72页
6 Repairs to SmartFeeder 4 mm X / Xi 6.12 Flap on drip tray for cover foil 72 Service Manual SIPLACE SmartFeeder 4 - 8 mm X / Xi SIPLACE SmartFeeder 2 x 8 mm X / Xi 11/2020 6.12.1 Replacing the flap on the drip tray and …
6 Repairs to SmartFeeder 4 mm X / Xi
6.12 Flap on drip tray for cover foil
Service Manual SIPLACE SmartFeeder 4 - 8 mm X / Xi SIPLACE SmartFeeder 2 x 8 mm X / Xi 11/2020 71
6.12 Flap on drip tray for cover foil
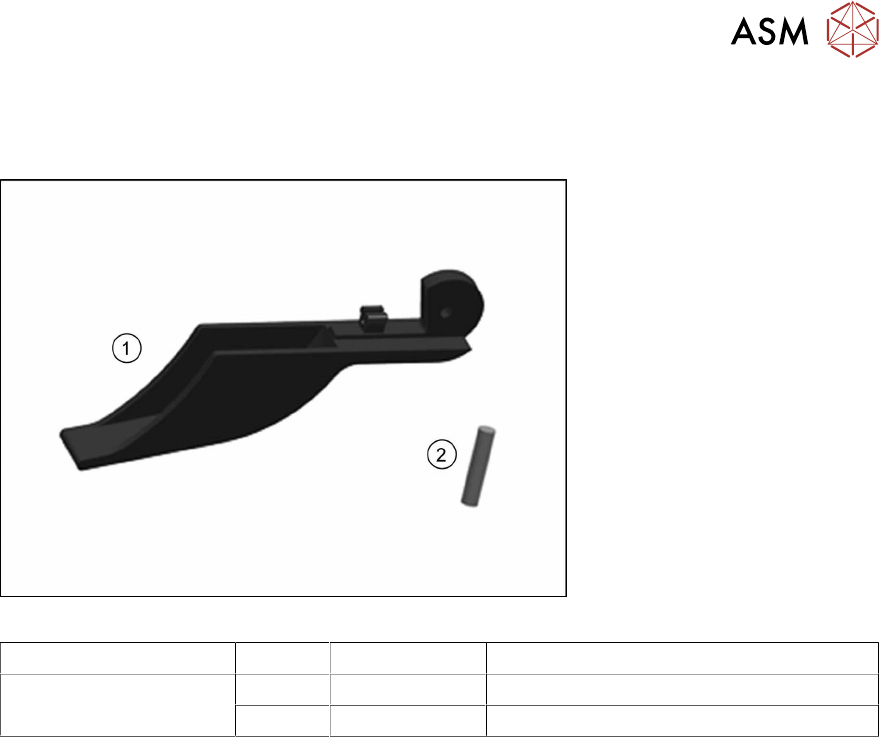
Required spare part
Fig.18: Flap for drip tray and shaft
Feeder module Position Item no. Designation
SmartFeeder 4mmX
SmartFeeder 4 mm Xi
1 03119392Sxx Drip tray for cover foil X4Smart
2 03004081-xx Shaft for D2 foil flap X8
Tools required
●
TORX screwdriver size T8, with 0.6Nm
●
Phillips screwdriver 0.9Nm
6 Repairs to SmartFeeder 4 mm X / Xi
6.12 Flap on drip tray for cover foil
72 Service Manual SIPLACE SmartFeeder 4 - 8 mm X / Xi SIPLACE SmartFeeder 2 x 8 mm X / Xi 11/2020
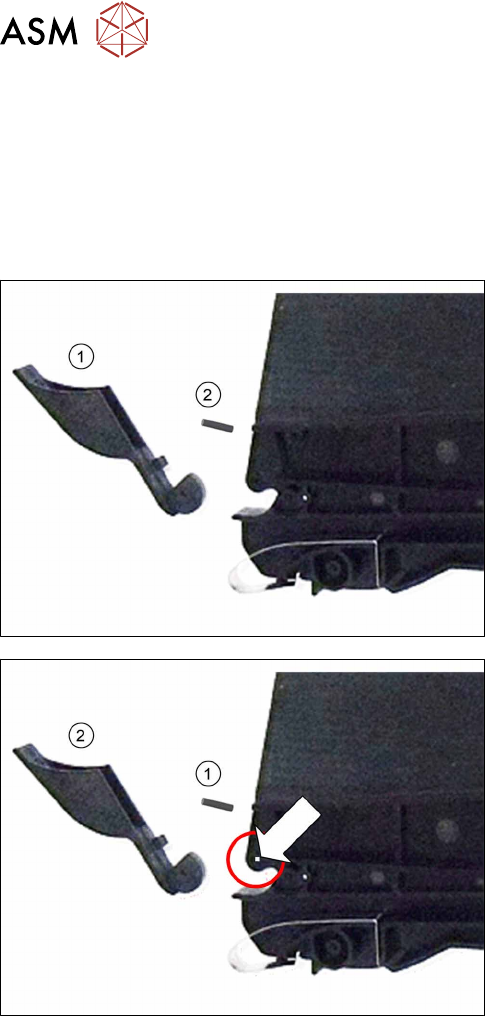
6.12.1 Replacing the flap on the drip tray and shaft
► Carefully place the feeder module with the left side down on a stable, level and clean surface.
► Remove the right side cover (see 6.3.3 "Removing the Right Side Cover" [}31]).
► Remove the "insertion foil container" (see 6.17.1.1 "Cleaning or replacing the foil con-
tainer" [}86]).
► Clean the foil container thoroughly and remove all foil and adhesive residues.
► Remove the "flap on cover foil drip tray"(1) and,
if needed, the "shaft D2"(2)
. The shaft is just in-
serted into the insertion foil container.
► Insert the (new) "shaft D2"(1) in the position
shown in the insertion foil container, as far as the
stop.
► Push the (new) flap for the cover foil drip tray
onto the "shaft D2".
► Fit the "insertion foil container" (see 6.17.1.1 "Cleaning or replacing the foil container" [}86]).
► Fit the right side cover (see6.3.4 "Fitting the Right Side Cover" [}32]).
6 Repairs to SmartFeeder 4 mm X / Xi
6.13 Foil disposal blade
Service Manual SIPLACE SmartFeeder 4 - 8 mm X / Xi SIPLACE SmartFeeder 2 x 8 mm X / Xi 11/2020 73
6.13 Foil disposal blade
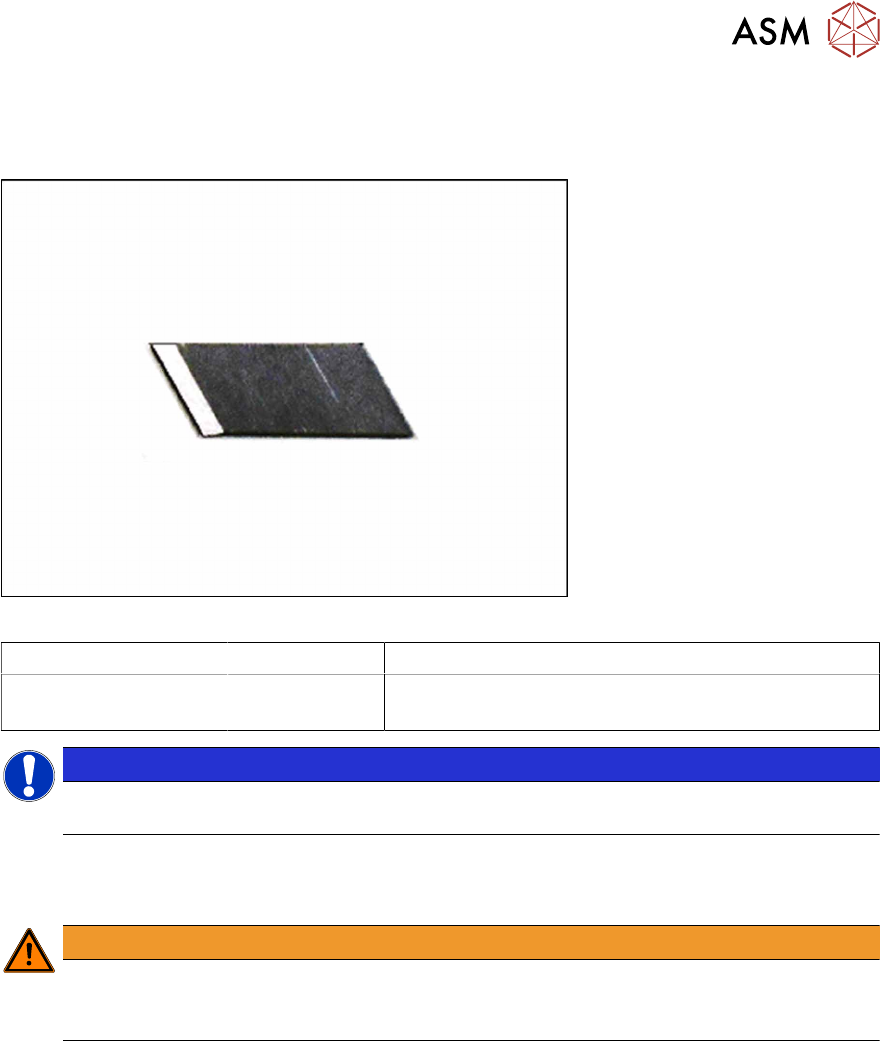
Required spare part
Fig.19: Blade partition wall
Feeder module Item no. Designation
SmartFeeder 4mmX
SmartFeeder 4 mm Xi
00341370Sxx Blade partition wall
NOTICE
Pay attention when preparing the individual blades. Individual blades must be broken at the
cutter edge. Ensure all safety precautions are observed.
Tools required
●
TORX screwdriver 0.6Nm, size T8
WARNING
Risk of injury
The edge of the blade is very sharp. Make sure that you always use a pair of tweezers
when removing and fitting the blade.
6.13.1 Removing the Blade Partition Wall
► Place the feeder on a stable, level and clean surface.
► Open the flap.
► Loosen the screw fastening the blade and remove the old blade.
6.13.2 Fitting the Blade Partition Wall
► Place the new blade in position and tighten the screw.