YSD_Users_E.pdf - 第148页
4-20 4 Making the dispensing stable 3.1.4 Checking the dispensing amount on the dot station Check the dispensing amount on the dot station b y making a dispensing test with the mark data that was created. T he following …
4-19
4
Making the dispensing stable
n
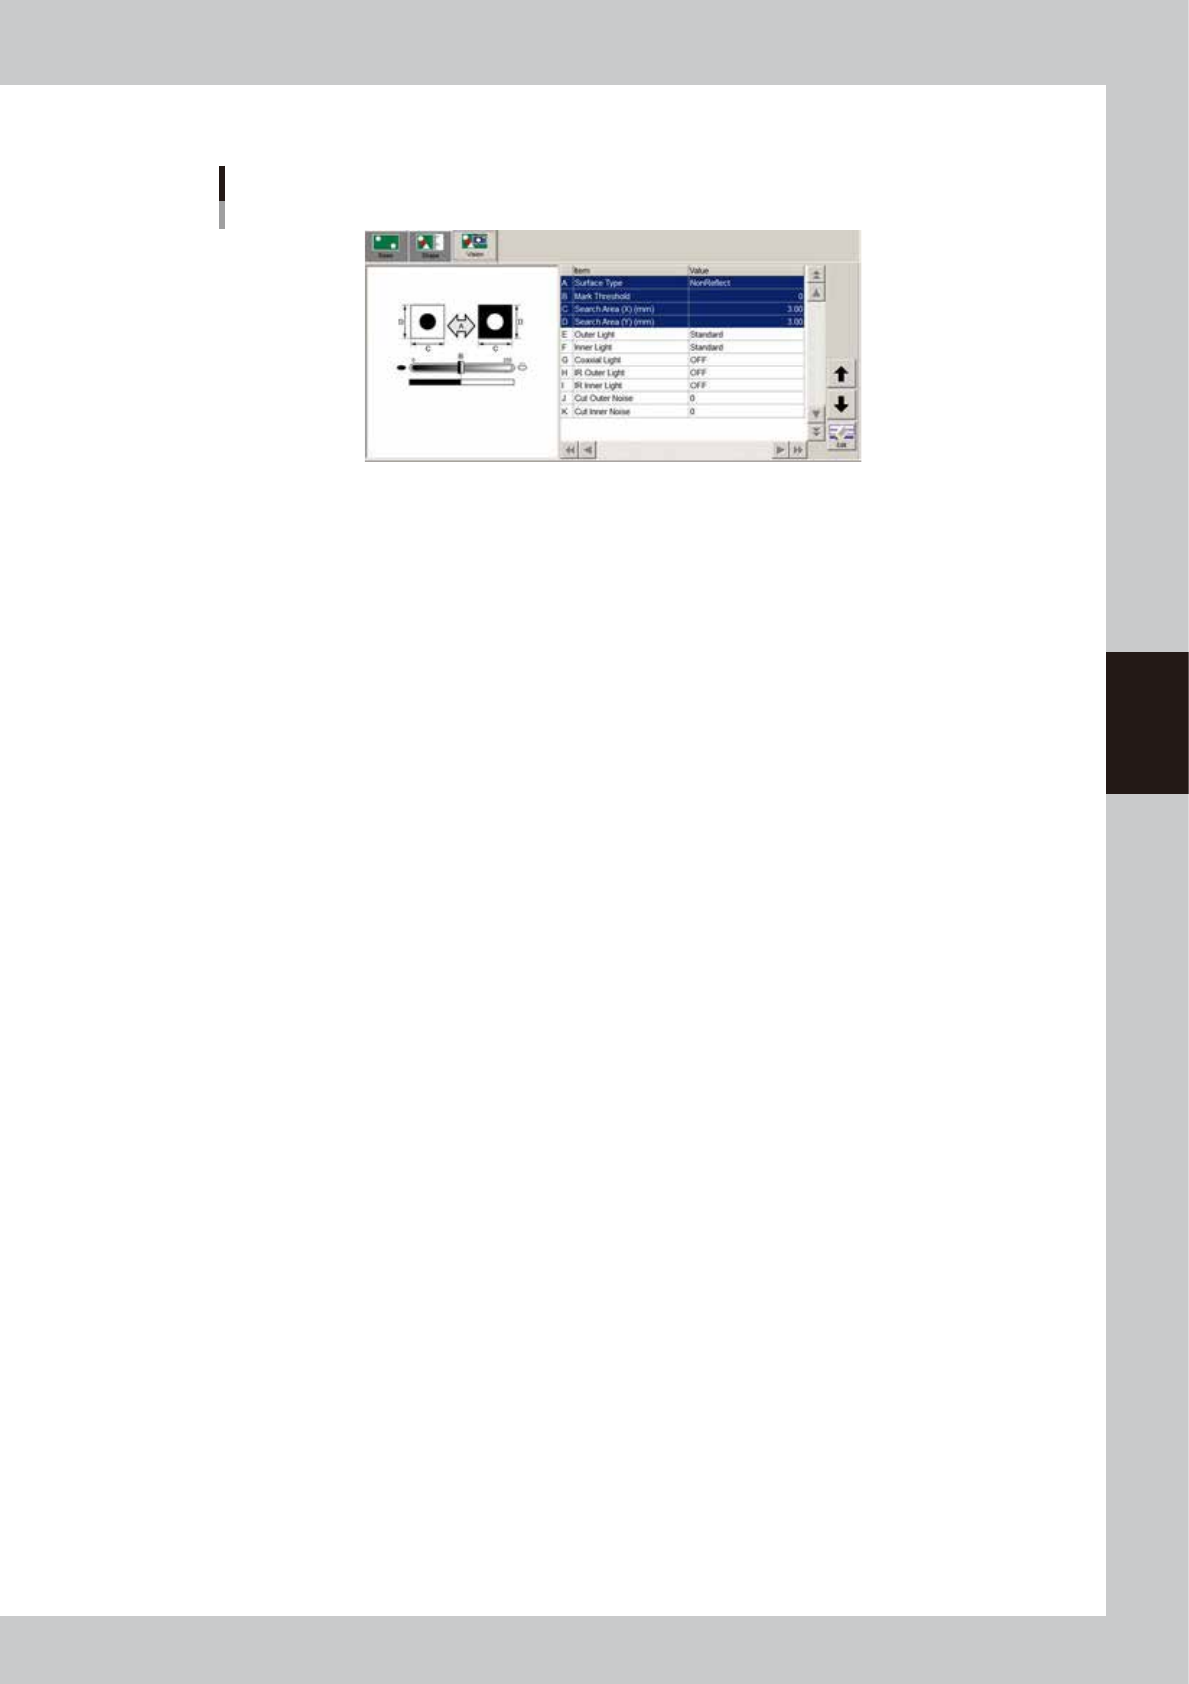
Mark recognition information
Mark recognition information
64436-N7-00
A: Surface Type
Normally, set this parameter to "NonReflect".
B: Mark Threshold
Set the threshold that reproduces the dot shape correctly.
If the background is uniform (no patterns, etc.), setting this parameter to "0" will automatically determine an appropriate
threshold.
C, D: Search Area (XY)
Set this parameter as small as possible for the dot to be recognized.
4-20
4
Making the dispensing stable
3.1.4 Checking the dispensing amount on the dot station
Check the dispensing amount on the dot station by making a dispensing test with the mark data that was
created. The following steps describe the procedure for checking the dispensing amount using a Type 111
nozzle as an example.
1
Set up the head unit.
Prepare a new syringe kept at ambient temperature and the nozzle, and attach them to the head. For
the instructions on how to attach the syringe and nozzle, see “3.4 Setting up the head unit” in Chapter 2.
2
Bleed the nozzle air.
When setting the temperature, bleed the air after waiting until the target temperature is reached. For
the instructions on how to bleed the nozzle air, see “3.6 Bleeding the nozzle air” in Chapter 2.
3
Adjust the air pressure.
Press the [Dispense Test] button to open the dispense screen and the press the [Execute] button to start
dispensing. Adjust the air pressure so that the recognition results reach the standard area value. If failed
to recognize a dispensed dot even after adjusting the air pressure, then check the e dispensing state
visually and adjust to the size you want for the main dispensing.
4
Make the mark adjustment.
Use a dot having a stable shape to make the mark adjustment. Press the [Test] button, switch to Monitor
Mode, and check the dot recognition state. If the lighting is not correct, then press the [Mark Light]
button and adjust the lighting so as to fall within the correct dot recognition state. After making the
adjustment, press the [Check] button to check if it is within the tolerance range.
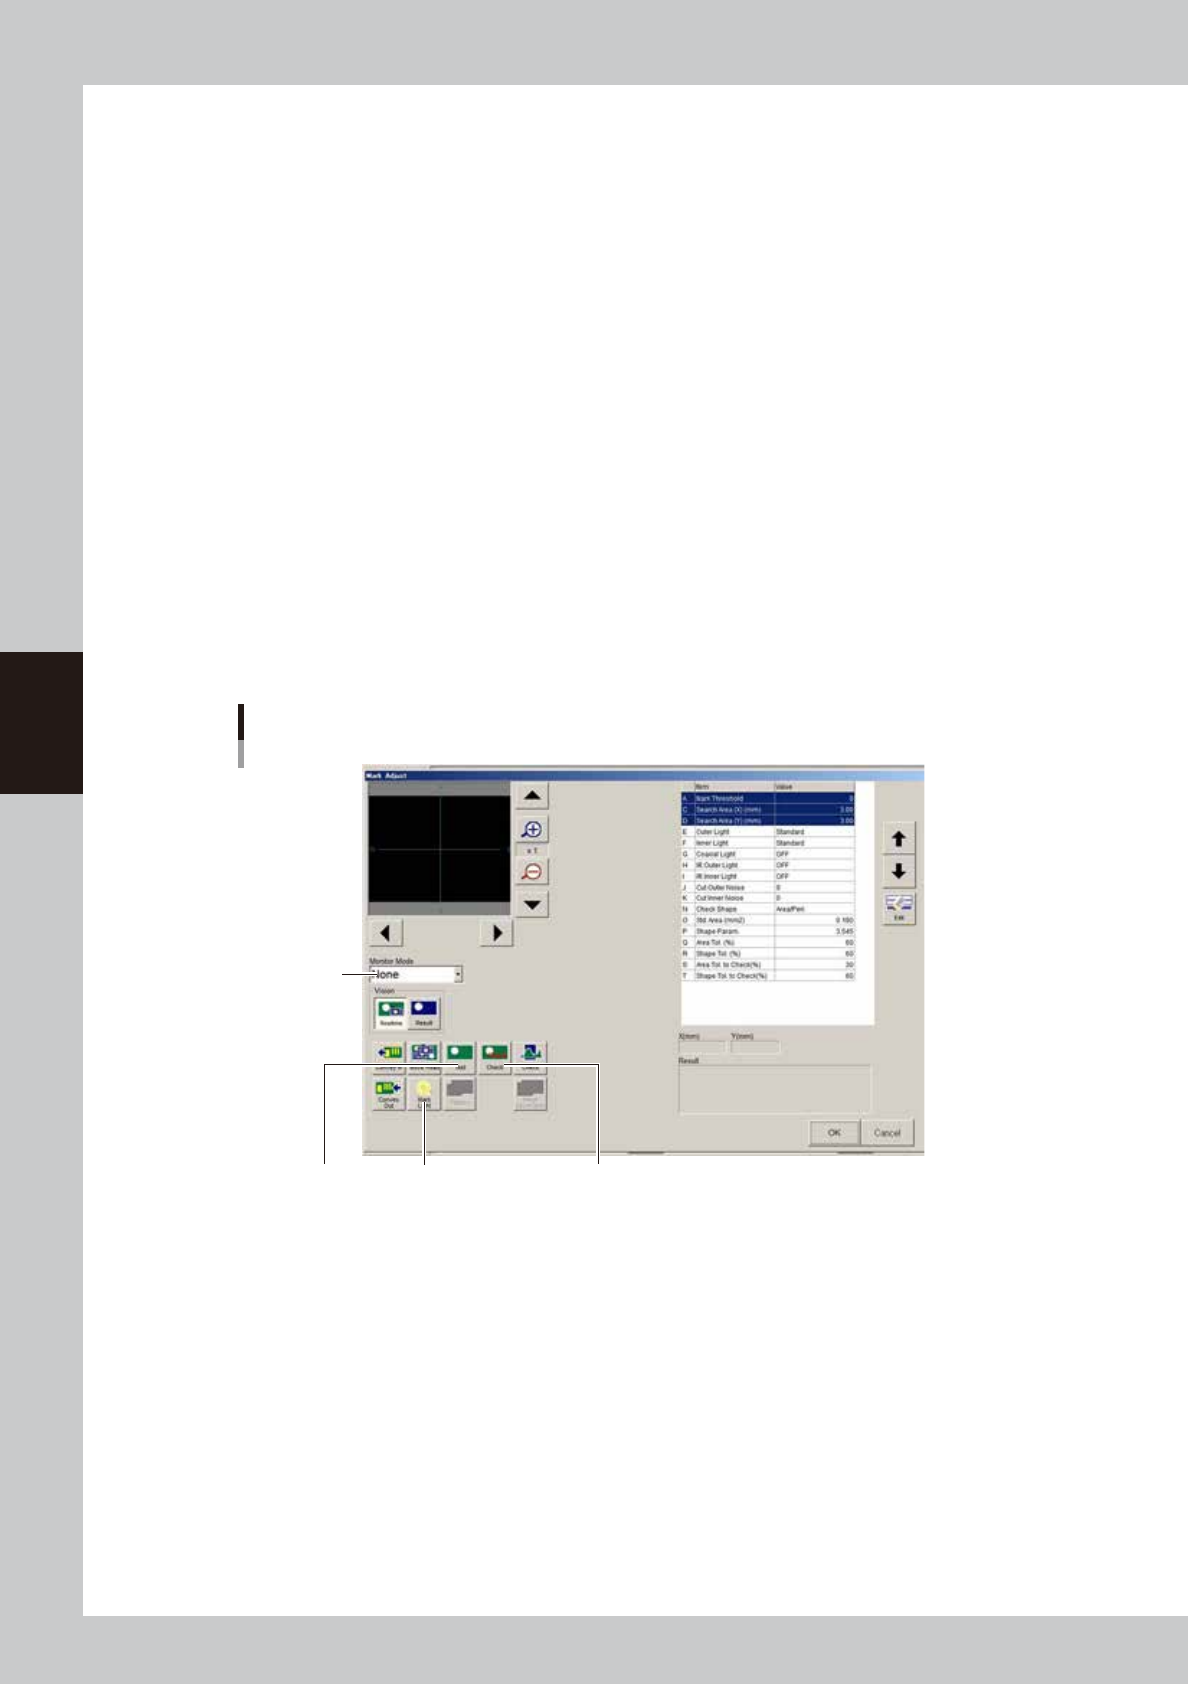
Mark Adjust window
[Test] button
Monitor Mode
[Check] button[Mark Light] button
64437-N7-00
[Test] button
If you are not performing the alignment amount check, press this button to acquire the dot area. The acquired area and
perimeter will be displayed when "Result" is selected in the Monitor Mode dropdown list.
[Mark Light] button
Set the lighting level according to the dispensing state. Adjust to the lighting level that produces a dot you want to
recognize.
[Check] button
Use this button if you are performing the alignment amount check, to see whether the dot area is within the tolerance.
4-21
4
Making the dispensing stable
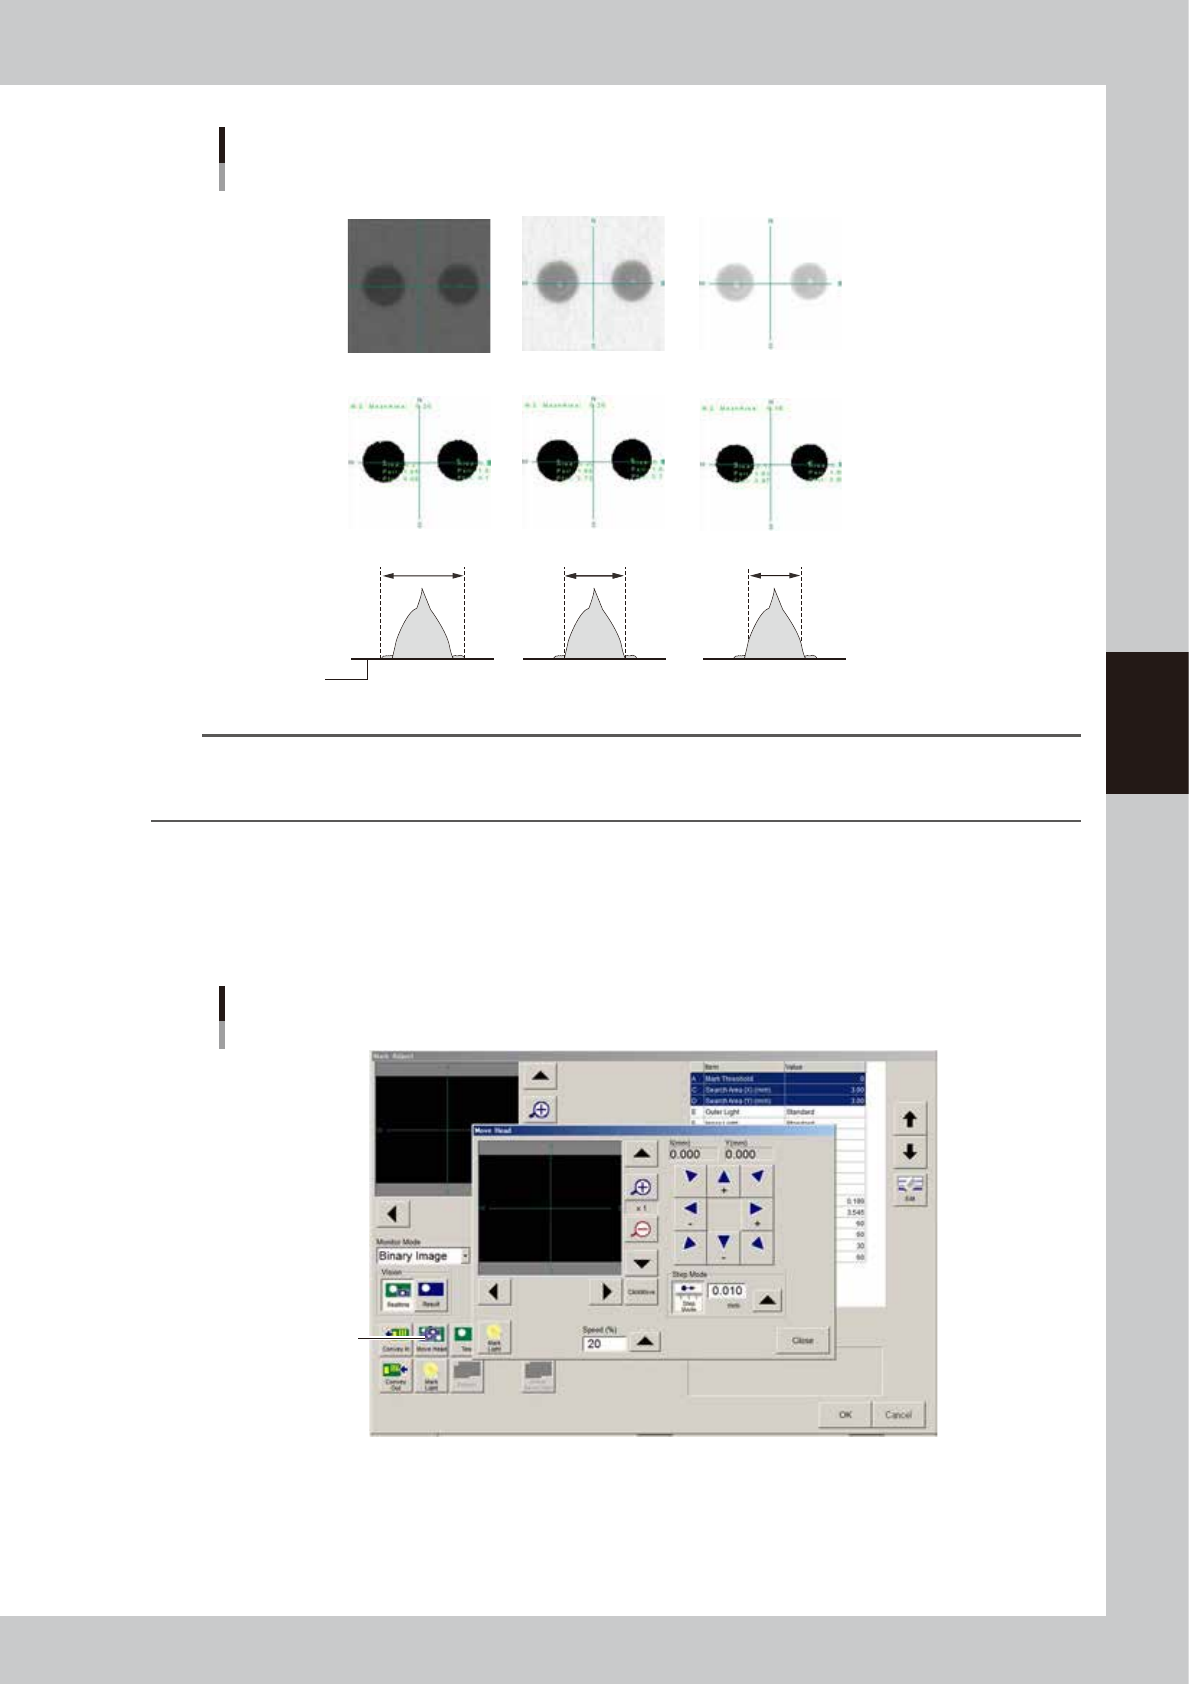
Dot recognition
Examples
Too bright
Binary image
Becomes small
Becomes large
Too dark
Good
Good
Dot recognition state
Periphery coat is recognized
Liquid outline is recognized Liquid outline is not
Paper
63410-N7-00
n
NOTE
If dot recognition is unstable even under the appropriate conditions due to the bond adhesive and solder
characteristics, then change the standard area setting to include the periphery coat so that the dot is recognized
stably.
5
Check the difference between the actual dot and recognition state.
Use the moving camera to check whether the area of the actual dot and the recognized result match
each other. Press the [Move Head] button and align the crosshairs on the camera with the dot groove
for recognition. Set the Monitor Mode to “Binary Image”, and compare the recognition state with the
actual dot to ensure there is no difference. If there is a difference, then readjust using mark adjustment.
Actual dot and recognition state
[Move Head] button
64438-N7-00
6
Confirm the air pressure
Run the dispensing test again and adjust the air pressure so that the dot has the standard area. Make a
note of the air pressure value that you just set.
7
Save the data.
Save the data that was made above.