YSD_Users_E.pdf - 第162页
4-34 4 Making the dispensing stable 4. Position correction dispense function 4.1 Over view and item restrictions T his function measures the deviation in dispensing position caused by the individual nozzle accurac y and …
4-33
4
Making the dispensing stable
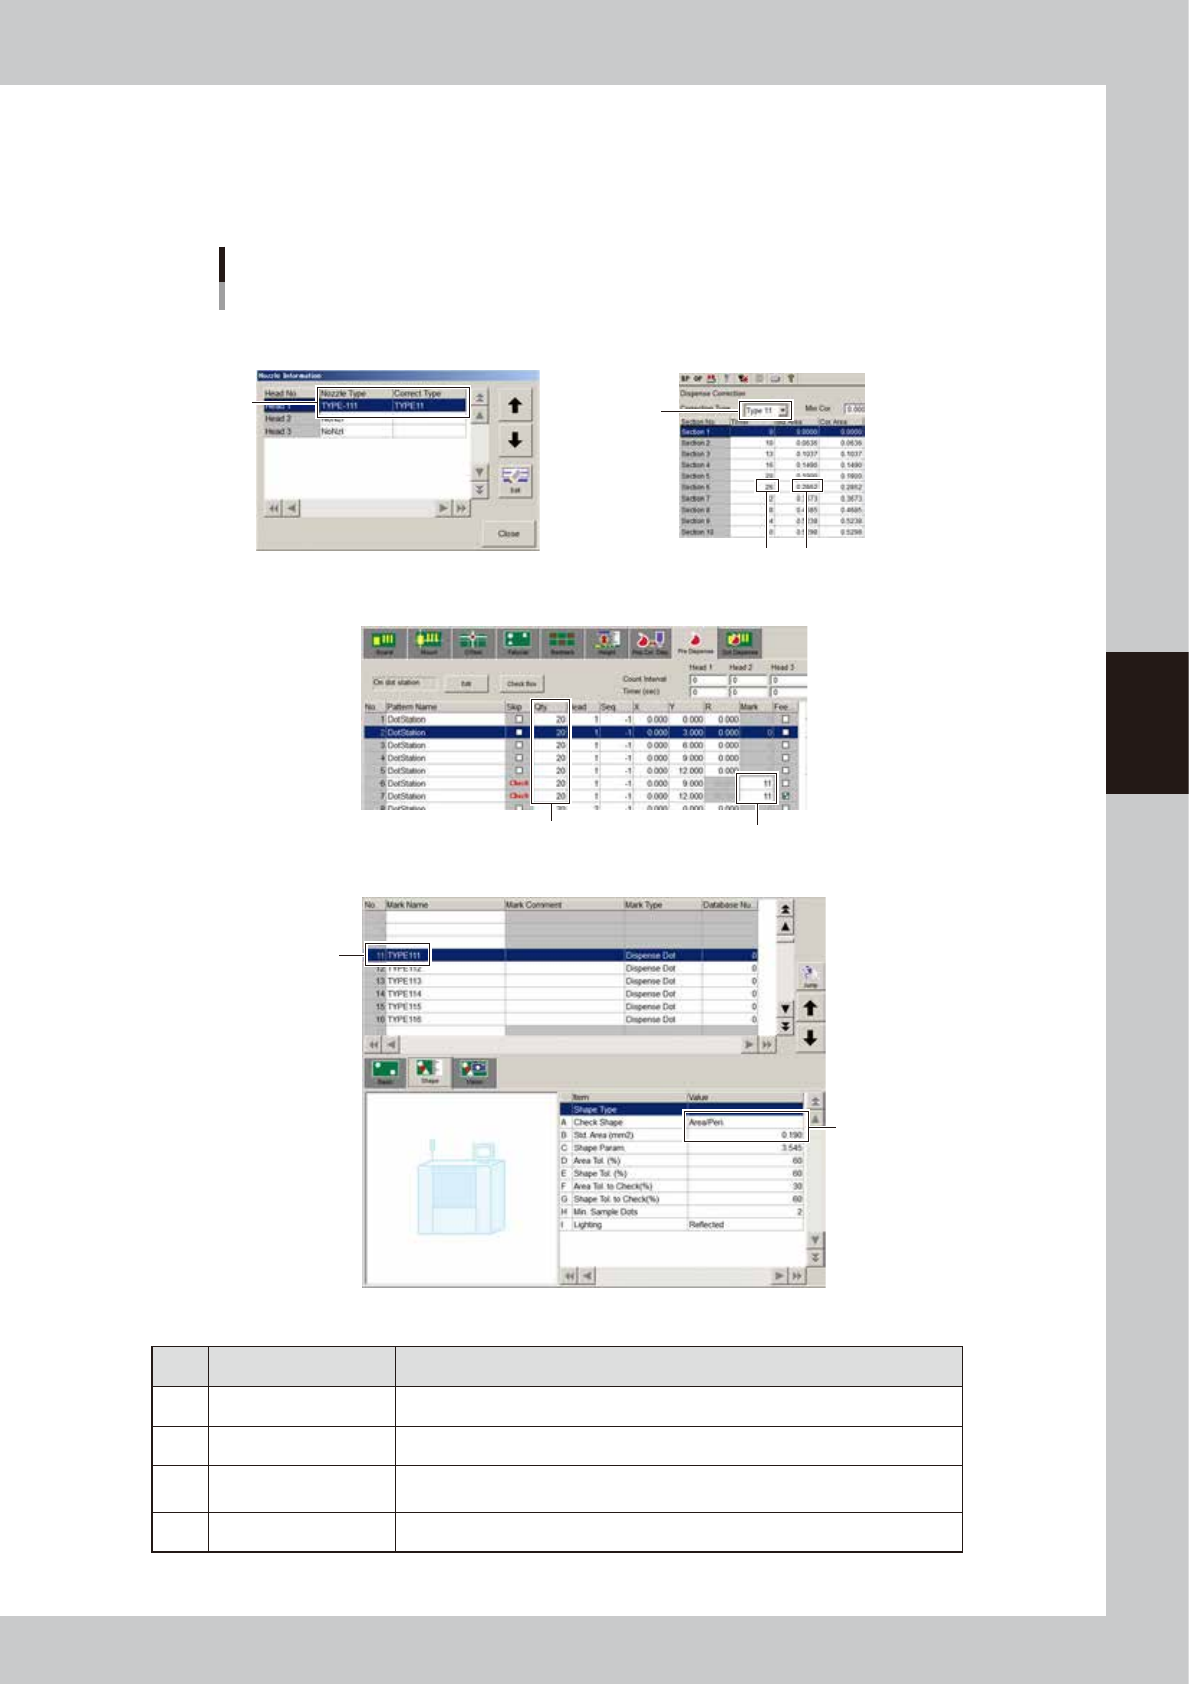
3.1.8 Checking that each setting is consistent
Check that each setting at the numbers below is consistent to ensure correction will be performed accurately.
The description here is given using a Type 111 nozzle as an example. If a setting was freely made, then adjust
it to match the other settings.
Check for each setting
Example for Type 111 nozzle
[Setup] - [Nozzle] screen
[Machine] - “Dispense Correction” screen
[Board] – [Pre Dispense] screen
[Mark] screen
1
1
4
4
3
3
2
2
64447-N7-00
n
Example of settings for Type 111 nozzle
Setting Description
1 Type -111: Type 11 Checks if correction type matches the target nozzle.
2 11 Checks if the mark No. to be used is correct.
3 Area/Per. : 0.19
Checks if “Check Shape” is set to “Area/Peri.” and the value for the standard
area is correct.
4 20 Checks if the liquid amount and timer values match.
4-34
4
Making the dispensing stable
4. Position correction dispense function
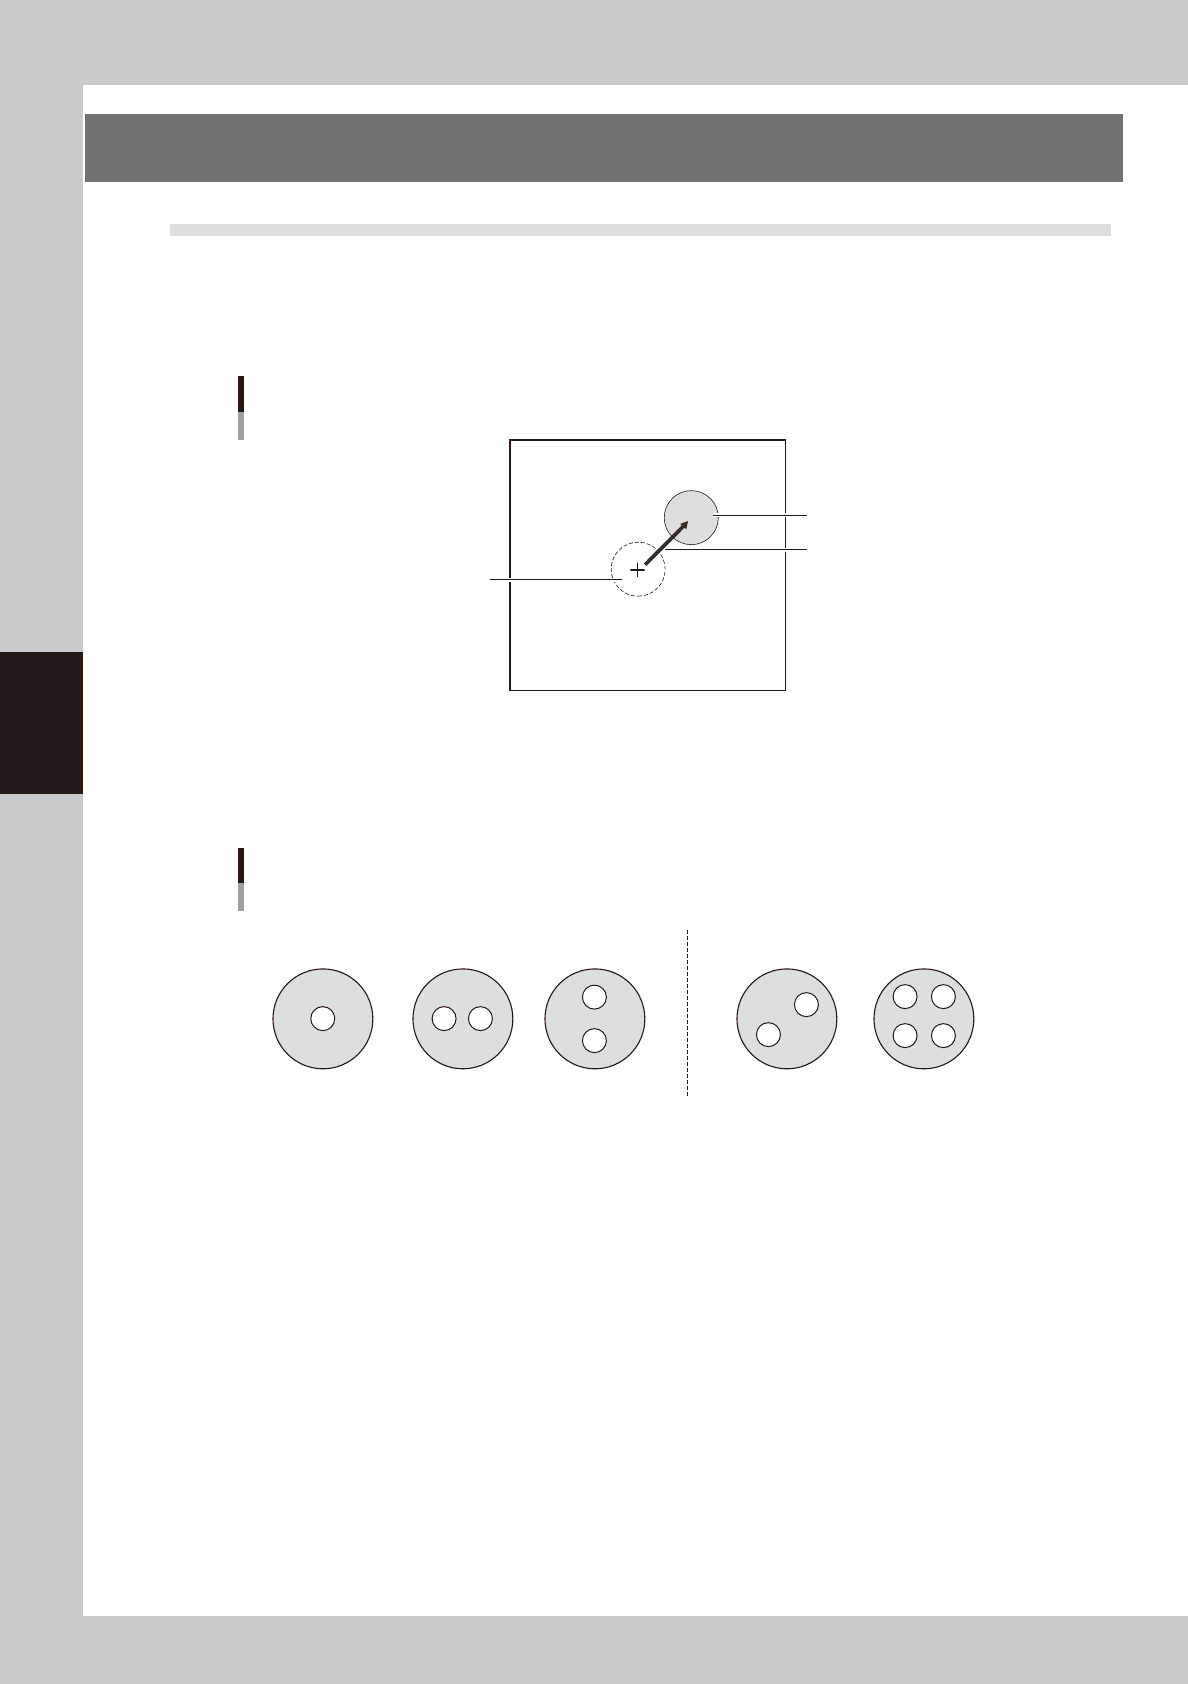
4.1 Overview and item restrictions
This function measures the deviation in dispensing position caused by the individual nozzle accuracy and the
rattle or play at the nozzle joint, and corrects it to improve the dispensing accuracy. This function recognizes
the dot dispensed on the dot station or dot plate, finds the deviation from the ideal dispensing position, and
corrects it when dispensing on the board.
Deviation from ideal dispensing position
Ideal dispensing position
Dispensing position
Amount of deviation
63402-N7-00
Nozzle shapes compatible with position correction dispensing are 1-shot and 2-shot nozzles (same for solder
nozzles). This function is not compatible with 2-shot nozzles whose hole position is offset in both X and Y
directions.
Example of compatible nozzles
Usable Not usable
63403-N7-00
• The “Execute after Board Data Loaded” and “Execute after Cover Opened” parameters on the [Machine] - “Setting”
- “Machine Data” - “Precision” - “Pos Correct Dispense” screen are supported by V4.42STD R1.000 or later versions.
• The dot plate is supported by V4.42STD R1.000 or later versions.
• When using a dispensing liquid whose dots are not recognizable, the liquid amount correction and position correction
may not be possible. (The dot plate in particular does not have backlighting, so dots may not be recognized even if
they are recognized on the dot station.)
• Position correction dispense data will be lost when board data is saved in machines (YGD, HSD-XG, etc.) or offline
software that do not support the board data containing position correction dispense data.
• Y.Fact is supported by V1.41STD R1.000 or later versions.
4-35
4
Making the dispensing stable
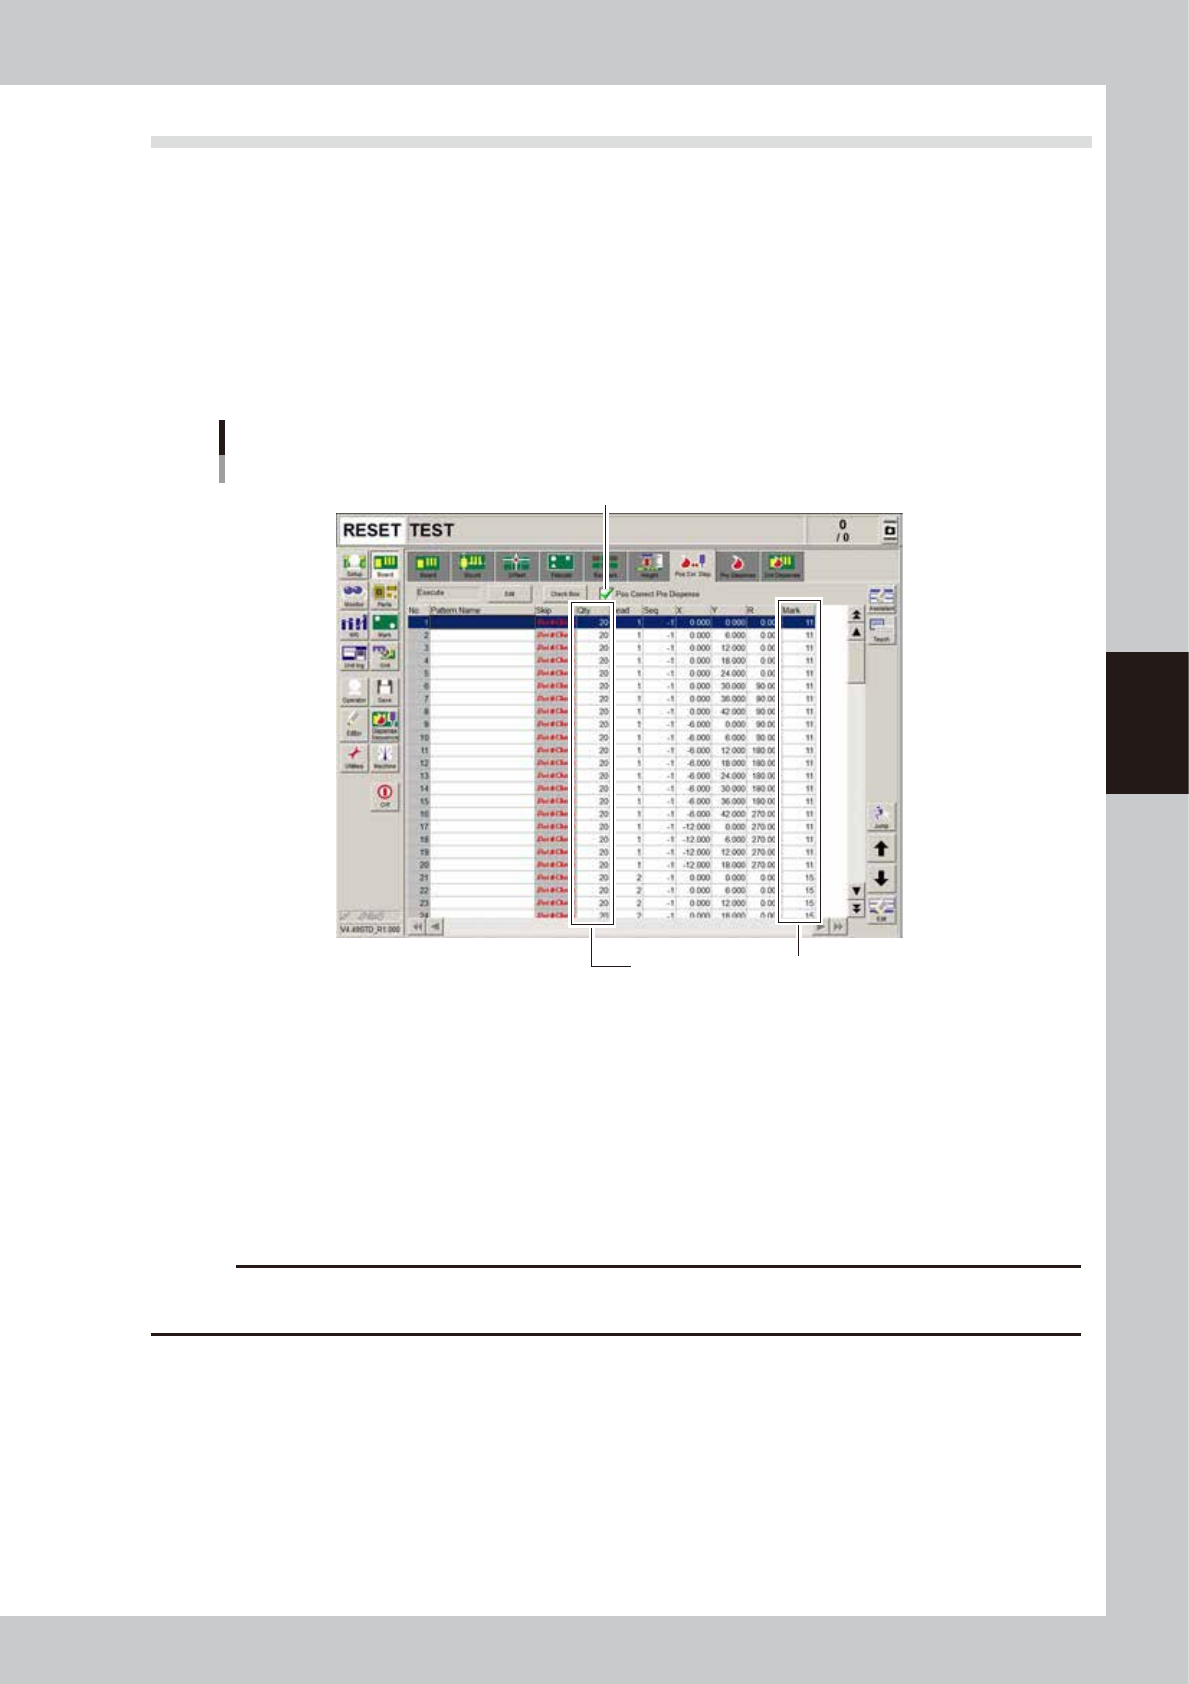
4.2 Setting method
Follow these steps to make setting.
1
Open the position correction dispense data screen.
Press the [Board] button and select the [Pos. Cor. Disp.] tab.
2
Create position correction dispense data.
Create the data at 4 angles (0/90/180/270) for each head used to dispense dots. Copy the coordinates
of the board data (YSD_96001_3HEAD.ygx) and enter the liquid amount and mark No. according to the
predispensing conditions. If not using predispensing, enter the dispensing liquid amount and mark
values.
“Pos. Cor. Disp.” tab screen
Step3
Make a match with predispensing data
64405-N7-00
n
To copy
1. Open board data that has already been created.
2. Open the [Board] – [Pos. Cor. Disp.] tab screen and press the [Assistant] button.
3. Move the cursor to the start row of the range you want to copy and press the [Row Selection] button.
4. Click the last row of the range you want to copy and press the [Copy] button.
5. Open the board data where you want to paste the data.
6. Open the [Board] – [Pos. Cor. Disp.] tab screen and press the [Assistant] button.
7. Move the cursor to the start row where you want to paste the data, and press the [InsPaste] button.
c
CAUTION
Create the number of data (“Dot&Check” in “Skip” column) that is more than “Minimum Sample Num” specified on
the [Machine] - “Pos Correct Dispense” screen.
3
Place a check in the “Pos Correct Pre Dispense” check box.
Before correcting the dispensing position, perform predispensing in most cases. This is possible only when
the dot station is used as the predispensing location.