YSD_Users_E.pdf - 第383页
3-9 3 Periodic maintenance items 4. One-year inspection 4.1 Cleaning and greasing the W axis 4.1.1 Cleaning and greasing the W-axis ball screws 1 Set the conv ey or width to maximum. Press the [Width] button on the Setup…
3-8
3
Periodic maintenance items
3. Six-month inspection
3.1 Cleaning the base section filter
1
Turn off the machine power.
End the software, and turn the machine
power switch to OFF.
2
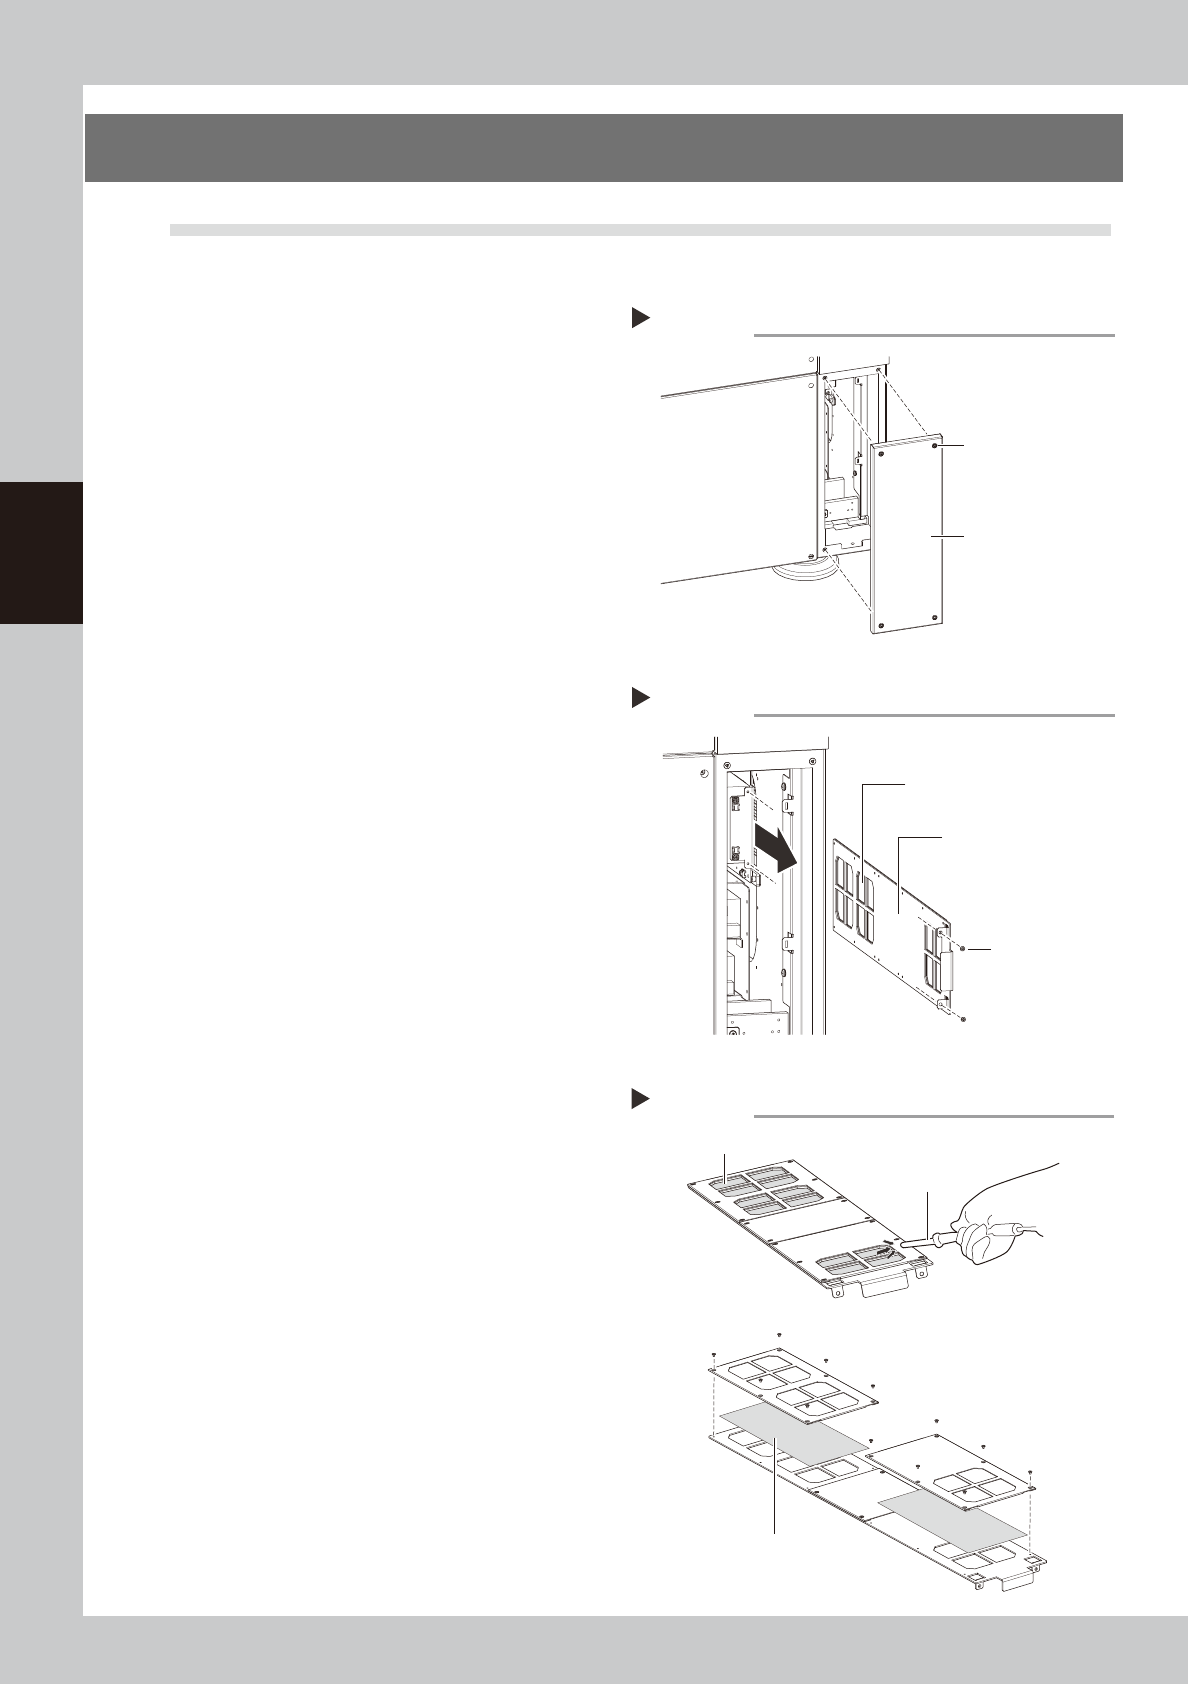
Remove the cover.
1. Using a Phillips screwdriver, loosen the
screws securing the lower right cover on
the back of the machine.
2. Remove the cover.
53330-N7-00
3
Remove the filter unit.
1. Using a Phillips screwdriver, remove the
two screws securing the filter unit.
2. Pull out the filter unit.
53331-N7-00
4
Clean the filter unit.
1. Suction up any dirt accumulated in the
filter by using a vacuum assembly
(option) or a mini-vacuum cleaner.
2. Proceed to step 6 if there is no problem
with the cleaned filter.
53332-N7-00
5
Replace the filter.
If the dirt and grime on the filter could not
be removed in step 4 or the filter is broken or
damaged, replace it with a new filter.
Using a Phillips (+) screwdriver, remove the
screws for the plate enclosing the filter as
shown in the figure on the right and replace
it with a new filter.
6
Reattach the filter unit.
Reinstall the filter unit back in its original
position using the reverse of the procedure
in steps 2 to 3.
Removing the cover
Step 2
Back lower right cover
Screws securing cover
Removing the filter unit
Step 3
Filter
Filter unit
Mounting screws
Cleaning and replacing the filter
Step 4, 5
Filter
When replacing the filter
Vacuum assembly or
mini-vacuum cleaner
Filter
3-9
3
Periodic maintenance items
4. One-year inspection
4.1 Cleaning and greasing the W axis
4.1.1 Cleaning and greasing the W-axis ball screws
1
Set the conveyor width to maximum.
Press the [Width] button on the Setup screen
to display the "Conveyor Width" dialog, and
select "Max Width".
e
2
Press the emergency stop button.
The machine must be in emergency stop to
ensure safety during work.
3
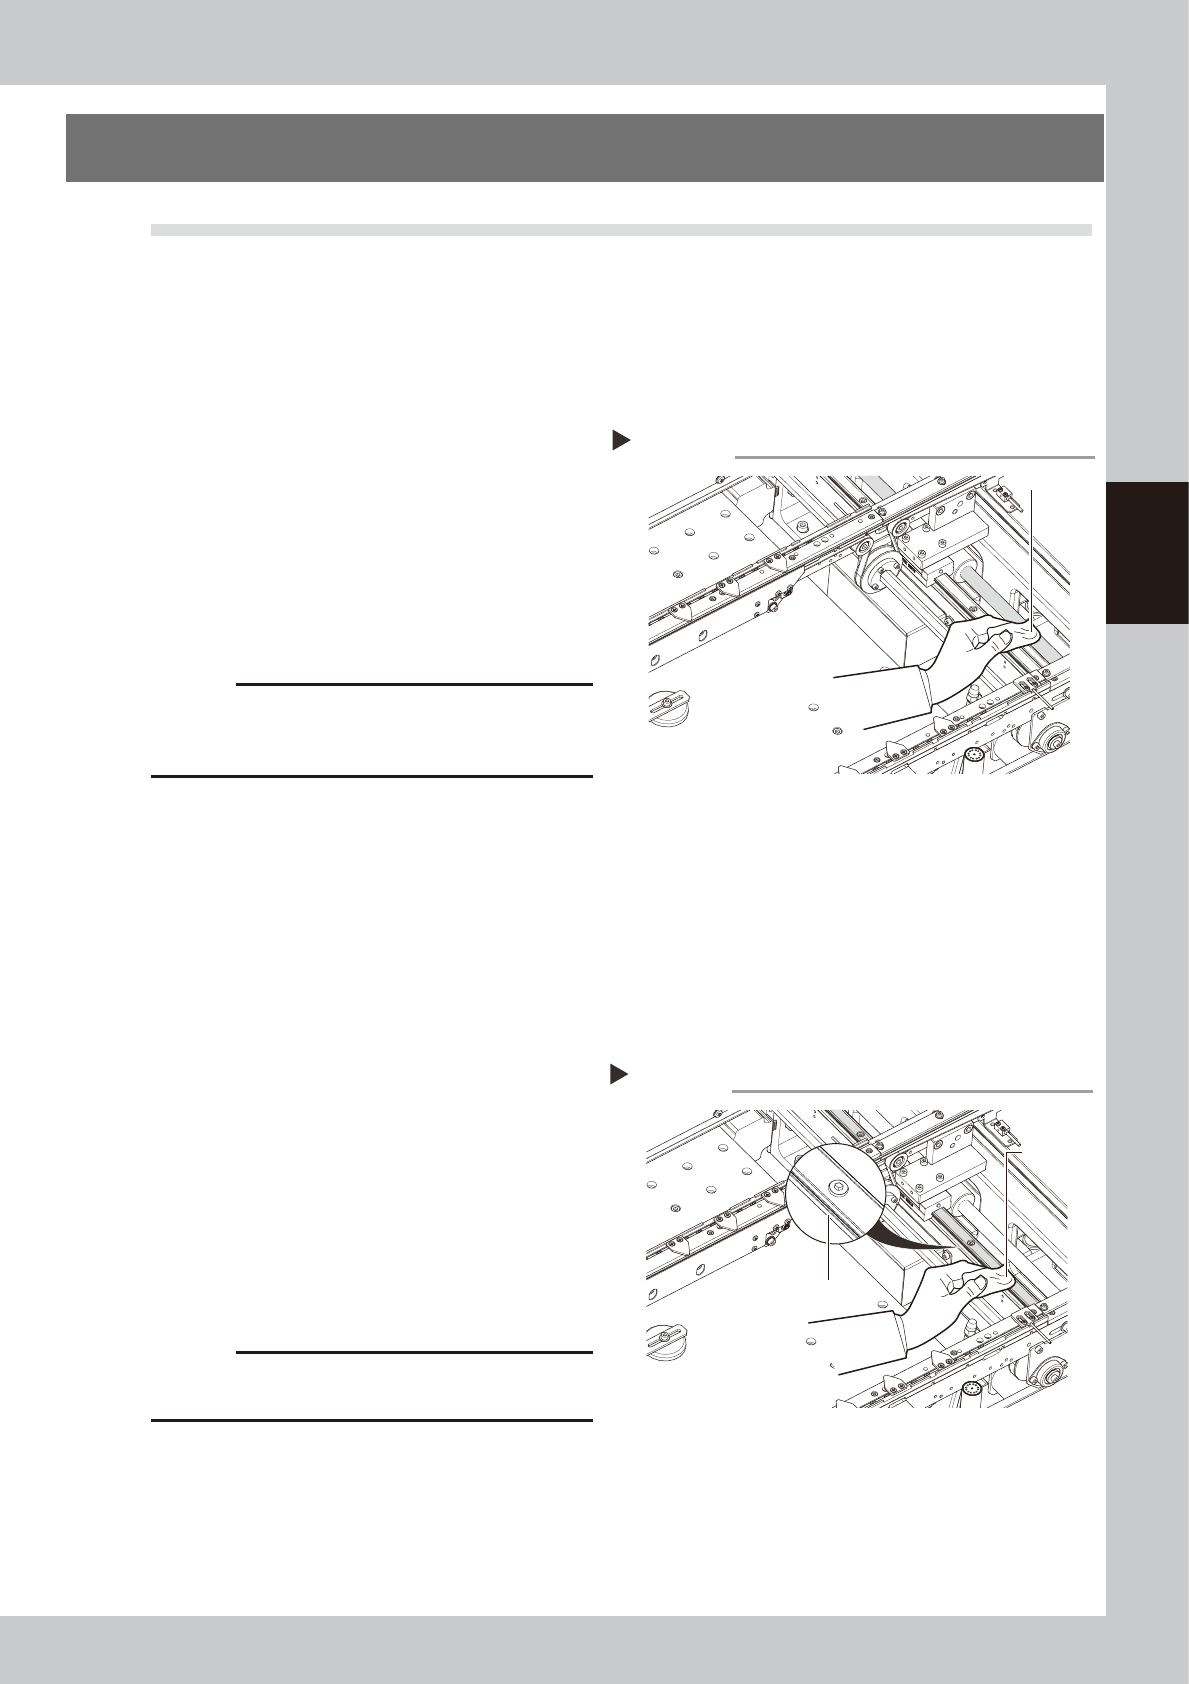
Clean the ball screws.
Wipe away the old grease and dirt from the
ball screw with a lint-free cloth or paper
towel (for clean room use).
53315-N7-00
c
CAUTION
Wipe away the old grease and dirt in the lead groove
of the ball screw. Also check that no debris or residue
remains in the lead groove.
4
Apply grease to the ball screws.
Apply the specified grease (NSL) by hand
uniformly over the surface and lead groove
of the ball screw.
4.1.2 Cleaning and greasing the W-axis guides
1
Set the conveyor width to maximum.
Press the [Width] button on the Setup screen
to display the "Conveyor Width" dialog, and
select "Max Width".
e
2
Press the emergency stop button.
The machine must be in emergency stop to
ensure safety during work.
3
Clean the linear guides.
Move the head (or conveyor rails) to one
end of its axis, and wipe away the old
grease and dirt from the linear guides with a
lint-free cloth or paper towel.
53316-N7-00
c
CAUTION
Wipe away thoroughly the old grease in the grooves of
the linear guide rails.
4
Apply new grease to the guide rails.
Apply grease (NSL) by hand to the guide
surface and groove uniformly.
Cleaning the W-axis ball screw
Step 3
Paper wipe
Cleaning the W-axis guide
Step 3
Paper wipe
Guide groove
3-10
3
Periodic maintenance items
4.2 Cleaning and greasing the Z axis
4.2.1 Cleaning and greasing the Z-axis guide, ball screw and shafts
e
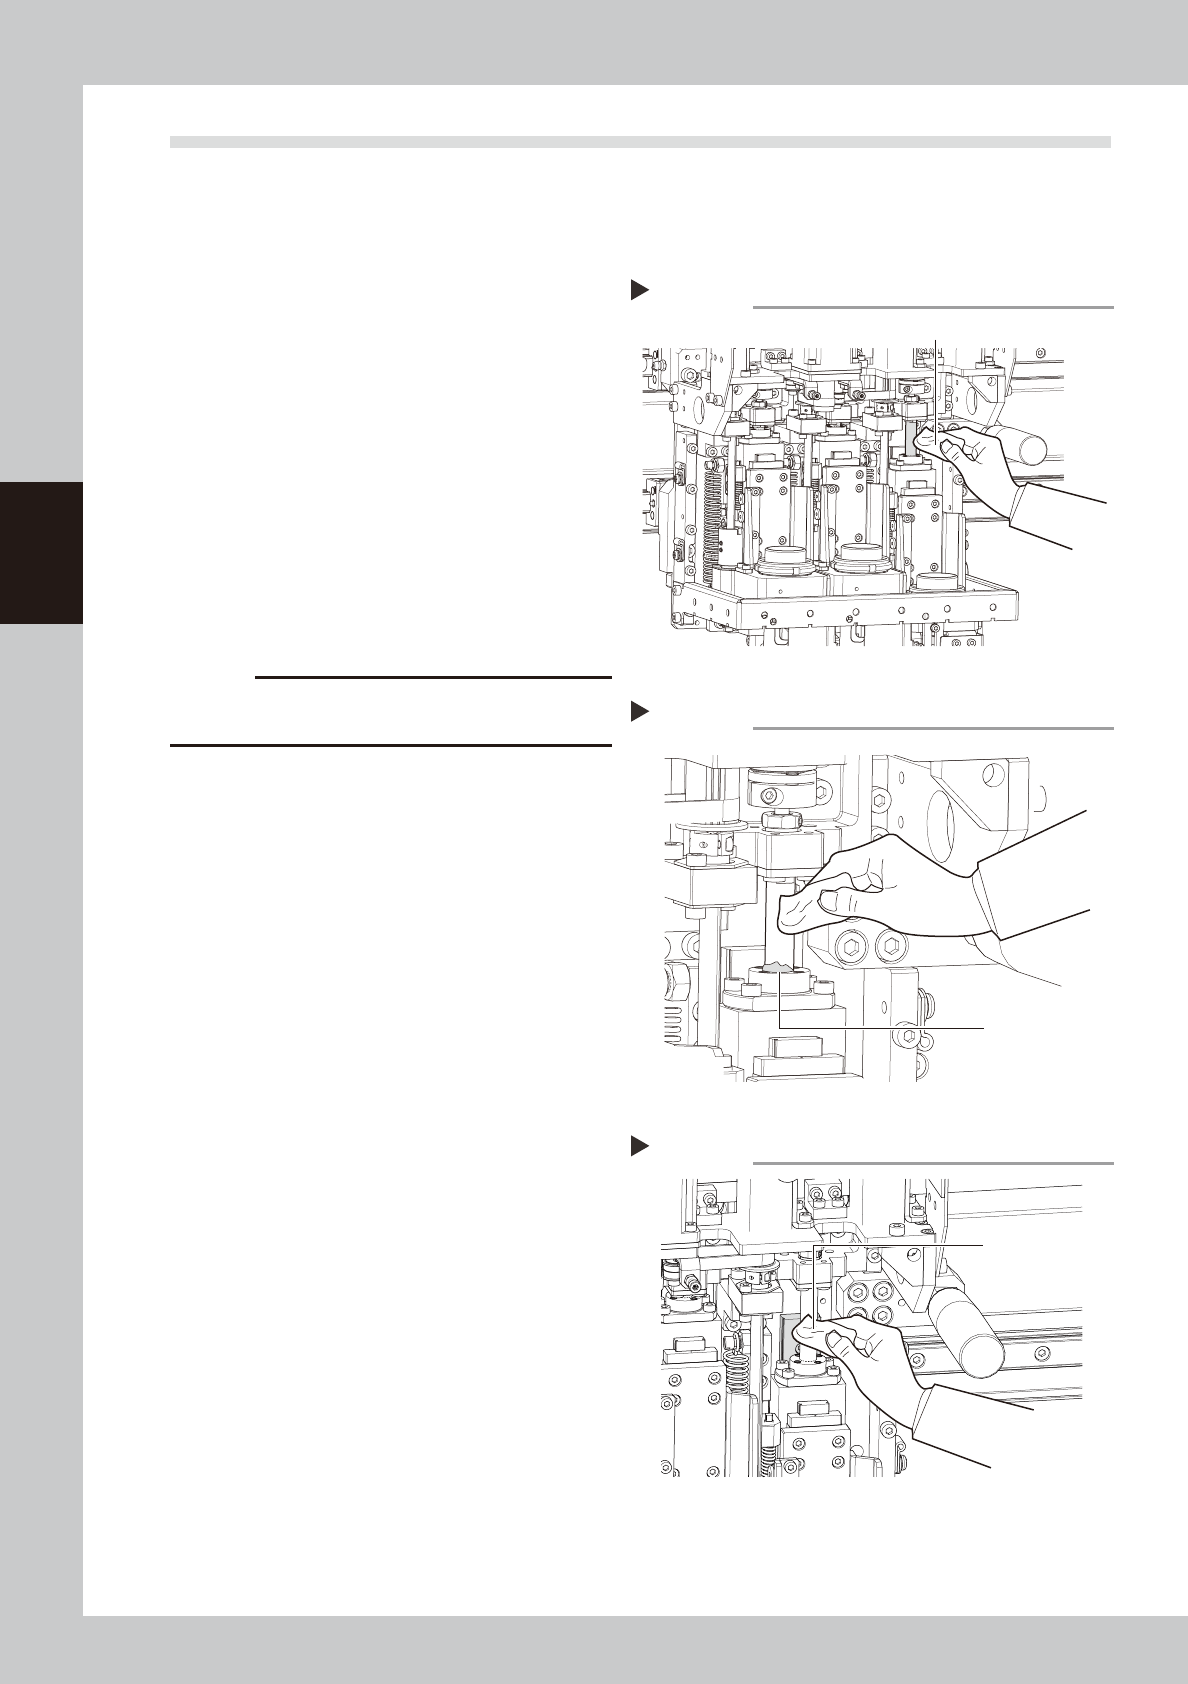
1
Move the head.
1. Press the [Replace Syringe] button on the
Setup screen.
2. Press the [Move default] button.
3. Press the emergency stop button and
then open the cover.
2
Clean the ball screw and spline
shafts.
Ball screw
Lower the Z axis and wipe the ball screw
with a paper wipe.
Spline shafts
Wipe the spline shaft of each head with a
paper wipe.
53317-N7-00
c
CAUTION
Wipe away the old grease and dirt in the lead groove
of the ball screw.
3
Apply grease.
Ball screws
Apply grease by hand to the entire ball
screw.
Spline shafts
Apply a thin coat of grease by hand to the
entire spline shaft of each head.
4
Wipe away excess grease.
Move the head up and down by hand a few
times and wipe away excess grease which
has collected at the nut section.
53318-N7-00
5
Clean and grease the guide.
Clean and grease the guide with the same
procedure as for the ball screw.
53328-N7-00
Cleaning the Z-axis ball screw
Step 2
Paper wipe
Wiping off grease on the Z-axis ball screw
Step 4
Excess grease
Cleaning the Z-axis guide
Step 5
Paper wipe