YSD_Users_E.pdf - 第388页
3-14 3 Periodic maintenance items 4.5 Cleaning and greasing the hexagonal spline 1 Set the conv ey or width to maximum. Press the [Width] button on the Setup screen to display the "Conveyor Width" dialog, and s…
3-13
3
Periodic maintenance items
4.4.2 Replacing the conveyor belt
If the conveyor belt is worn and needs to be replaced, use the following procedure to replace the belt.
e
1
Press the emergency stop button.
The machine must be in emergency stop to
ensure safety during work.
2
Slacken the belt.
1. Using an oil-based marker pen, put a
mark to indicate the current tension
pulley position.
2. Loosen the tensioner bolt with The hex
wrench (4, 5mm) and slide the bolt fully
along the elongate hole (in the direction
of slackening the belt).
53321-N7-00
3
Detach the belt.
Using the hex wrench (3mm), loosen the bolt
securing the belt drive pulley and pull out
the shaft. Then detach the belt from the
pulley and take it out through the space
between the pulley and the shaft.
53323-N7-00
4
Remove the board clamp assembly.
Using the hex wrench (3mm), remove the
four bolts securing the board clamp
assembly and remove the board clamp
assembly.
53324-N7-00
5
Detach the belt from the conveyor.
6
Clean the conveyor rail.
Use a fine brush or paper wipe to clean the
gap between the conveyor rail and board
guide.
7
Attach a new belt.
1. Temporarily fit a new belt onto the pulley.
2. Reconnect the shaft to the pulley and
tighten the bolt.
3. Tighten the belt tensioner bolt while
applying a proper tension to the belt by
moving the belt tensioner bolt.
8
Reattach the board clamp assembly.
Reinstall the board clamp assembly in its
original position.
9
Check the belt rotating condition.
On the [Unit]-[Conveyor] tab, press the
[Right] button or [Left] button to turn on the
conveyor motor and check the belt rotation.
If the rotation speed fluctuates or there is
slack in the belt, adjust the position of the
tensioner bolt and then check the rotation
again.
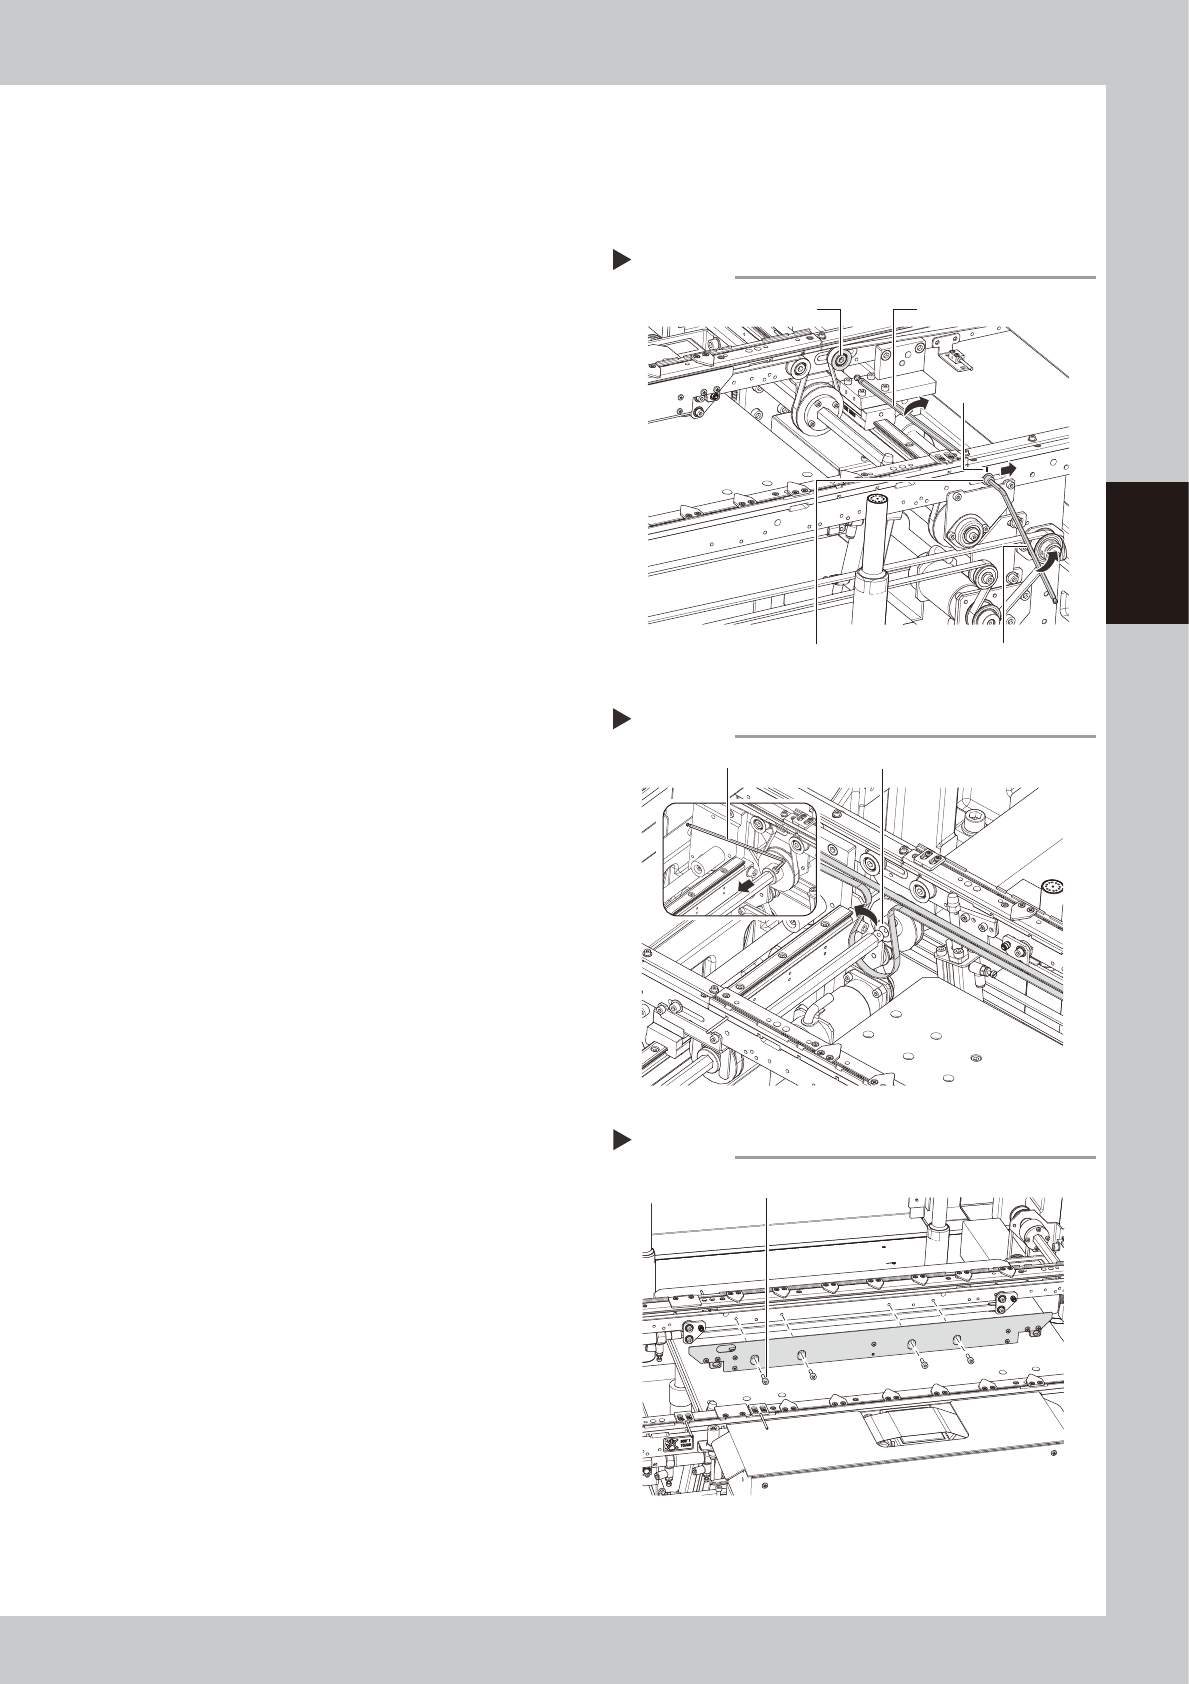
Removing the conveyor belt
Step 2-3
Hex wrench (5mm)
Marking
Hex wrench (4mm)Tensioner bolt
Tension pulley
Detaching the belt from the conveyor
Step 3
Hex wrench (3mm) Space between pulley and shaft
Removing the board clamp
Step 4
Bolt securing the board clamp assembly
3-14
3
Periodic maintenance items
4.5 Cleaning and greasing the hexagonal spline
1
Set the conveyor width to maximum.
Press the [Width] button on the Setup screen
to display the "Conveyor Width" dialog, and
select "Max Width".
e
2
Press the emergency stop button.
The machine must be in emergency stop to
ensure safety during work.
3
Clean the hexagonal spline.
Wipe away the old grease and dirt from the
hexagonal spline with a paper wipe.
53325-N7-00
4
Apply grease.
Apply the specified grease to your finger,
and apply a thin coat evenly on the surface
of the hexagonal spline.
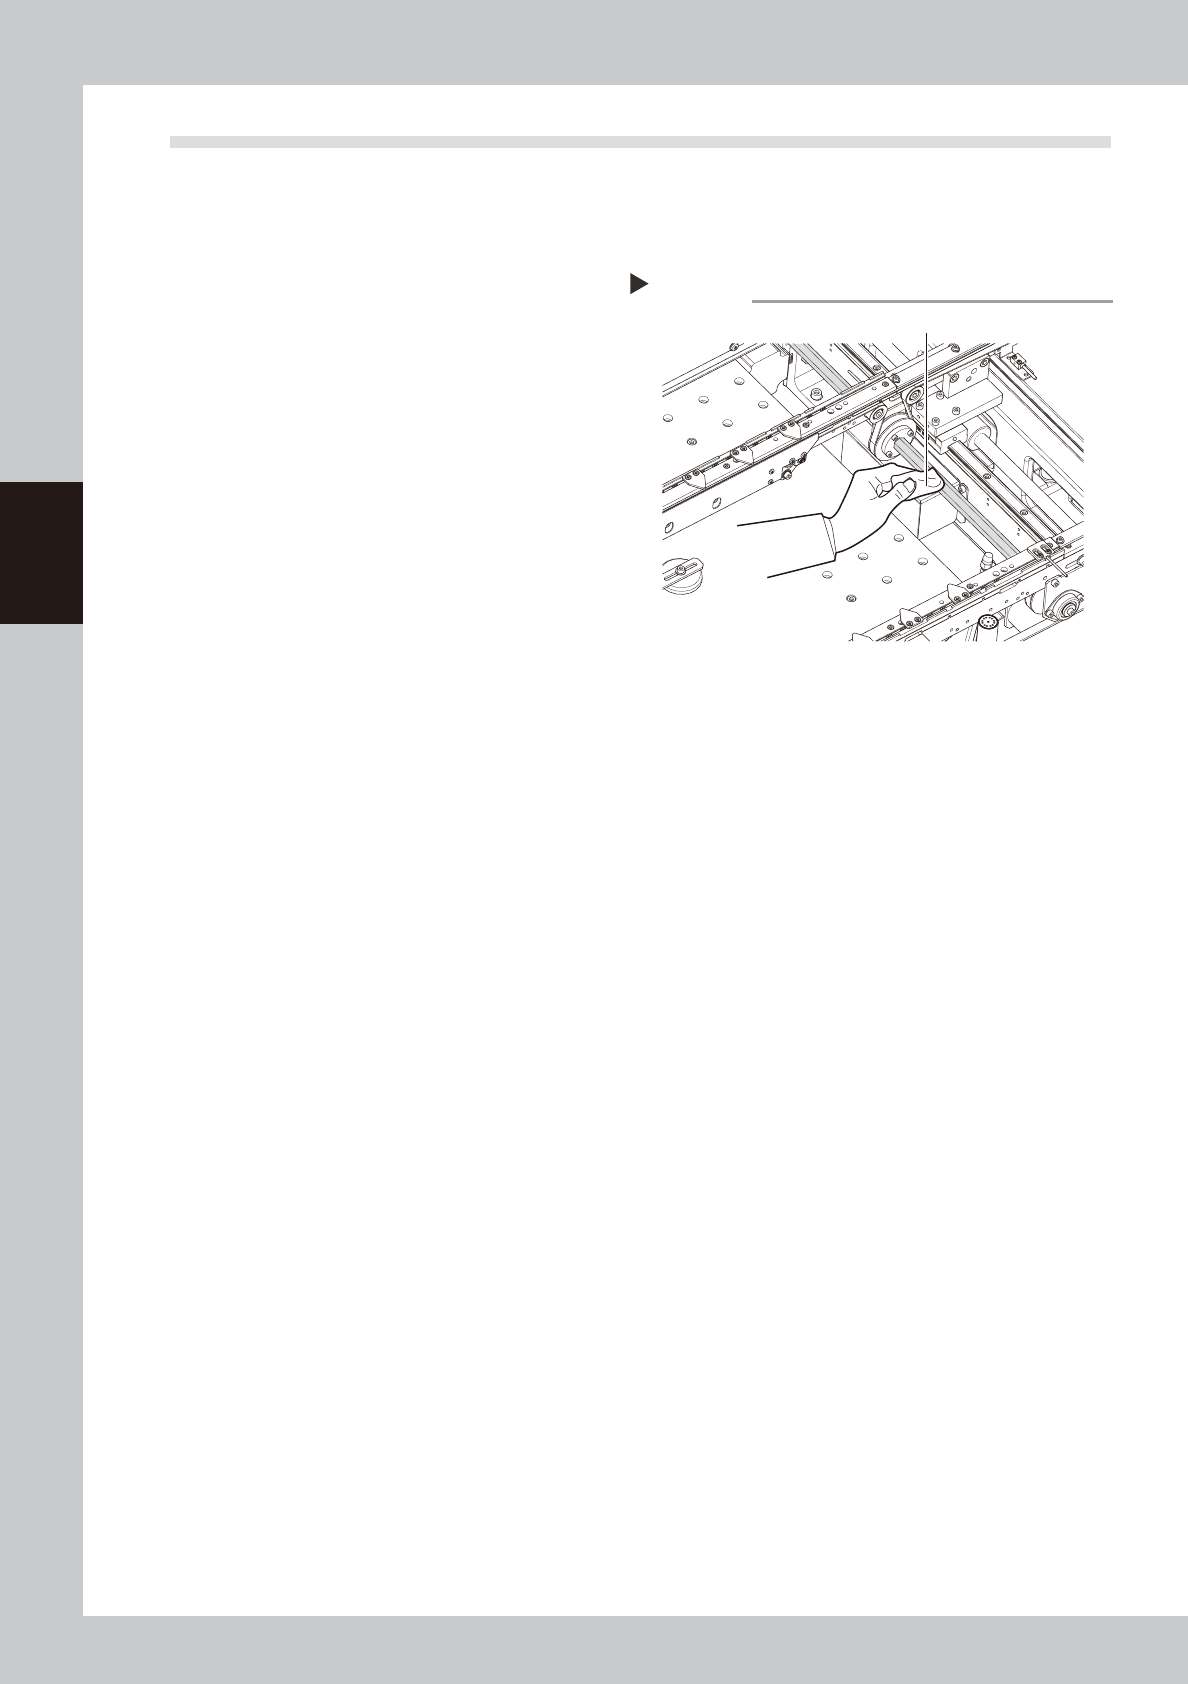
Cleaning the hexagonal spline
Step 3
Paper wipe
3-15
3
Periodic maintenance items
4.6 Inspecting and cleaning the air/mist filters
Air/mist filters are used to prevent oil, mist and other impurities in the air compressor from penetrating into the
machine. The procedures for inspecting and cleaning these filters are described below.
c
CAUTION
The air coupler should be disconnected to safely perform the work. When disconnecting it, be careful not to allow oil,
water, or impurities to splash outward. Also take care since a large air exhaust sound is produced when disconnecting
the air coupler.
n
Required tools
• Neutral detergent, air blow tool (option), paper wipe
c
CAUTION
When performing air blow, wear dust-proof goggles and mask to protect your face from blow air, etc.
4.6.1 Cleaning the filter cup
1
Check the inside of the filter cup.
Check for oil or water deposits in the filter cup through the window. If the window is dirty, follow the
steps below to clean the filter cup.
TIP
The drain cock at the bottom of the filter cup is an auto-drain type. It automatically drains the oil or water when
deposited in the cup. We recommend connecting a hose to this drain cock.
2
Remove the filter cup.
While pressing the button on the side of the
filter cup, turn it to the left and pull out the
filter cup downward. The cup you have
removed has a double structure. The inner
transparent cup should be cleaned.
53326-N7-00
3
Clean the inside of the filter cup.
1. Lightly clean the filter cup with water.
2. Then, pour water-diluted neutral
detergent into the filter cup and clean
the inside while shaking it.
3. Air blow the filter cup and then wipe
away any moisture with a paper wipe.
4
Reattach the filter cup.
1. Align the button on the side of the cup
with the attach/detach position and
push the cup upwards.
2. Turn the cup counterclockwise until you
hear a click.
5
Reconnect the air hose to the air
coupler.
After connecting the air hose, check that no
air is leaking.
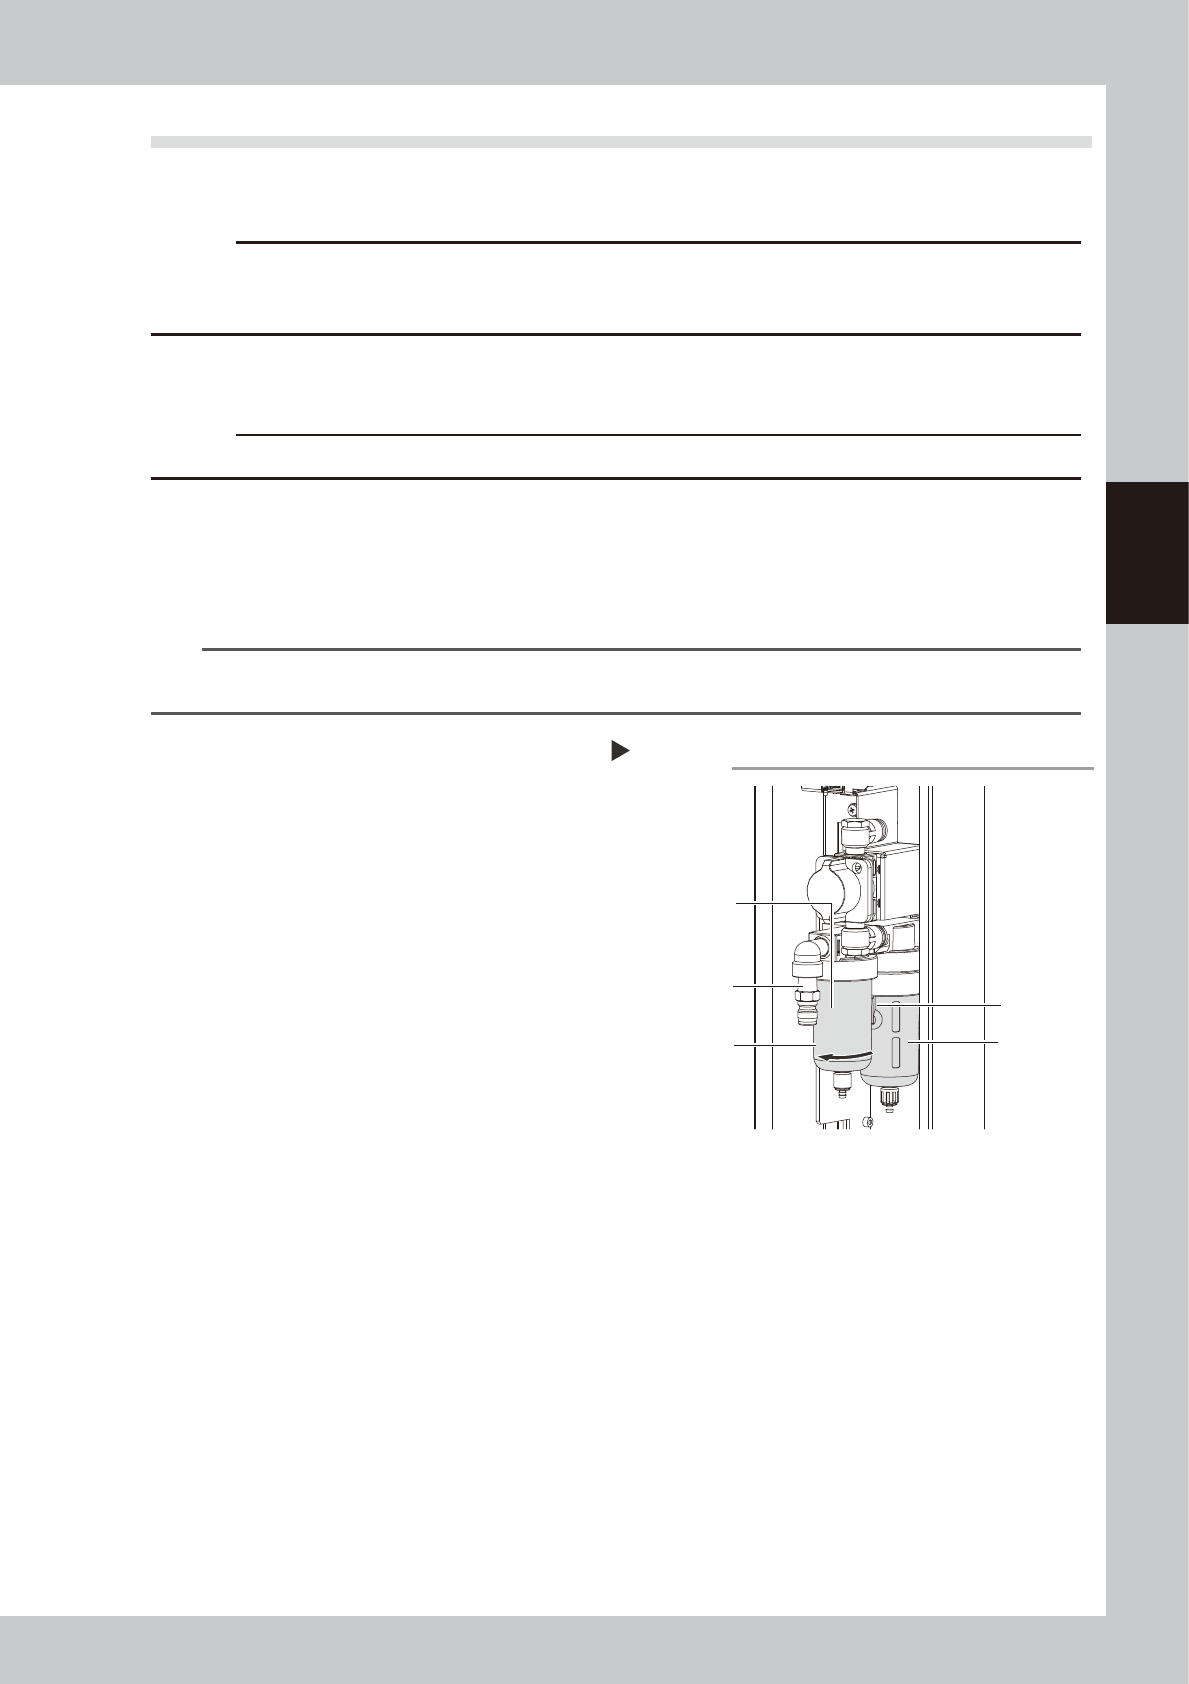
Removing the filter cup
Step 2
Filter cup
Air coupler fitting
Button
Air filter (inside)
Oil mist filter
(inside)