YS24X_Mainte_E - 第141页
6-5 6 How to replace consumable parts 3. Ejector unit 3.1 Replacing an ejector bit 1 Shut off the air supply . T ur n the air supply/exhaust switch inside the machine lower left panel to the right, to stop the air supply…
6-4
6
How to replace consumable parts
n
Using the leaf spring installation tool to replace the leaf springs
When installing the optional purchase part "leaf spring installation tool (P/N:KGS-M8810-00X)" makes it
possible to install the leaf springs more uniformly.
n
NOTE
When you have this tool, install the leaf springs with this tool.
e
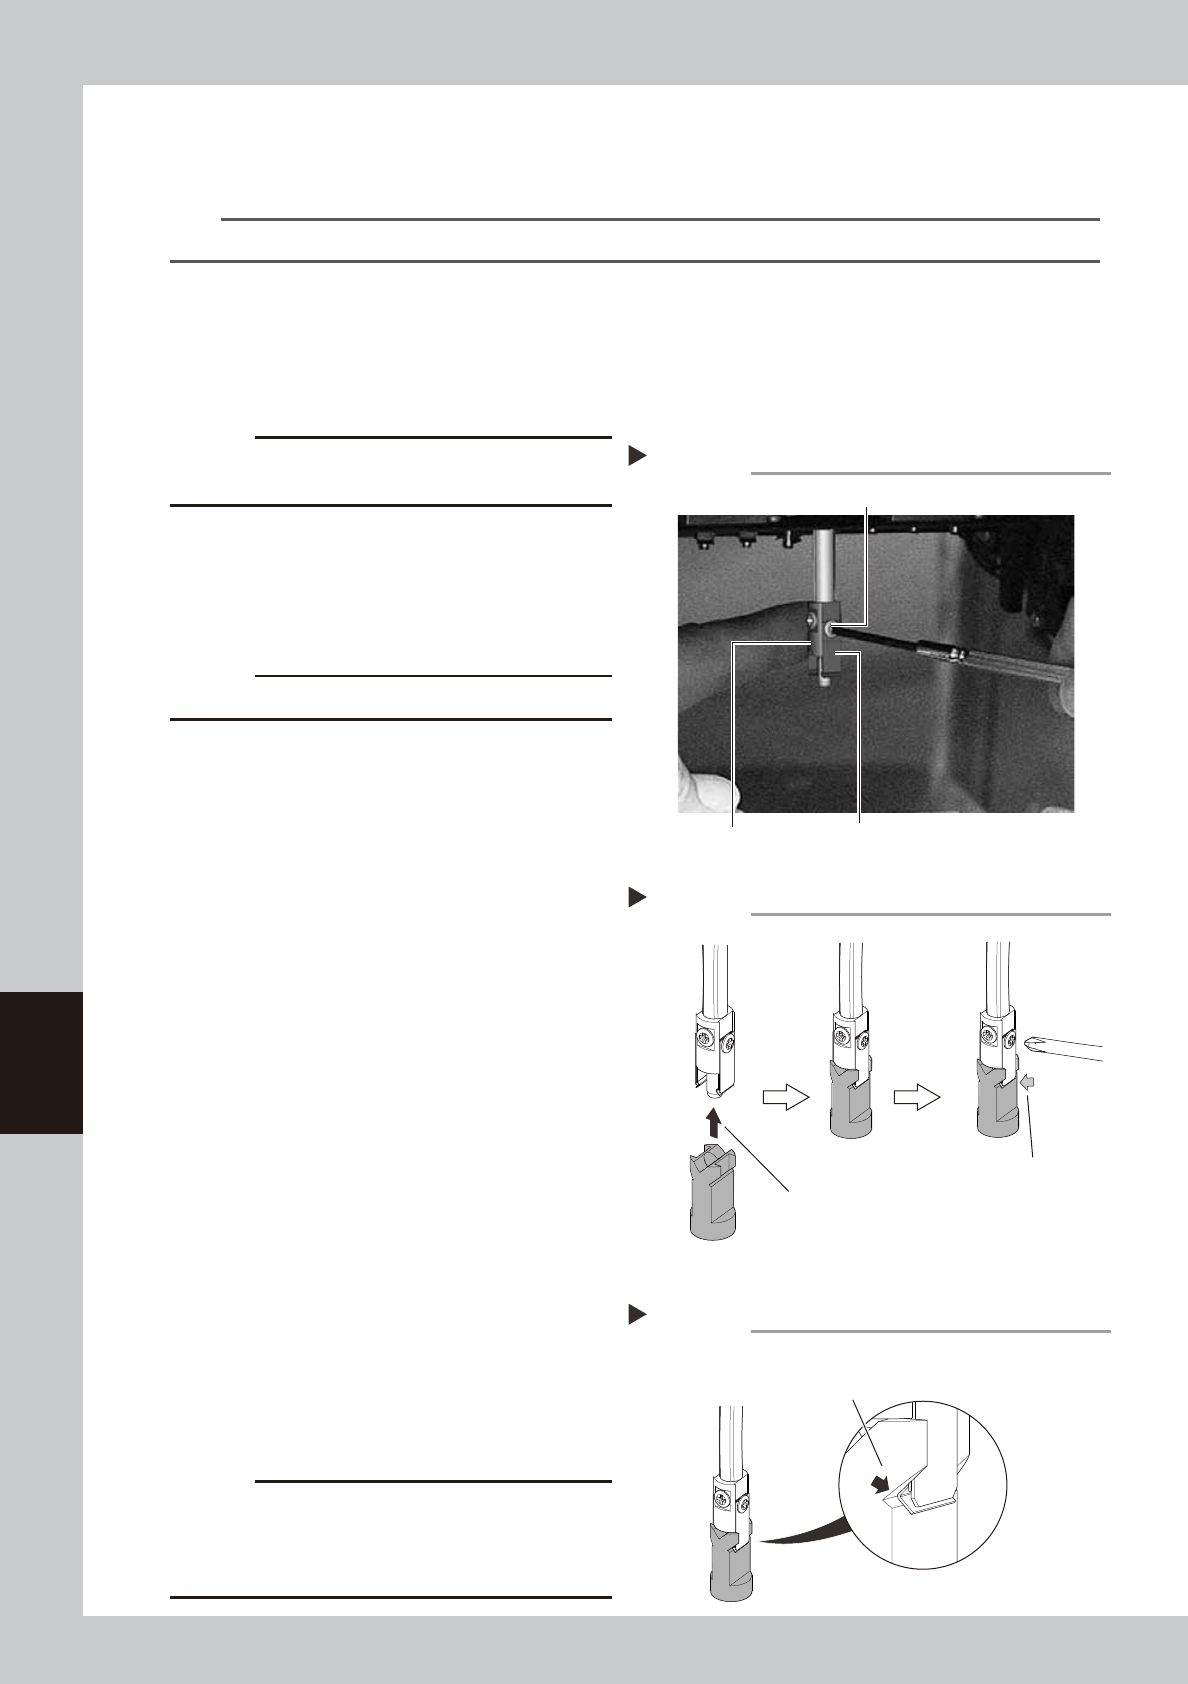
1
Remove the nozzle.
1.
Press the emergency stop button to put the machine in the emergency stop state.
2. If the machine is equipped with a carriage, remove the carriage to allow you to easily access the
head.
3. Place a square cloth under the head unit.
4. Remove the nozzle, to which the leaf springs you want to replace are attached, by hand.
c
CAUTION
When the machine is equipped with a nozzle station,
return all nozzles to the nozzle station.
2
Remove the leaf springs.
Remove the mounting screw with a precision
Phillips screwdriver while holding the shaft,
and then remove the leaf springs you want
to replace.
53629-L4-00
c
CAUTION
Remove the screw of leaf spring side only.
3
Install the leaf springs temporarily.
Loosen the leaf spring mounting screw 1/4
turn from its fully closed position to install the
leaf springs temporarily.
4
Insert the tool.
Insert the tool into the nozzle shaft so that
the groove on the leaf spring installation tool
matches to the convex part of the leaf
spring.
Insert the tool all the way to the upper portion.
53604-L4-00
5
Secure the leaf springs.
With the convex part of the leaf springs and
the groove on the tool held by finger,
tighten the leaf spring mounting screw with
a precision Phillips screwdriver to secure the
leaf springs.
6
Check the leaf spring installation status.
Check that the groove on the tool is tightly in
contact with the convex part of the leaf spring.
53605-L4-00
7
Remove the tool.
8
Check that the nozzle is held securely.
1. Attempt detaching and attaching the
nozzle several times to check that there
is no looseness.
2. Remove the square cloth.
c
CAUTION
Be sure to return the nozzle you have removed to its
original head. When the nozzle has been removed from
the nozzle station (option), return it correctly to the
storage position where you have removed the nozzle.
Insert the tool all the way
to the upper portion.
Leaf spring installation tool
Using the leaf spring installation tool
Step 4,5
Tighten the screw while
holding the convex part of
the leaf spring and the
groove on the tool.
Checking the leaf spring installation status
Step 6
The convex part of the leaf spring must be
tightly in contact with the groove on the tool.
Removing nozzle leaf springs
Step 2
Nozzle holder
Nozzle leaf spring mounting screw
Nozzle leaf spring
6-5
6
How to replace consumable parts
3. Ejector unit
3.1 Replacing an ejector bit
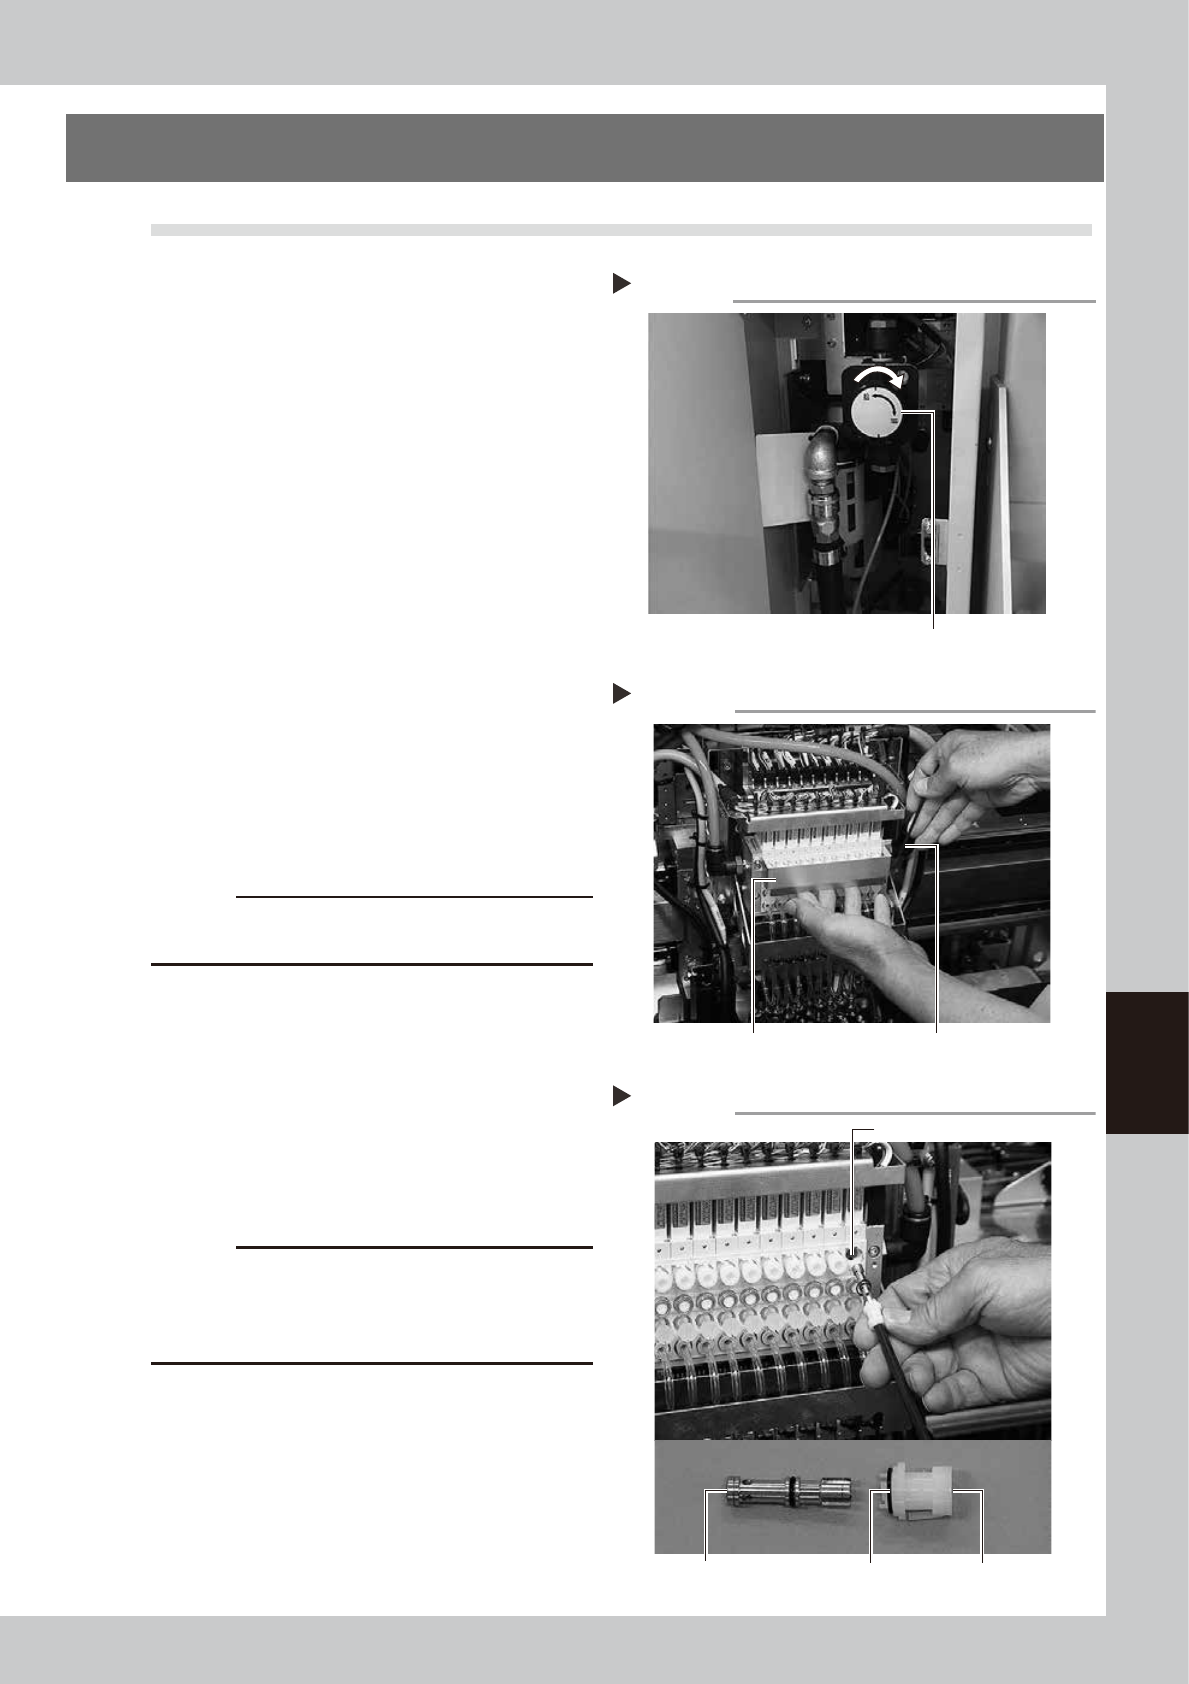
1
Shut off the air supply.
Turn the air supply/exhaust switch inside the
machine lower left panel to the right, to stop
the air supply.
53606-L4-10
2
Move the head (table) to a convenient
position for replacement work.
For the work on the B-table, enter your hand
from a portion above the XA-axis. For the
work on the A-table, move to the rear of the
machine and perform the work from a
portion above the XB-axis.
3
Remove the baffle plate.
1. Place a square cloth under the head unit.
2. Remove the baffle plate with a hex
wrench.
53607-L4-00
4
Pull out the ejector bit by hand.
Remove the cap by turning it to the left with
a hex wrench. As you pull out the cap, you
can also remove the bit together.
53608-L4-00
c
CAUTION
The removed bit cannot be reused. Reuse may cause
component pickup errors.
5
Clean the bit installation hole.
Remove dust or grime in the installation hole
using an air blow tool (available as an
option), lint-free cotton swab, etc.
6
Install a new bit.
Fit an O-ring to the new bit and install one
end of the bit into the cap. Then insert the
bit into the installation hole and close the
cap by turning it to the right.
c
CAUTION
Make sure that the bit cap is locked properly.
Additionally, when closing the cap after the bit has
been inserted, pay special attention so that the O-ring
does not protrude.
7
Reattach the baffle plate.
1. Reattach the baffle plate at its original
position using the hex wrench.
2. Remove the square cloth.
8
Supply air to the machine.
Turn the air supply/exhaust switch inside the
machine lower left panel to the left, to start
the air supply.
Removing the baffle plate
Baffle plate Hex wrench
Step 3
Removing the bit
O-ring CapBit
Step 4
Bit installation hole
Step 1
Shutting off the air supply
Air supply/exhaust switch
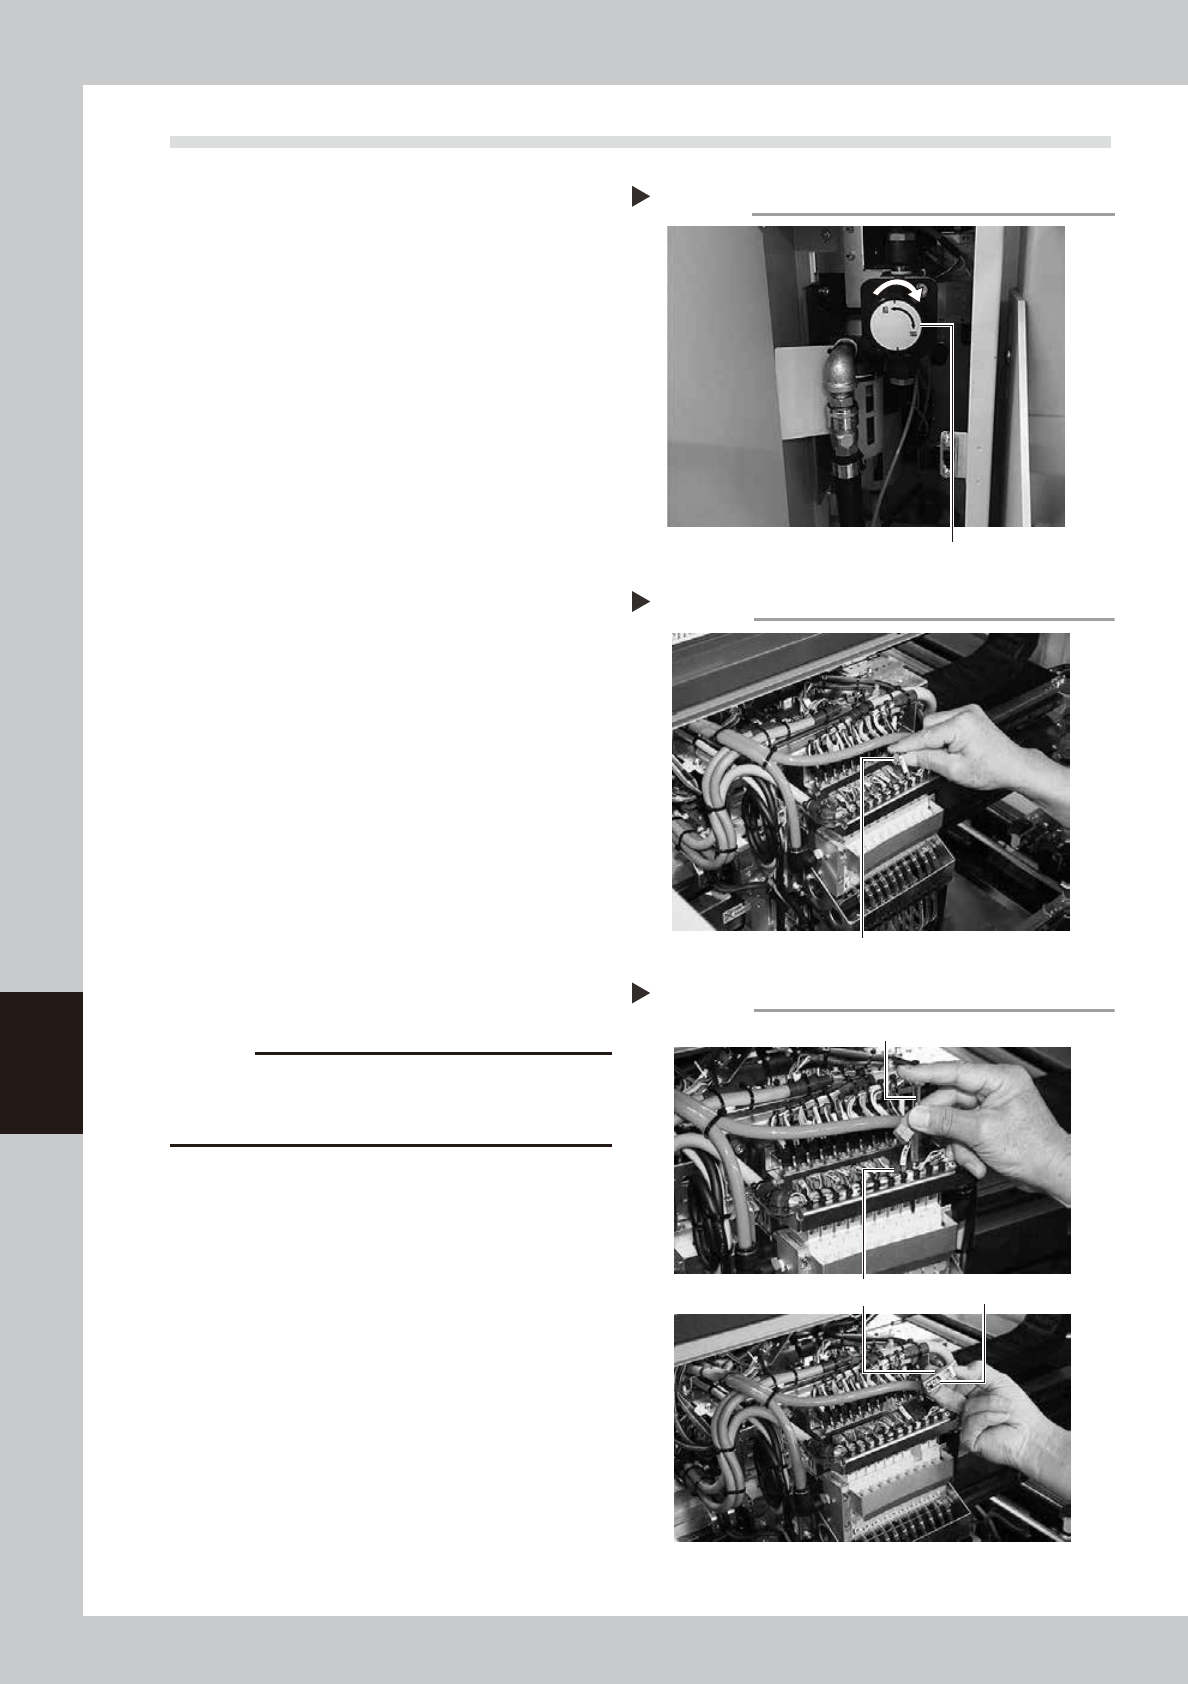
6-6
6
How to replace consumable parts
3.2 Replacing a valve (solenoid valve)
1
Turn OFF the air supply and power
OFF the machine.
1. Quit the software and power OFF the
machine.
2. Turn the air supply/exhaust switch inside
the panel at lower left of the machine
clockwise to turn the air supply OFF.
53606-L4-10
2
Move the head (table) to a
convenient position for replacement
work.
1. For the work on the B-table, enter your
hand from a portion above the XA-axis.
2. For the work on the A-table, move to the
rear of the machine and perform the
work from a portion above the XB-axis.
3
Remove the connector.
1. Place a square cloth below the head.
2. Remove the connector of the valve
(solenoid valve) to replace.
53610-L4-00
4
Remove the valve (solenoid valve)
to be replaced.
Use a precision Phillips screwdriver to loosen
the two screws securing the valve (solenoid
valve) and then remove the valve (solenoid
valve).
53611-L4-00
5
Attach a new valve (solenoid valve).
c
CAUTION
A gasket is attached on the back of the valve. Be
careful not to drop and pinch the gasket when
replacing with a new valve.
6
Reconnect the harness.
1. Place the connector of the replaced
valve (solenoid valve) to its original
place.
2. Remove the square cloth.
7
Supply air to the machine and
power on the machine.
When the machine has started, perform
return-to-origin.
8
Check the operation.
On the [Unit] - [Head] screen, press the
[Vacuum] and [Blow] buttons to check that
no abnormal values appear.
Disconnecting the Connector
Step 3
Connector
Removing the valve (solenoid valve)
Step 4
Precision Phillips screwdriver
Valve (solenoid valve)
Gasket
Step 1
Shutting off the air supply
Air supply/exhaust switch