YS24X_Mainte_E - 第79页
3-12 3 Periodic maintenance items 1.7 Cleaning the camera protective glass Adhered dust, etc., on the multi-camera lighting's protecti ve glass can cause component recognition errors. T o prevent this, it is recomme…
3-11
3
Periodic maintenance items
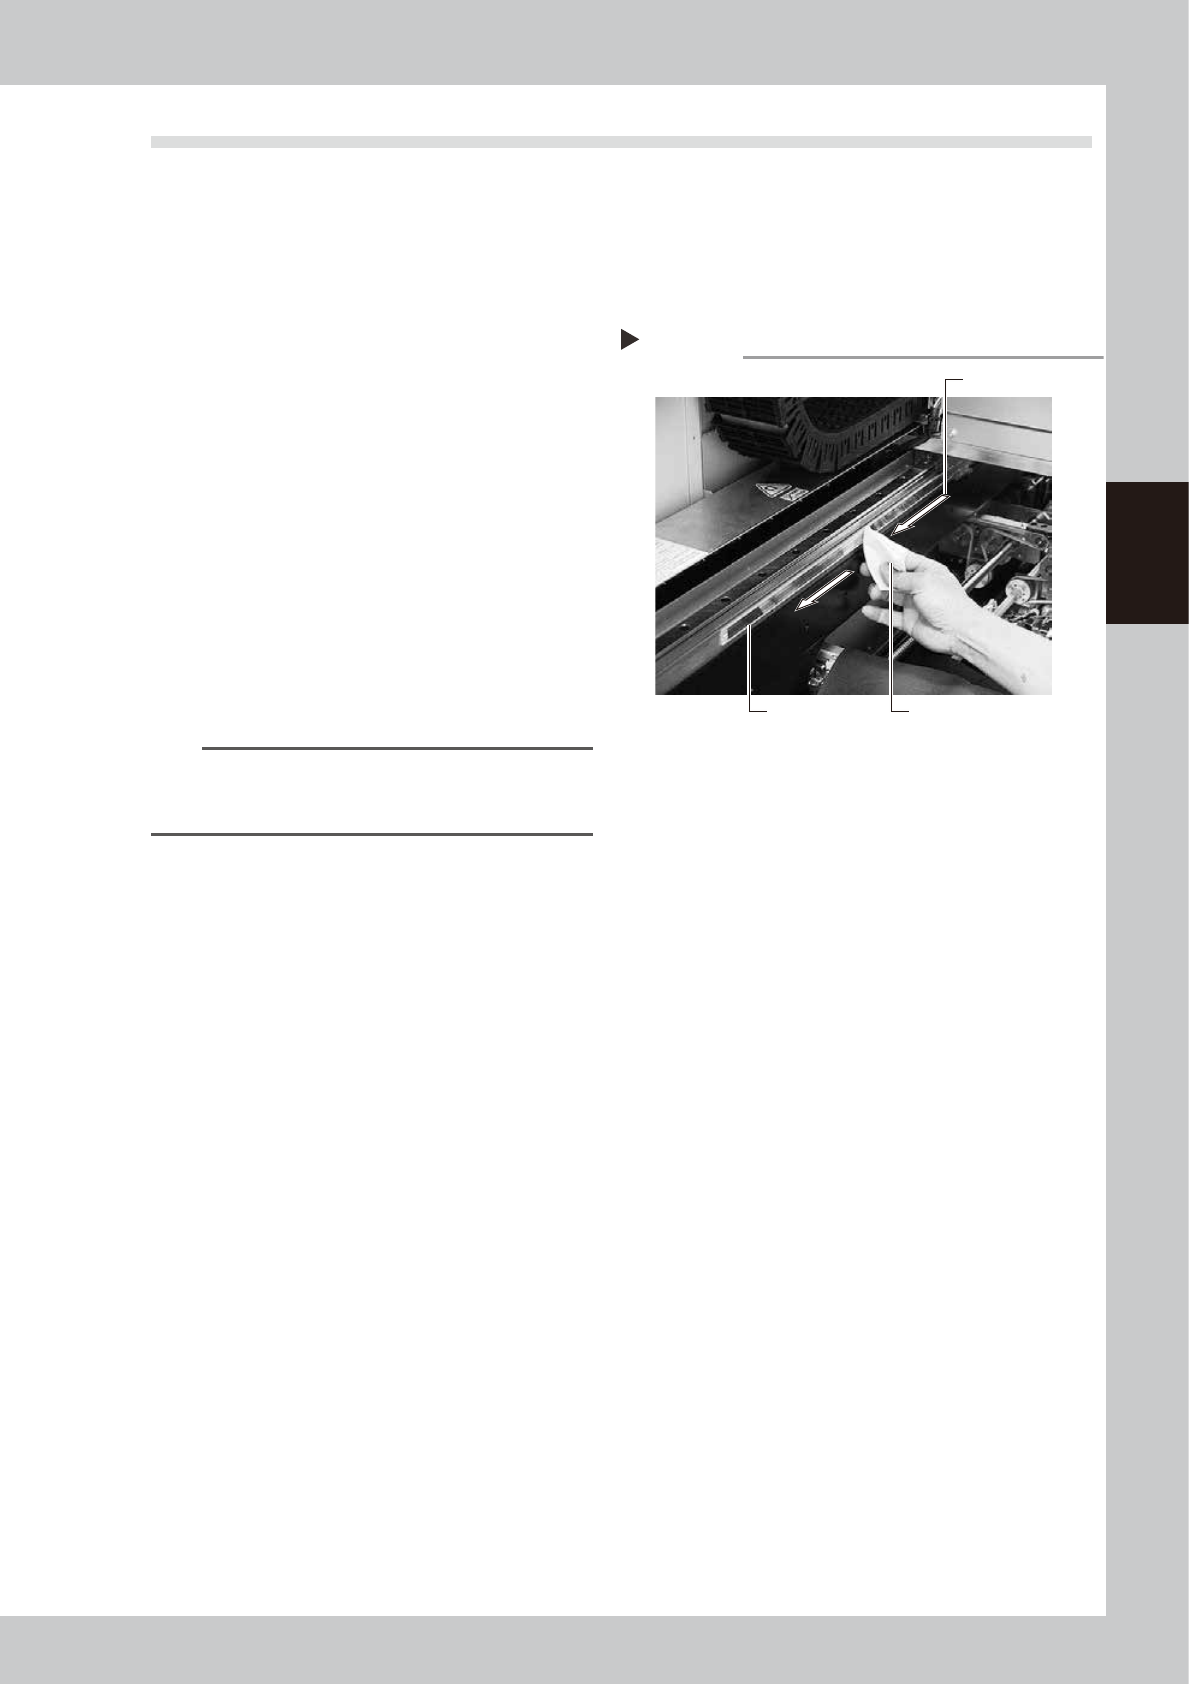
1.6 Cleaning the Y-axis linear scale
If the Y-axis linear scale (scale tape) is dirty, an error may occur when reading the linear scale. To prevent such
an error, the linear scale must be cleaned periodically.
1
Move the head unit to the rear of
the machine.
1. Take off all accessories susceptible to the
magnetic fields, such as a wristwatch
and/or magnetic ID card.
e
2. Press the emergency stop button to open
the machine safety cover.
3. If the machine is equipped with a
carriage, remove the carriage to access
the Y-axis easily.
4. Move the head unit to the rear of the
machine.
2
Clean the scale tape.
Wipe the scale tape in one direction using a
lint-free cloth that does not raise dust
moistened with isopropyl alcohol (absolute
ethanol).
53307-L4-00
n
NOTE
To remove moistened dust, wipe the scale surface at
intervals of about 200 mm while changing the wiping
surface of the lint-free cloth.
3
Wipe the scale surface with a dry
lint-free cloth.
Before the scale surface you wiped in step 2
dries completely, wipe it with a dry lint-free
cloth that does not raise dust.
4
Clean the linear scale on the rear
side.
Open the safety cover at the rear of the
machine, move the head unit to the front,
and clean the rest of the scale.
Step 2
Cleaning the scale tape
Wipe in one direction.
Scale tape Paper wipe
3-12
3
Periodic maintenance items
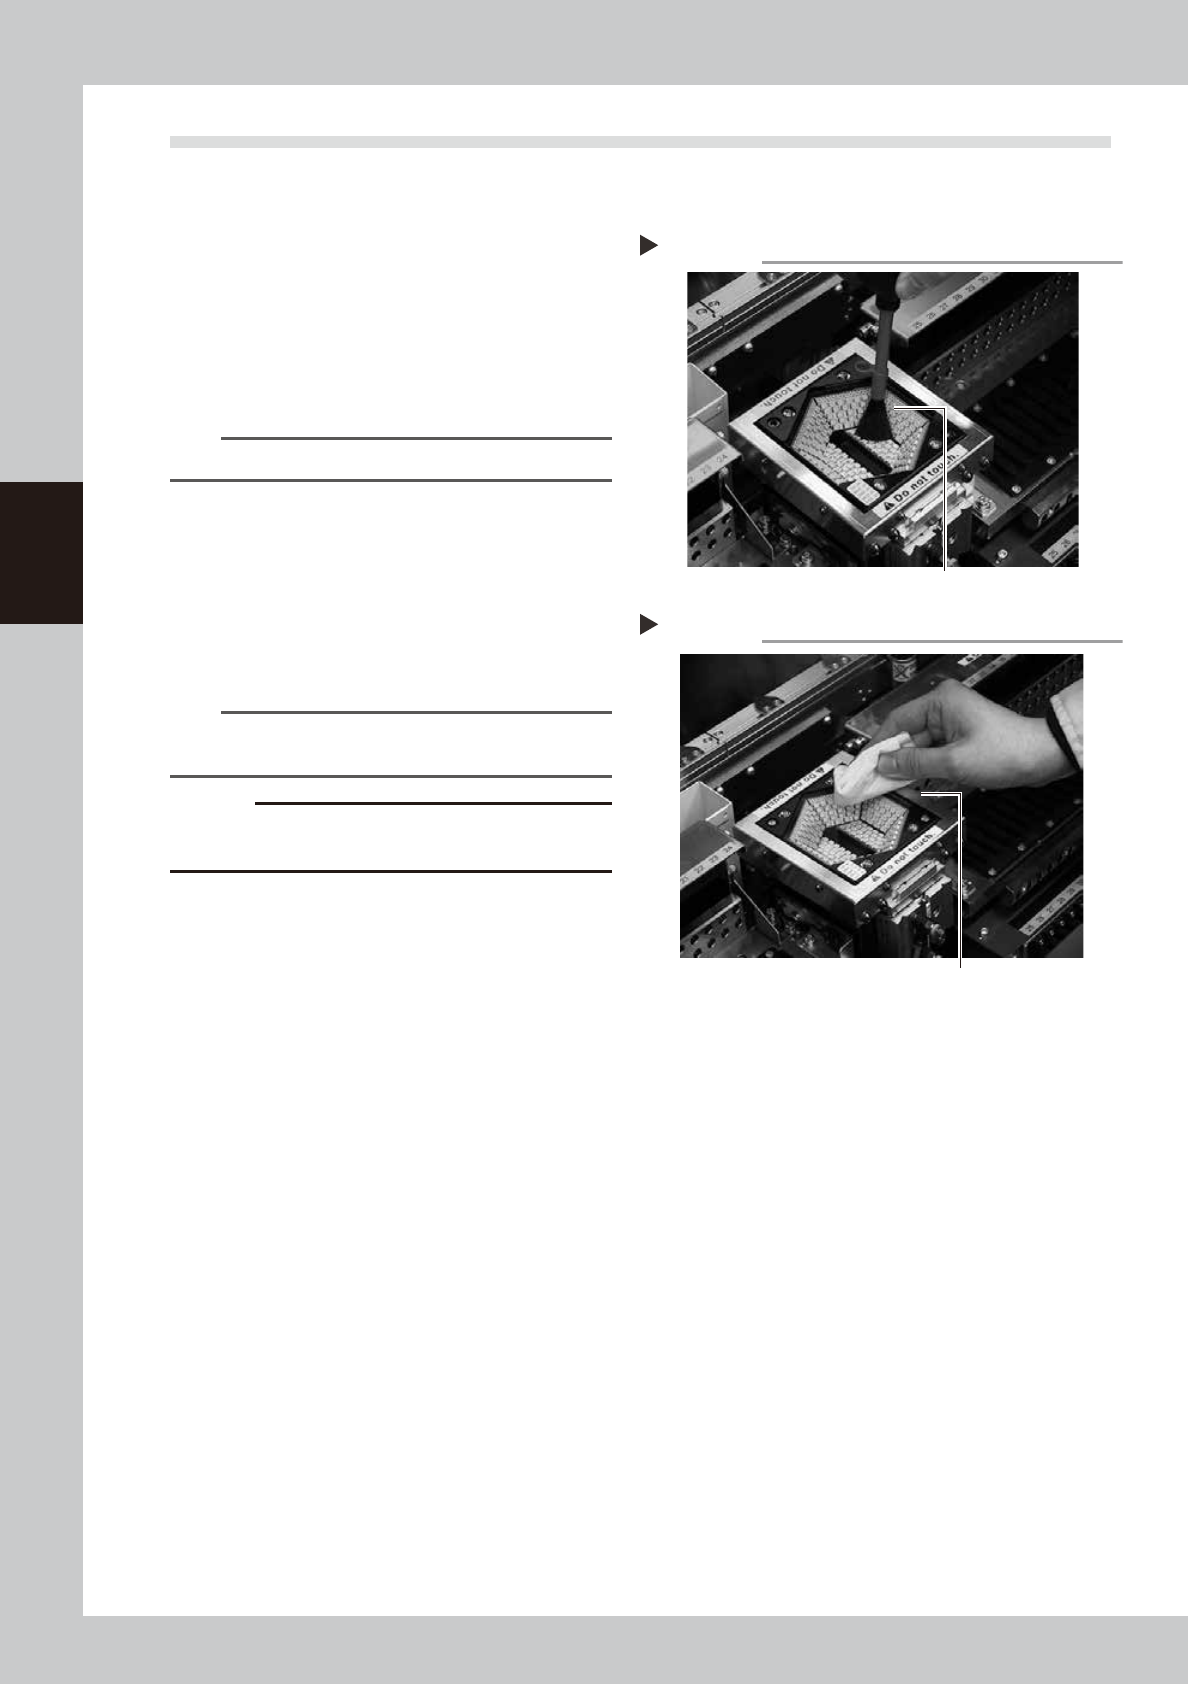
1.7 Cleaning the camera protective glass
Adhered dust, etc., on the multi-camera lighting's protective glass can cause component recognition errors.
To prevent this, it is recommended to inspect and clean the cover in a periodic manner.
e
1
Blow off dust on the lighting's
protective glass.
1. Press the emergency stop button to open
the machine safety cover.
2. Remove the dust on the lighting's
protective glass with a blower brush.
53389-L4-00
TIP
A lens blower brush is an optional purchase part.
2
Wipe the protective glass with a
cloth or cleaning paper.
Apply a few drops of lens cleaner to a
lint-free cleaning cloth or cleaning paper
that does not raise dust, and wipe the
protective glass.
53390-L4-00
n
NOTE
A lens cleaner and cleaning paper are optional
purchase parts.
c
CAUTION
Do not use other than the lens cleaner optionally
supplied, such as IPA or acetone.
Blowing off dust with blower brush
Step 1
Lens blower brush
Wiping the transparent cover
Step 2
Lent-free cleaning cloth or paper wiper
3-13
3
Periodic maintenance items
2. Monthly or bimonthly inspection
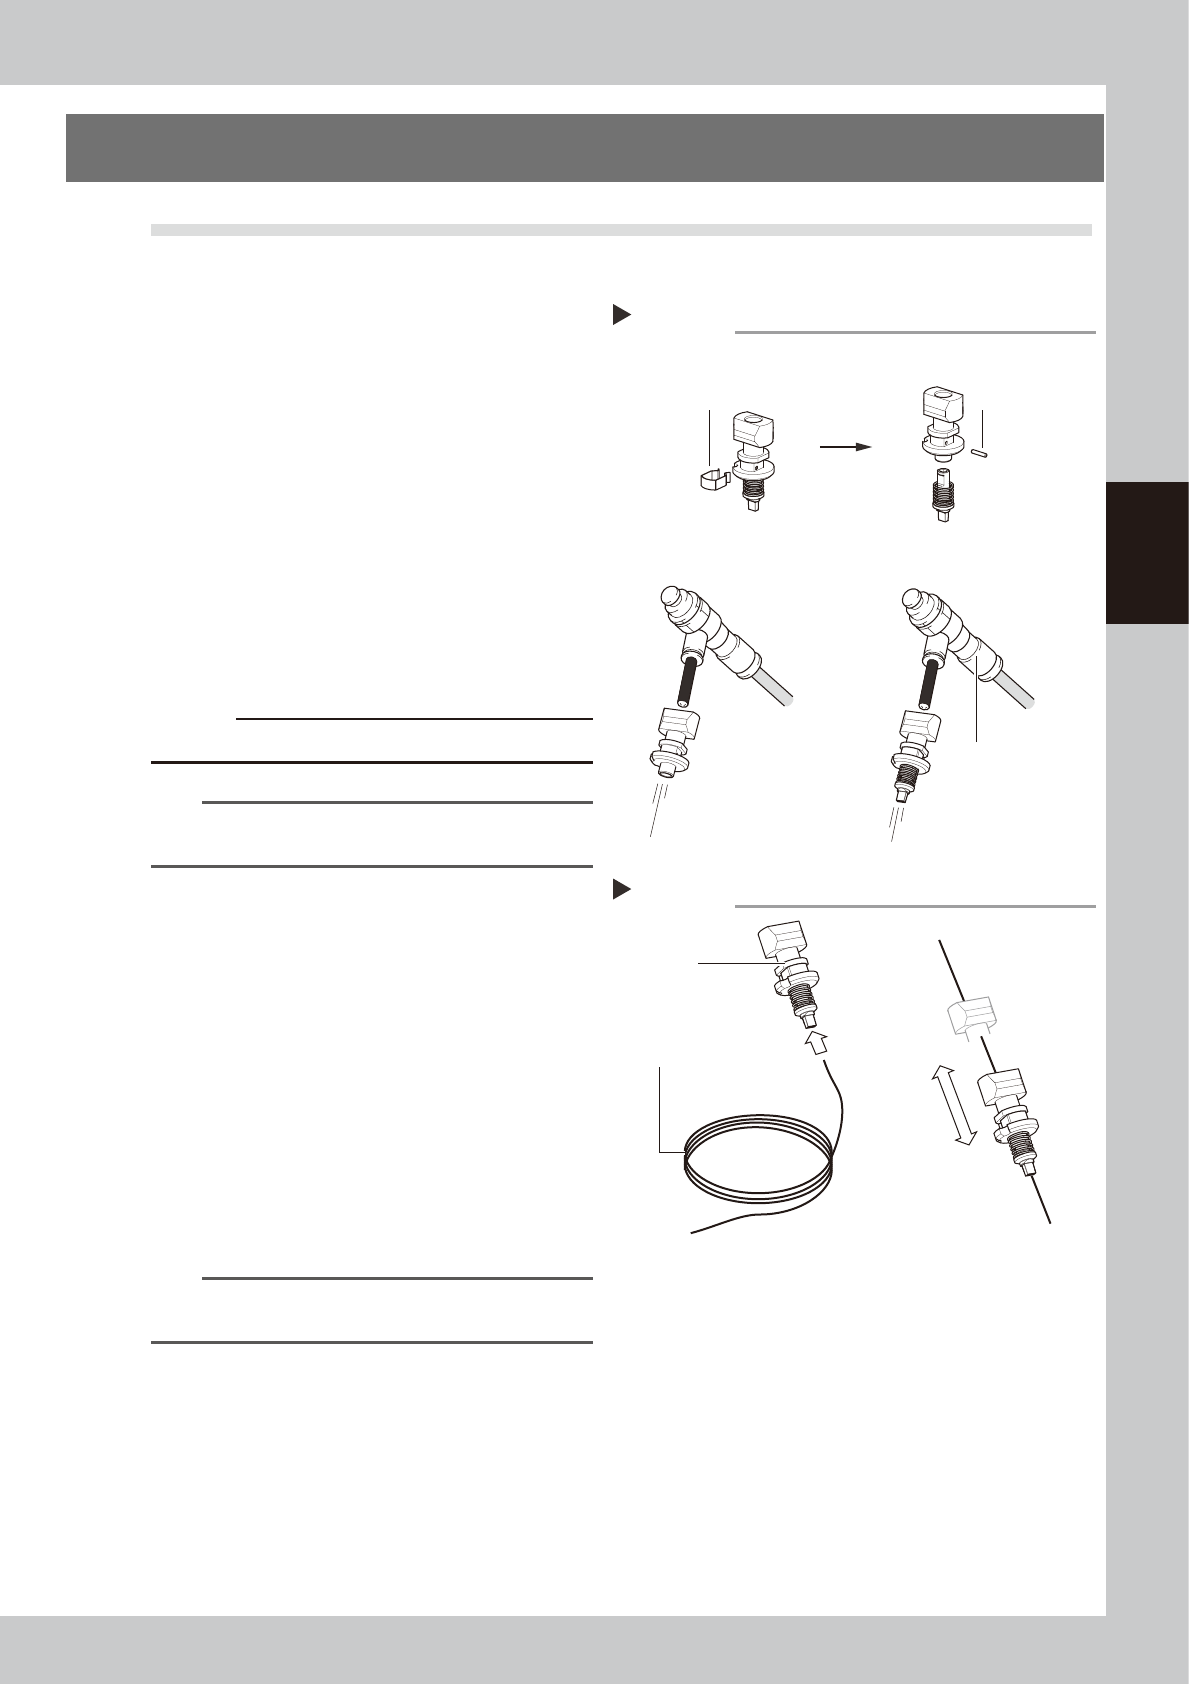
2.1 Cleaning the nozzle air path
Clean the nozzle air path if a nozzle clogging is found in the daily inspection or every month.
e
1
Remove the nozzle from the head.
1. Press the emergency stop button and
then open the machine safety cover.
2. Remove the nozzle from the head. If the
machine is equipped with the nozzle
station, press the [Nozzle Stn Shutter]
button to open the nozzle station shutter
and remove the nozzle.
2
Blow air through the nozzle.
1. Detach the nozzle tip and air blow the
nozzle from the nozzle mounting side.
2. Attach the nozzle tip and air blow the
nozzle from the nozzle mounting side.
53308-L4-10
c
CAUTION
Be careful not to deform the clip.
n
NOTE
If there are dust deposits in the nozzle, perform steps 3
and 4.
3
Clean the nozzle hole.
1. Pass a nozzle cleaning wire through the
nozzle hole.
2. Clean the nozzle by moving it as shown
at right.
53309-L4-10
4
Blow air onto the nozzle tip again.
Remove the nozzle cleaning wire, then
air-blow the nozzle interior with the air blow
tool as described in Step 2.
5
Return the nozzle to its original
head.
n
NOTE
If removed nozzles from the nozzle station, return them
to the nozzle storage positions.
Cleaning a nozzle
Step 3
Nozzle
Nozzle cleaning wire
Air blow
Step 2
Air blow unit (optional)
Remove the clip.
Pull out the pin.
Air tube (orange) connected
to air supply port
■ Detach the nozzle tip, and
air-blow from that side.
■ Attaching/detaching the nozzle tip
■ Blow air from the nozzle
attachment side.