JANETS_INM.pdf - 第196页
JaNets In structio n Manual 5. Shopflo or Setu p 5- 76 Copying a fee der as sign ment symm etrical ly Drag a mou se to surr ound a feeder(s ) to be co pied a nd select it (them ). Click th e right b utton of the mouse wh…
JaNets Instruction Manual 5. Shopfloor Setup
5-75
Clearing a feeder assignment
Deleting feeders one by one
Select a feeder icon (you can two or more feeder icons) within the feeder attachment area, and
click the <Clear> button on the “Permanent Feeder Setup” screen. When the confirmation
message appears on the screen, select the <Yes> button. You can clear a feeder assignment by
performing the operation below also.
Select a feeder icon, and press the [Del] key of the keyboard. After the confirmation message
appears on the screen, clear the selected feeder.
* When you delete a tray holder itself, all components assigned to the tray holder are cleared.
* When you delete a feeder having two or more lanes, all components assigned as a lane of the
feeder are cleared.
Deleting feeders at a time
When you select the <Clear All> button on the “Permanent Feeder Setup” screen, the confirmation
message appears on the screen. Select the <Yes> button. The system clears all feeders assigned
to a machine currently displayed on the screen.
Copying a feeder assignment
Copying a feeder assignment symmetrically with respect to a line
Drag a mouse to surround a feeder(s) to be copied and select it (them). Click the right button of the
mouse to display the pop-up menu. Select the [Mirror Copy] command from this pop-up menu.
The [Mirror Copy] command is enabled for a machine equipped with the front and rear banks only.
Figure 5.9-41 Feeder assignment position when the system copies a feeder
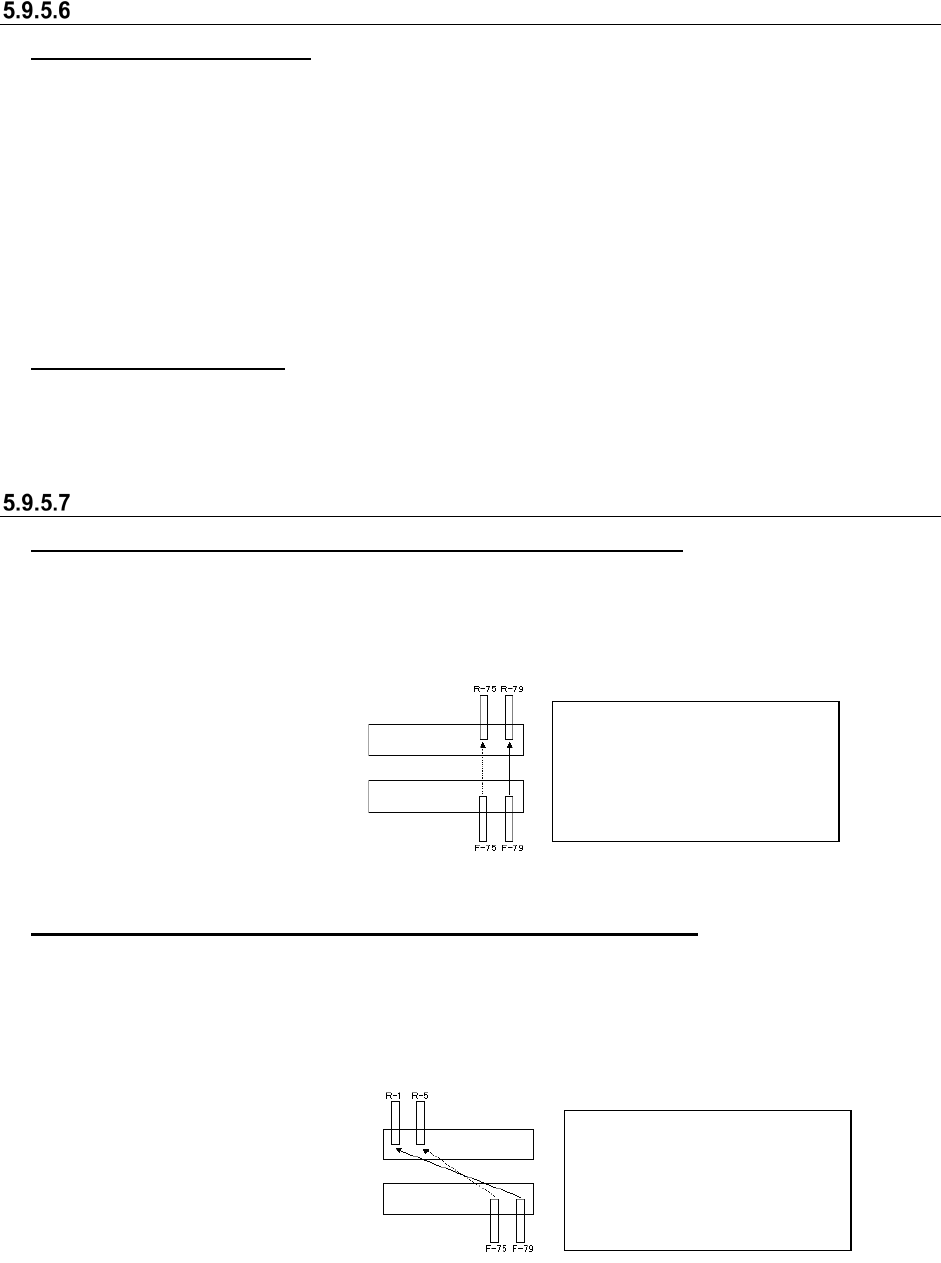
Copying a feeder assignment symmetrically with respect to a point
Drag a mouse to surround a feeder(s) to be copied and select it (them). Click the right button of the
mouse to display the pop-up menu. Select the [Position Copy] command from this pop-up menu.
The [Position Copy] command is enabled for a machine equipped with the front and rear banks
only.
Figure 5.9-42 Feeder assignment position when the system copies a feeder
When you select a feeder on
the front side, it is copied to the
rear side. When you select a
feeder on the rear side, it is
copied to the front side.
When you select a feeder on
the front side, it is copied to the
rear side. When you select a
feeder on the rear side, it is
copied to the front side.
When feeders are copied symmetrically with respect to a point
JaNets Instruction Manual 5. Shopfloor Setup
5-76
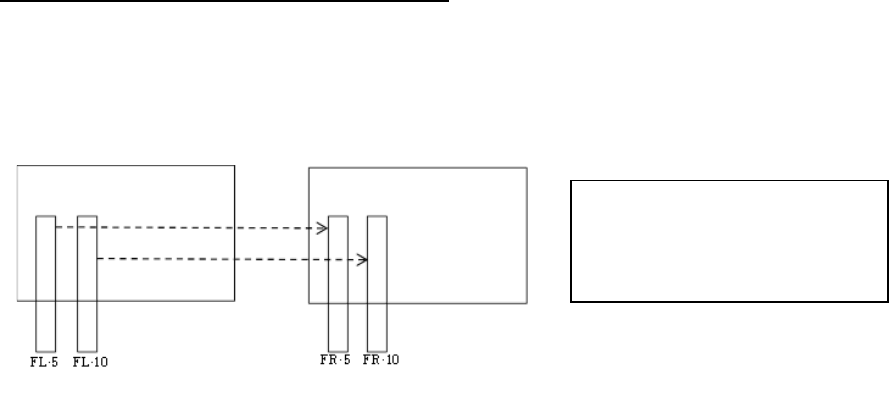
Copying a feeder assignment symmetrically
Drag a mouse to surround a feeder(s) to be copied and select it (them). Click the right button of the
mouse while the feeder(s) is (are) being selected to display the pop-up menu. Select the [Station
Copy] command from this pop-up menu.
The [Station Copy] command is enabled for a machine equipped with the left and right stations
only.
Figure 5.9-43 Feeder assignment position when the system copies a feeder
* No tray component can be copied even though you execute the [Mirror Copy]/[Position
Copy]/[ Station Copy] command. In addition, if you select any feeder located on both the front
side and the rear side (or the left station and right station), the system will not copy it.
* The copying is available only when the both banks are the same types (the number of holes
and the driving method).
When you select a feeder on the left
side, it is copied to the right side.
When you select a feeder on the right
side, it is copied to the left side.
JaNets Instruction Manual 5. Shopfloor Setup
5-77
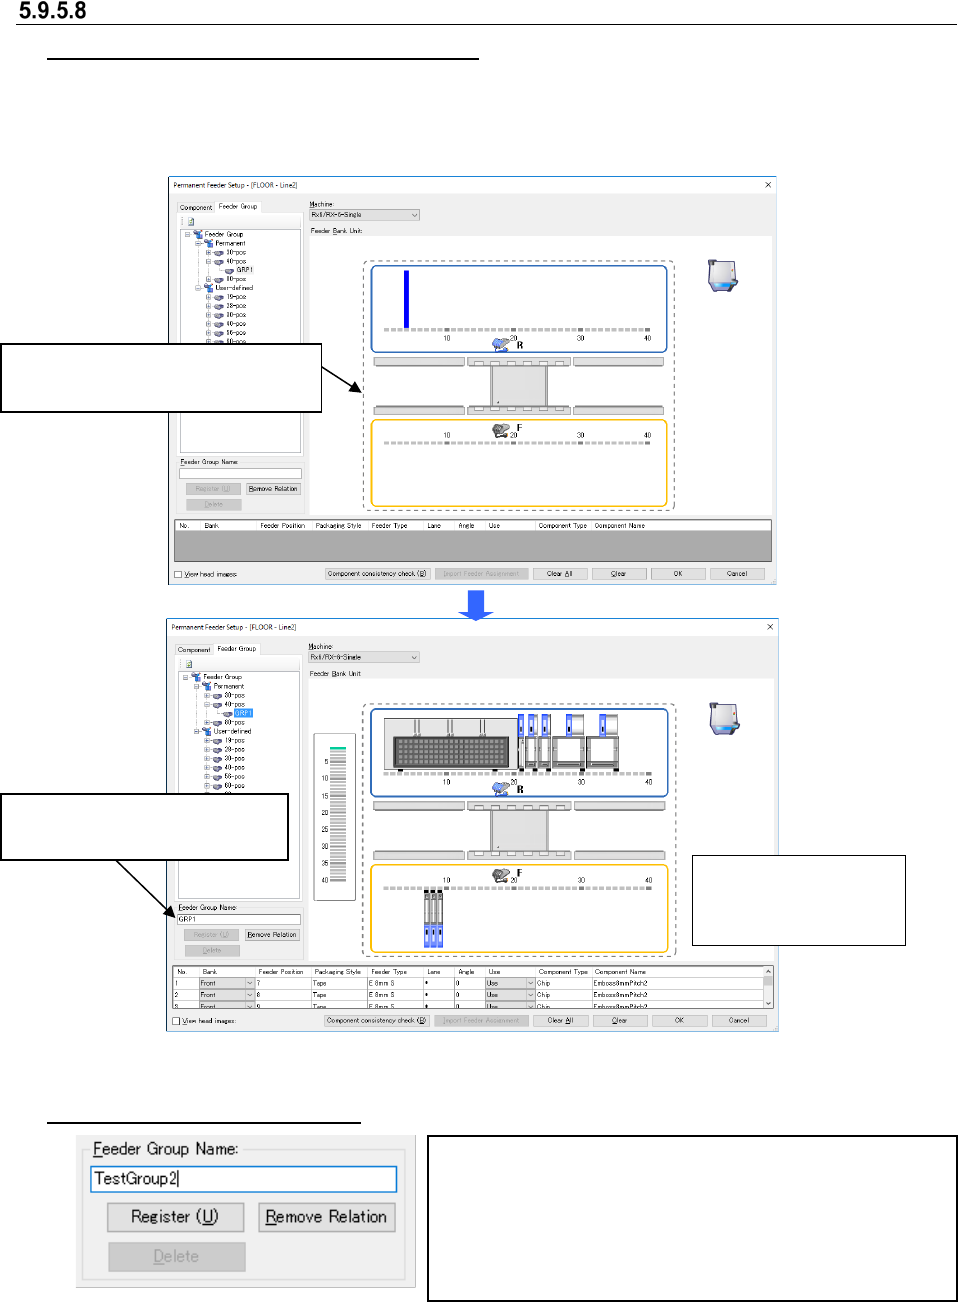
Setting a feeder group
Referring to a feeder group from a machine
To reference a feeder group (feeder assignment information) from the machine, follow the
instruction below. Or, select a feeder group in the “Feeder Group” list, and click the right button of a
mouse to display the pop-up menu. Select the [Load & Feeder Group] command. The selected
feeder group is loaded into the machine currently being displayed.
Figure 5.9-44 Before/after referring to a feeder group
Registering a new feeder group
Figure 5.9-45 Entering the name of a feeder group name
Enter the name of a feeder group to be registered (up to 20
half-width characters). When you enter it, the <Register>
button is enabled. When you select this <Register> button, the
confirmation message appears on the screen. When you
select the <Yes> button, the selected feeder group is
registered in the database.
Drag and drop a feeder group to be
referred to onto the layout screen.
The layout of the
dropped feeder group
is displayed.
The name of the referred feeder
group is displayed here.