JANETS_INM.pdf - 第301页
JaNets In structio n Manual 7. Program Editor 7- 94 ◆ Lead moveme nt 1) Click [Lead] . 2) In the combo bo x of [Lead No.], select the lead No. of the lead to be moved. 3) In [T ool box], click the lead mov ing butt on . …
JaNets Instruction Manual 7. Program Editor
7-93
6) To change the lead pitch, click the white circular marker at the end of the lead with the mouse
and drag it as it is.
7) The lead pitch varies depending on the mouse pointer position. After the end of the adjust-
ment, release the mouse button.
8) To change the mouse pointer position, click the orange outward marker at the end of the lead
with the mouse and drag it as it is.
9) The lead with varies depending on the mouse pointer position. After the end of the adjustment,
release the mouse button.
10) To change the contact surface length, click the orange upward marker at the end of the lead
with the mouse and drag it as it is.
11) The contact surface length varies depending on the mouse pointer position. After the end of
the adjustment, release the mouse button.

JaNets Instruction Manual 7. Program Editor
7-94
◆ Lead movement
1) Click [Lead].
2) In the combo box of [Lead No.], select the lead No. of the lead to be moved.
3) In [Tool box], click the lead moving button .
4) Click the blue marker in the reference position of the lead to be moved with the mouse and
drag it as it is.
5) The lead positions in all directions vary depending on the mouse pointer position. After the
end of the movement, release the mouse button.
◆ Lead rotation
1) Click [Lead].
2) In the combo box of [Lead No.], select the lead No. of the lead to be rotated.
3) In the combo box of [Lead No.], click the lead rotating button .
4) Click the yellow marker in the right side of the lead with the mouse and drag it as it is. The
lead set is rotated around the blue marker in the reference lead position. After the end of the
lead position adjustment, release the mouse button.
◆ Lead deletion
1) Click [Lead].
2) In [Tool box], click the lead deleting button .
3) In the combo box of [Lead No.], select the lead No. of the lead to be deleted.
4) Click the blue marker in the reference lead position with the mouse. (Or click an optional
position of [Editing window] with the right part of the mouse.)
5) The deletion confirmation message is displayed. The specified lead information is deleted
by clicking [Yes].
JaNets Instruction Manual 7. Program Editor
7-95
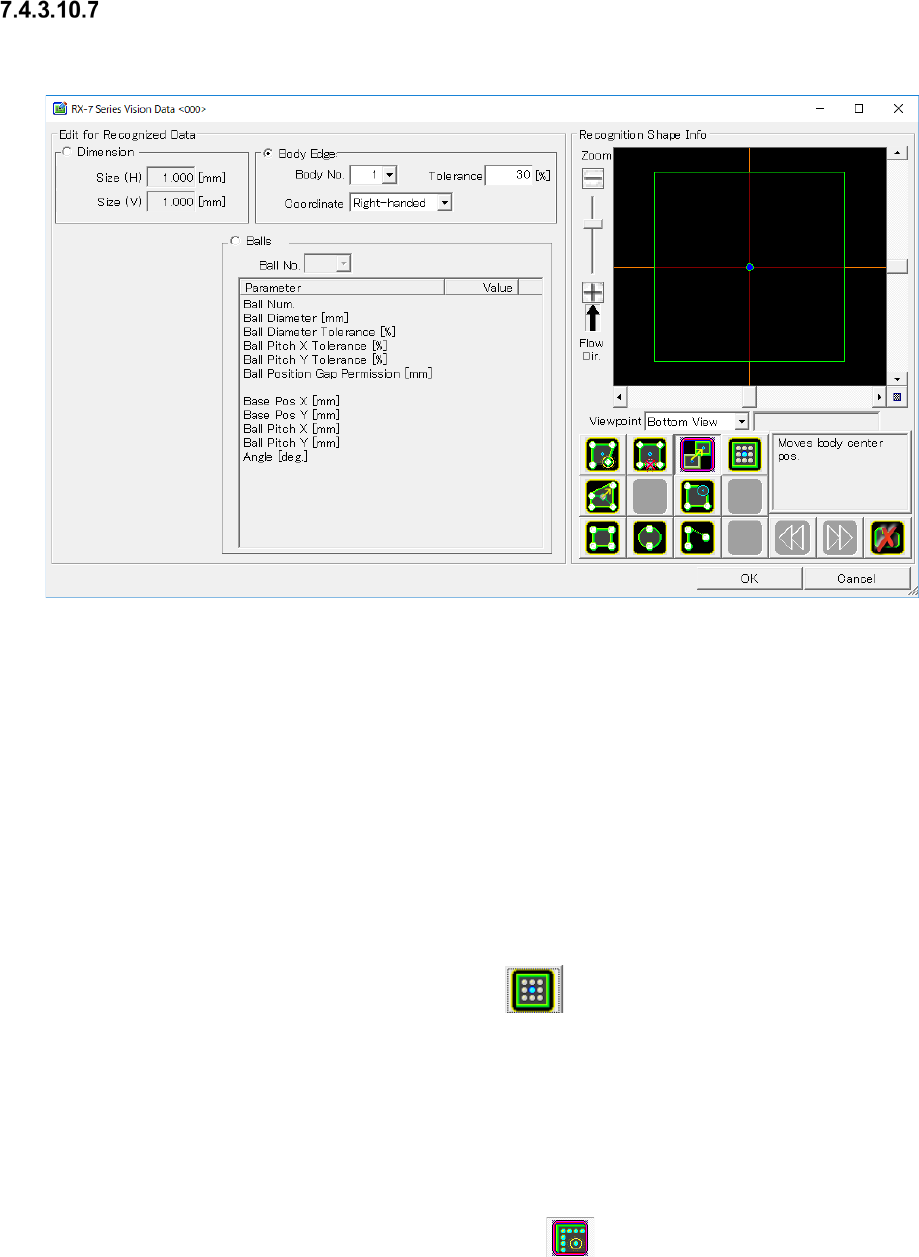
Odd-shape body information (with BALL)
When you press the <Edit> button, the screen like one shown below appears.
Figure 7.4-134 “RX-7 Series Vision Data <ODD_BALL>” screen
(for an oddly-shaped component with balls)
The input items are the same as those of the BGA information and odd-shape body information
(without lead).
* In order to hold the odd-shaped parts (with the ball) data in the slope as 0, ball number, the
number of balls, a reference position, the ball pitch is updated.
The value that you saved with the entered value may vary.
◆ Creation of bowl and adjustment of the number of bowls
1) Click [Bowl].
2) In [Tool box], click the bowl creating button . After a bowl is newly created, a new
bowl pattern will be created in the center of the external dimension frame. In the bowl pat-
tern, the center position of the pattern is displayed by blue marker, the bowl arranging position
is displayed by light blue marker, and the bowl arrangement enable position is displayed by
white marker.
3) In the combo box of [Bowl No.], select the bowl No. of the bowl to be edited.
4) To arrange a bowl, click the bowl adding button
in [Tool box].
5) Click the white-frame marker of the desired bowl arranging position with the mouse, and the
bowl will be arranged in this position.