JANETS_INM.pdf - 第480页
J aN et s Inst ructi on M anual 11. Mark Database 11 -7 11.5.1 List of BOC mar ks to be imported BOC m ark data already taught i s dis pl ayed as a l ist . Y ou cannot im por t any tem p late m arks. (Y ou cannot set tem…
JaNets Instruction Manual 11. Mark Database
11-6
Select the mark information to be registered in the database on the list screen.
Figure 11.5-2 Selecting data to be imported
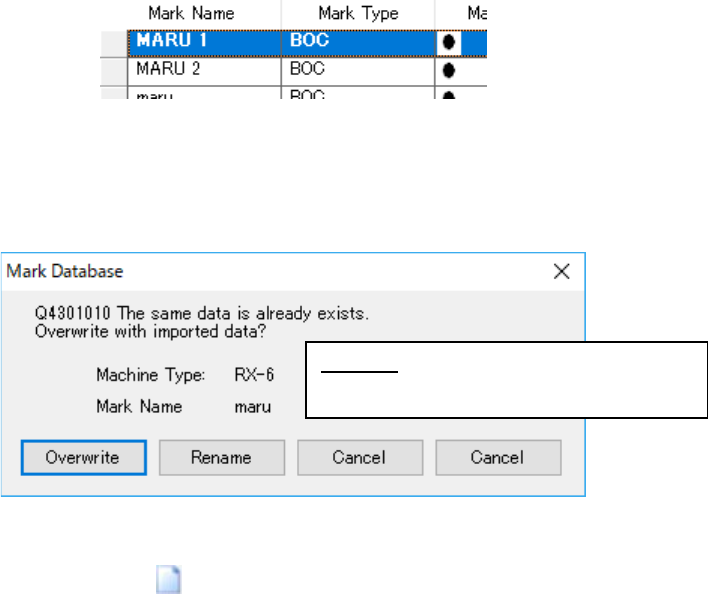
If the name of mark data to be imported is the same as any one already registered in the da-
tabase, the confirmation dialog box for overwriting data appears on the screen.
Figure 11.5-3 Confirmation dialog box for overwriting data
2. Press the “Import Data” (
) button of the toolbar.
The “Open” dialog box appears on the screen. Select a production program to be added
(you cannot select two or more programs), and select the <Open> button. The screen
for importing mark data appears. Select information to be imported, and then register it in
the database. (Operate in the same manner as you do at 1 above.)
3. Select a production program from the Program Explorer, and drop and drag it onto the
mark list screen. The system performs the process for obtaining a file controlled with the
database. (A file you drag and drop is to be loaded.) The screen for importing mark data
appears. Select information to be imported, and then register it in the database. (Operate
in the same manner as you do at 1 above.)
Rename: Renames data (see Section 11.6
“Changing a Mark Data Name”).
JaNets Instruction Manual 11. Mark Database
11-7
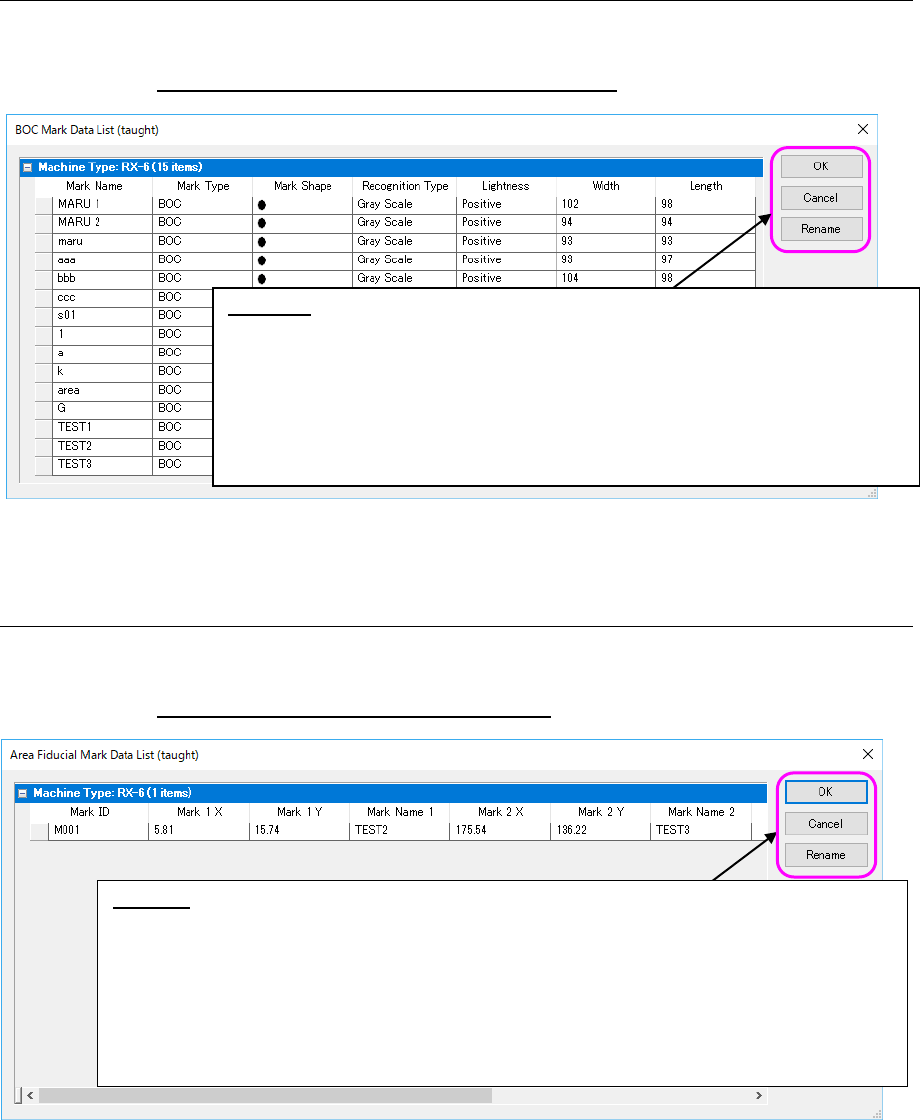
11.5.1 List of BOC marks to be imported
BOC mark data already taught is displayed as a list. You cannot import any template marks.
(You cannot set template mark to be registered.)
(See Section 11.3
“Example of the ‘BOC Mark Data’ Screen” for the displayed items.)
Figure 11.5-1 When selecting the “BOC Mark”
11.5.2 List of area fiducial marks to be imported
Area fiducial mark data already taught is displayed as a list. You can import neither any tem-
plate marks nor area fiducial mark data whose type is “Solder” or “Solder (PWB).”
(See Section 11.4
“‘Area Fiducial Mark Data’ Screen” for the displayed items.)
Figure 11.5-2 When selecting the “Area Fiducial Mark”
* Even though you do not enter any data in the cells “Mark Name 1” to “Mark Name 3,” you can
import data. You can change a value in the “Mark ID” cell or a name of any of the “Mark
Name 1” to “Mark Name 3” cells.
Rename: Select a line of mark data whose name you want to change.
After selecting the desired line, press the <Rename> button. The dialog box for changing a
mark ID/a mark name appears on the screen.
Enter a mark name and a mark ID to which you want to change on the dialog box, and then
press the <OK> button. The mark name on the selected line is changed as you specified.
(See Section
11.6“
Changing a Mark Data
Name” for the dialog box for changing a mark ID/a mark name.)
* You cannot change a mark ID to any one that exists in the same machine type in which are to
import mark data.
Rename: The dialog box for renaming a mark appears on the screen. When you
enter a mark name in the “New Mark Name” field on this dialog box, and then
select the <OK> button, the mark name on the selected line is changed as you
specified. (See Section 6.6 “Changing a Mark Data Name” for this dialog box.)
* You cannot change a mark name to any one that exists in the same machine type
in which you are to import mark data.
* If you do not enter any mark name for the BOC mark data, “#” appears in the
“Mark Name” cell and you cannot specify the data so that it can be imported.
Change the name in this case.
JaNets Instruction Manual 11. Mark Database
11-8
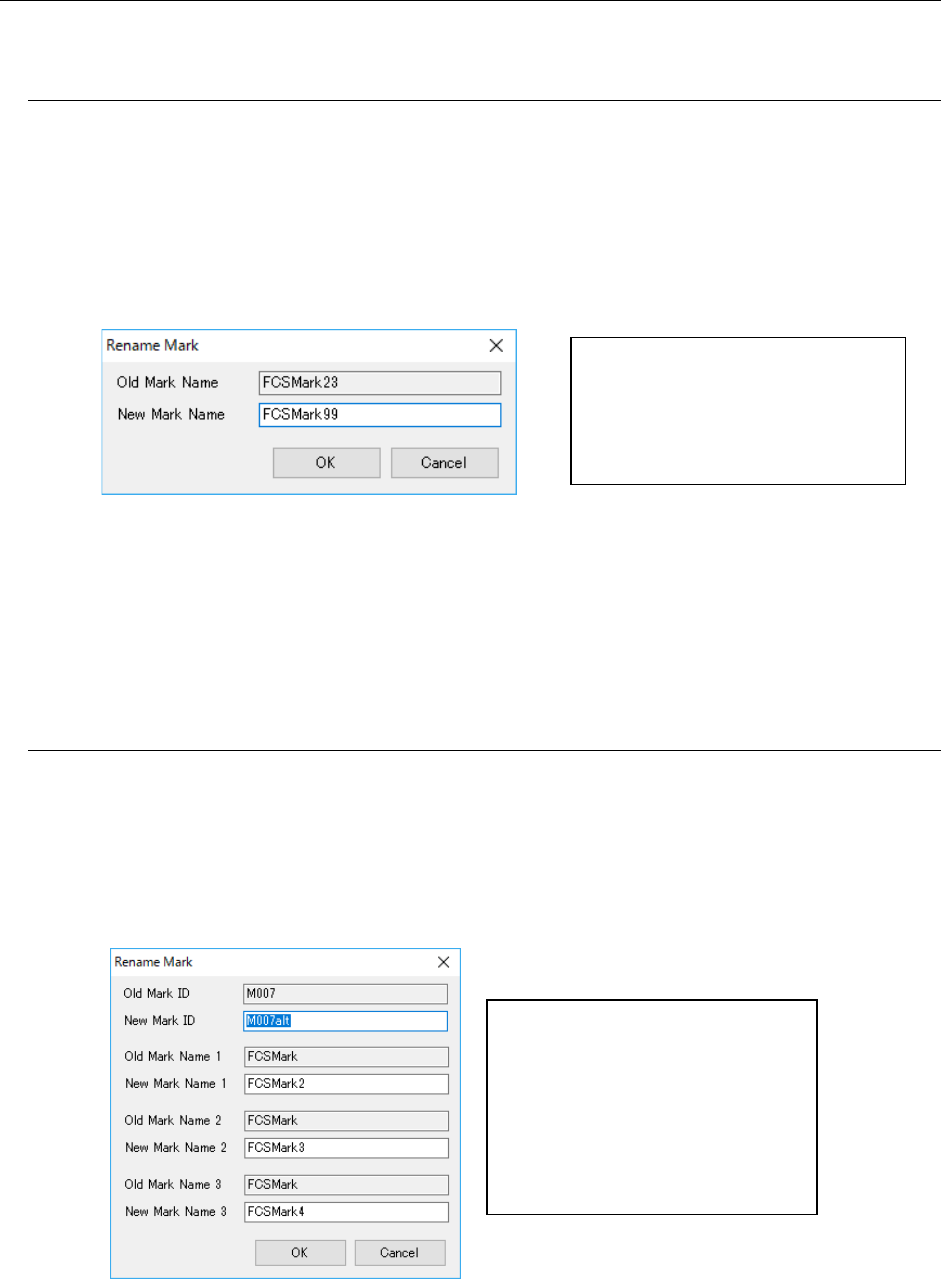
11.6 Changing a Mark Data Name
You can change a mark data name registered in the database.
11.6.1 Renaming a BOC mark data
You can change a BOC mark data name. You can enter up to 16 half-width alphanumeric
characters as a name.
(Note that you cannot enter “#” alone)
Change a name by performing either one of the operations below.
1. Select a line of mark information you want to change on the BOC mark list screen.
Select the [Edit] command from the menu bar, and then the [Rename] command from the
“Edit” menu. The “Rename Mark” dialog box appears on the screen.
Figure 11.6-1 “Rename Mark” dialog box
2. When you double-click the line of mark information you want to change on the BOC mark
list screen, the “Rename Mark” dialog box appears on the screen. Enter the desired mark
name in the “New Mark Name” field, and then select the <OK> button. The registered
mark data name is updated. (Unless you enter a name in the “New Mark Name” field, you
cannot select the <OK> button.)
11.6.2 Renaming an area fiducial mark
You can change a mark ID and mark names 1 to 3 of area fiducial mark data. You can enter up
to eight half-width alphanumeric characters as an ID or a name. Change a name by perform-
ing either one of the operations below.
1. Select a line of mark information you want to change on the area fiducial mark list screen.
Select the [Edit] command from the menu bar, and then the [Rename] command on the
“Edit” menu. The dialog box for a mark ID/mark name appears on the screen.
Figure 11.6-2 Dialog box for changing a mark ID/a mark name
Enter the desired mark name in the
“New Mark Name” field, and then
select the <OK> button.
The registered mark data name is
changed.
Enter the desired mark ID in the
“New Mark ID” field and the desired
mark name in the “New Mark Name”
field, and press the <OK> button.
The registered mark data name is
updated and the dialog box closes.
(Unless you enter any mark ID, you
cannot select the <OK> button.)