JANETS_INM.pdf - 第610页
JaNets In structio n Manual 16 Component D ataba se 16 - 10 Figure 16.3 -4 Basic setting scre en (Item buttons in the componen t data edit screen) “Packaging Style” sett ing window The “Packa ging Style” setting win dow …
JaNets Instruction Manual 16 Component Database
16-9
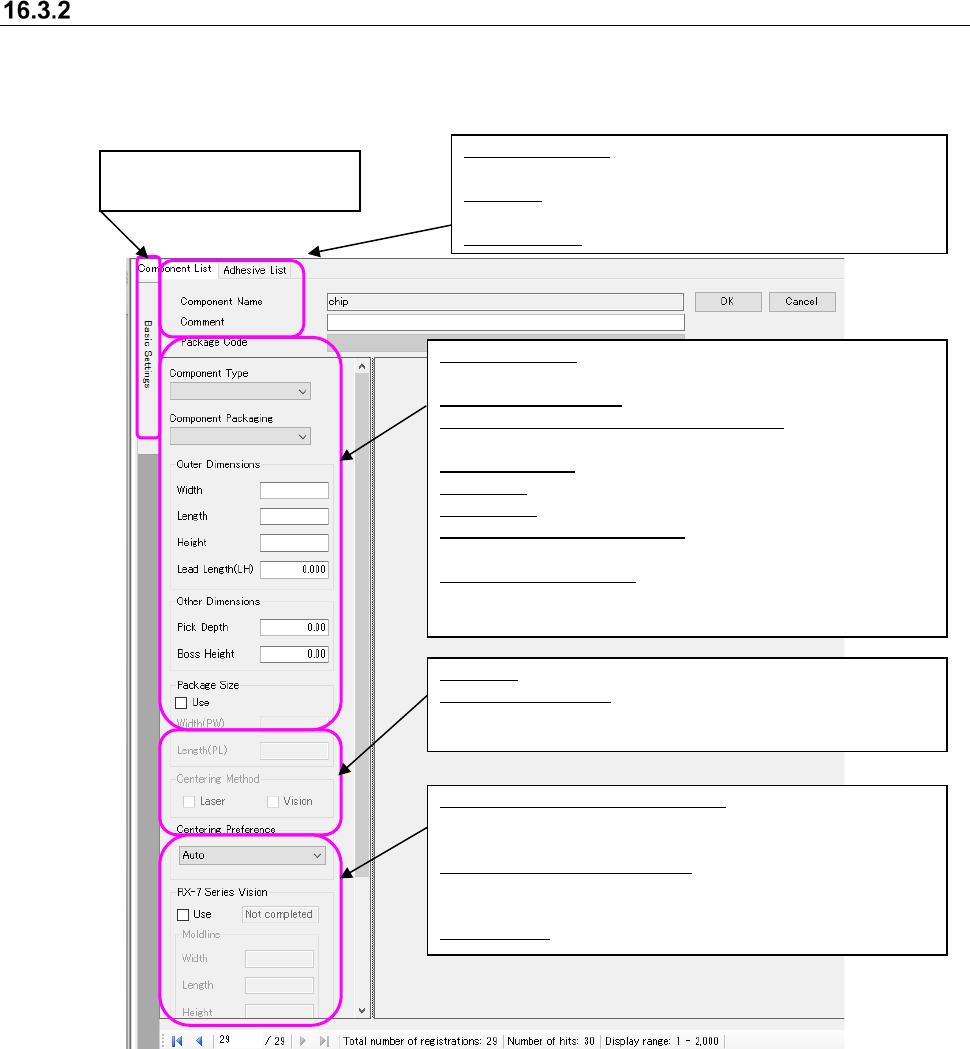
Basic setting screen
The edits basic data concerning components. This screen is displayed by selecting one
corresponding item from the component database screen and selecting [Edit] - [Change] or by
double clicking on the grid of the overview screen.
Figure 16.3-3 Basic setting screen
Component Name: Holds up to 60 alphanumeric
characters
Comment: Holds up to 127 alphanumeric
characters
Package Code: Selects the registered package code
Click on this tab to turn the
screen display ON/OFF.
Centering: Selects “Laser” or “Vision”
Centering Preference: Determines priority in centering when
multiple choices have been made in
centering above.
Component Type: The image displayed changes with
the selection of component type
Component Packaging: Selects type of packaging
Outer Dimensions (Length / Width / Height):
Inputs in mm units
Lead Length(LH): Inputs in mm units
Pick Depth: Inputs in mm units
Boss Height: Inputs in mm units
Package Size “Use” check box:
Check off this box to use the package size.
Width (PW)/Length (PL):
Enter the width and length of the package in
millimeters.
RX-7 Series Vision “Use” check box:
Check off this box for a component to be used
with an RX-7 series.
Mold line (Width/Length/Height):
Enter the width, length and height of a mold
part in millimeters.
Kind of shape: Select the shape type
JaNets Instruction Manual 16 Component Database
16-10
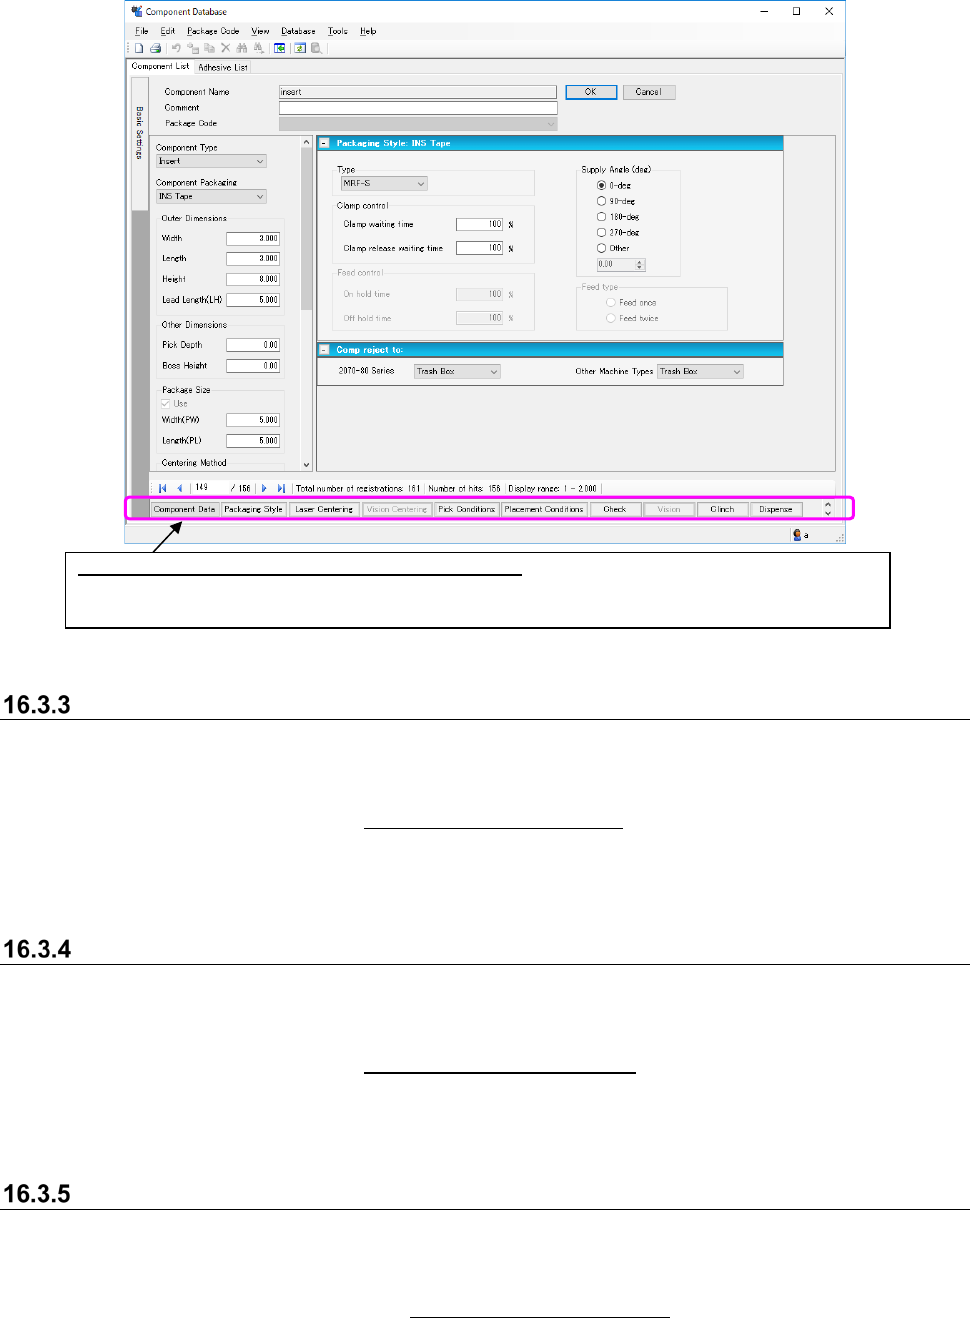
Figure 16.3-4 Basic setting screen (Item buttons in the component data edit screen)
“Packaging Style” setting window
The “Packaging Style” setting window allows you to specify packaging style information to be used
with the corresponding component.
When you click the <Packaging Style> button of the item buttons displayed on the component data
edit screen described in Section 16.3.2 “Basic setting screen,” this “Packaging Style” setting
window appears.
See Section 7.4.3.3 “Packaging Style” window of the “Component Data” screen” of Chapter 7 for
how to edit data on this window.
“Laser Centering” setting window
The “Laser Centering” setting window allows you to specify laser centering information to be used
with the corresponding component.
When you click the <Laser Centering> button of the item buttons displayed on the component data
edit screen described in Section 16.3.2 “Basic setting screen,” this “Laser Centering” setting
window appears.
See Section 7.4.3.4 “Laser Centering General Setting screen” of Chapter 7 for how to edit data on
this window.
“Vision Centering” setting window
The “Vision Centering” setting window allows you to specify vision centering information to be
used with the corresponding component.
When you click the <Vision Centering> button of the item buttons displayed on the component
data edit screen described in Section 16.3.2 “Basic setting screen,” this “Vision Centering” setting
window appears.
See Section 7.4.3.5 “Vision Centering General Setting screen” of Chapter 7 for how to edit data on
this window.
How to move between the component data edit screens:
You can select item buttons to move between the desired edit screens. The item buttons are
displayed on the component database overview screen.
JaNets Instruction Manual 16 Component Database
16-11
“Pick Conditions” setting window
The “Pick Conditions” setting window allows you to specify component pick-up conditions
information to be used with the corresponding component.
When you click the <Pick Conditions> button of the item buttons displayed on the component data
edit screen described in Section 16.3.2 “Basic setting screen,” this “Pick Conditions” setting
window appears.
See Section 7.4.3.6 “Pick Conditions General Setting screen” of Chapter 7 for how to edit data on
this window.
“Place Conditions” setting window
The “Place Conditions” setting window allows you to specify component placement conditions
information to be used with the corresponding component.
When you click the <Place Conditions> button of the item buttons displayed on the component
data edit screen described in Section 16.3.2 “Basic setting screen”, this “Place Conditions” setting
window appears.
See Section 7.4.3.7 “Placement conditions general setting screen” of Chapter 7 for how to edit
data on this window.
“Check” setting window
The “Check” setting window allows you to specify check information to be used with the
corresponding component.
When you click the <Check> button of the item buttons displayed on the component data edit
screen described in Section 16.3.2 “Basic setting screen”, this “Check” setting window appears.
See Section 7.4.3.8 “Component check detailed information setting screen” of Chapter 7 for how
to edit data on this window.
“Vision” setting window
The “Vision” setting window allows you to specify recognition information to be applied when the
corresponding component is to be centered with a VCS.
When you click the <Vision> button of the item buttons displayed on the component data edit
screen described in Section 16.3.2 “Basic setting screen”, this “Vision” setting window appears.
See Section 7.4.3.9 “Vision” of Chapter 7 for how to edit data on this window.
Clinch Setting Screen
Clinch Setting Screen sets the cognitive information in case of performing clinch by the
corresponding component.
It is displayed when clicking “Clinch” button by the item button of component data editing screens
for “16.3.2 Basic setting screen”.
Refer to Chapter 7 “7-4-3-11 Clinch” for the editing method.