JANETS_INM.pdf - 第666页
JaNets In structio n Manual 17 Program Expl orer 17 - 14 17.3.1.2 Enteri ng the “ D esign, ” “ Product Name ” and “ C omment ” ( avail ab le wi th a production program only) • T o enter t he “ Design ” (you cannot se lec…
JaNets Instruction Manual 17 Program Explorer
17-13
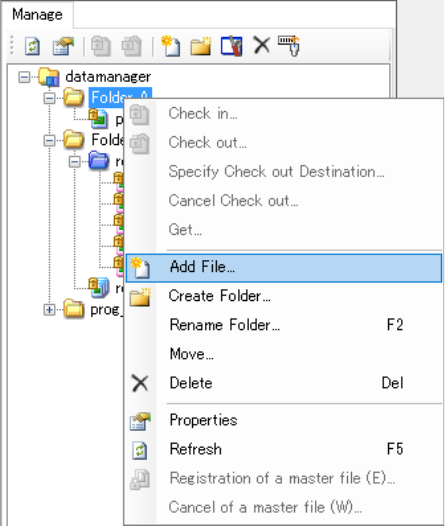
3. Perform the operations from ① to ④ below.
① Select a folder (you can select two or more folders at a time) on the “Manage” screen.
② Click the right button of a mouse to display the pop-up menu. Select the [Add File]
command on this pop-up menu.
③ In the same manner as the procedure 2, the “Open” dialog box appears on the screen.
Select a file to be added to the database.
④ The confirmation dialog box for registering a file(s) appears on the screen. After you
operate this dialog box, the file is registered in the database.
Figure 17.3-5 Pop-up menu displayed when you click
the right button of a mouse – [Add File]
* The types of files you can select to add them are only a production program (*.iss format) and
a reservation file (*.rsv format) only.
* You cannot register a divided file alone. A divided file is registered together with an optimized
(source) production program. (If you register a production program when a divided file is
located in the local folder where the production program is stored, the divided file is
automatically to be registered. You do not have to select it.)
* If you specify to register only a production program registered in a reservation file, the
reservation file, which is the parent, is not set to be registered. Only a production program is to
be registered.
JaNets Instruction Manual 17 Program Explorer
17-14
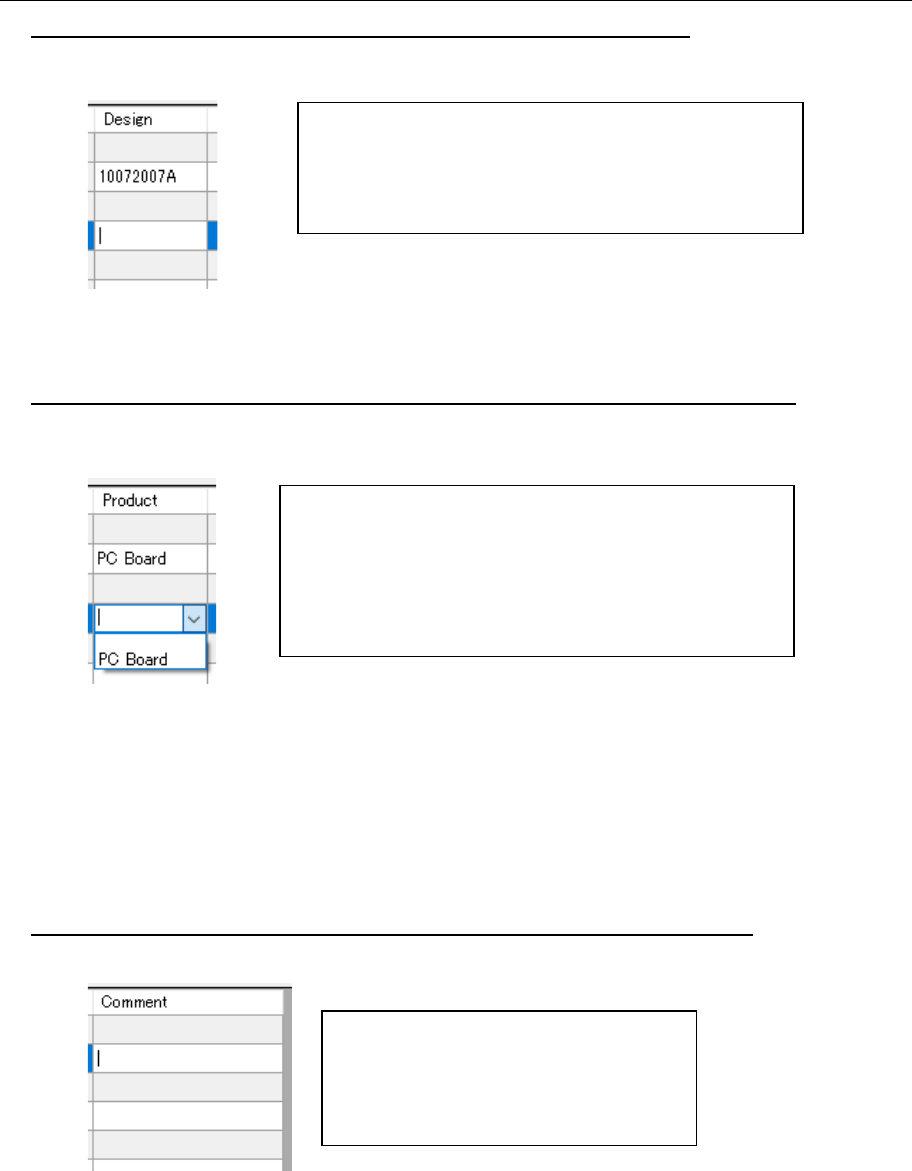
17.3.1.2 Entering the “Design,” “Product Name” and “Comment” (available with a
production program only)
• To enter the “Design” (you cannot select two or more cells at a time)
When you select a “Design” cell, the text box for entering the “Design” cell appears on the screen.
Figure 17.3-6 Text box for entering a number in the “Design” cell
• To enter the “Product Name” cell (you cannot select two or more cells at a time)
When you select a “Product Name” cell, the combo box for setting a product name appears on
the screen.
Figure 17.3-7 Combo box for selecting a product name
* If a production program to which a product name has been entered is not controlled with the
database, the list of product names becomes blank. A “product name” you entered here is
reflected in the “Product name” display of the production program tree.
* You can change the setting of a product name when you “check in” a file.
• To enter the “Comment” cell (you cannot select two or more cells at a time)
When you select a “Comment” cell, the text box for entering a comment appears on the screen.
Figure 17.3-8 Text box for entering a comment
Enter the design control number in the text box for entering
a comment directly (up to 64 half-width characters).
* The setting in the “Design” cell can be changed when
you check in a file.
Since the list of product names set for production programs
stored in the database is displayed in the combo box, select
the desired one from the list.
You can also enter a product name directly (up to 32
characters).
If you do not set any name here, a product name is set as
“No Product Name.”
Enter a comment directly here (up to 64
characters).
* You can change the setting of a
comment when you check in a file.

JaNets Instruction Manual 17 Program Explorer
17-15
Deleting a File or Folder from the Database
1. Select a file or folder on the “Manage” tab (you can select two or more files or folders). When
you select the “Delete” ( ) tool from the tool bar for the Program Explorer, the delete
confirmation message appears on the screen, and you can delete it (them).
* Whichever you select, a file or folder, the same operation is to be performed in the
following sections.
Moving a file between folders in the database
Follow the procedure 1 or 2 shown below.
1. Perform the operations ① and ② below.
Figure 17.3-9 Moving a file
2. When you select a file to be moved (you can select two or more files at a time) on the “Manage”
screen, and select the [Move] command on the pop-up menu displayed when you click the
right button of a mouse, the “Move” dialog box appears on the screen.
Figure 17.3-10 “Move” dialog box
①
Select a file to be moved (you can
select two or more files at a time.)
②
Drag and drop the
selected file(s).
The selected file(s) is (are) moved
to the folder you dropped it (them).
OK: Moves the selected file to the
selected destination folder.
Select the destination folder on the folder
configuration of the database displayed
on the “Move” dialog box.