JANETS_INM.pdf - 第91页
JaNets Instr ucti on Man ual 2. Install ation 2- 63 2.6.3 Adding the lice nse (1) The protect modul e license infor mat ion is displaye d in the “Key Inf ormati on” colu mn on the left side of the scr een, while the add …

JaNets Instruction Manual 2. Installation
2-62
2.6 Procedure for Adding the License
Use the protect module update tool to add the license to the protect module.
The procedure for adding the license is described below.
2.6.1 Notes on addition of the license
Terminate all application programs that have been started up.
Do not start up the protect module update tool on the network.
Confirm that the Sentinel Super Pro USB key is attached to the PC that is to be used for this
operation.
2.6.2 Starting up the protect module update tool
The licenses to be added are: “Line Manager,” “External Data Output,” “Exchange JSON Format,”
“Data Manager, “Offline Feeder Setup” and “TraceMonitor.”
The procedure for adding each license is the same. The “Line Manager” license is used as an
example to explain the operation here.
(1) Insert the Line Manager license adding disk (part number: 40189373) into the CD-ROM
drive, and then select the command [Specify a file name to add the license] from the “Start”
menu of the task bar.
Use the keyboard to enter “[D:\ JaNetsProtectKeyUpdater.exe]” (the CD-ROM drive is
supposed to be the drive D), and then click the <OK> button.
JaNets Instruction Manual 2. Installation
2-63
2.6.3 Adding the license
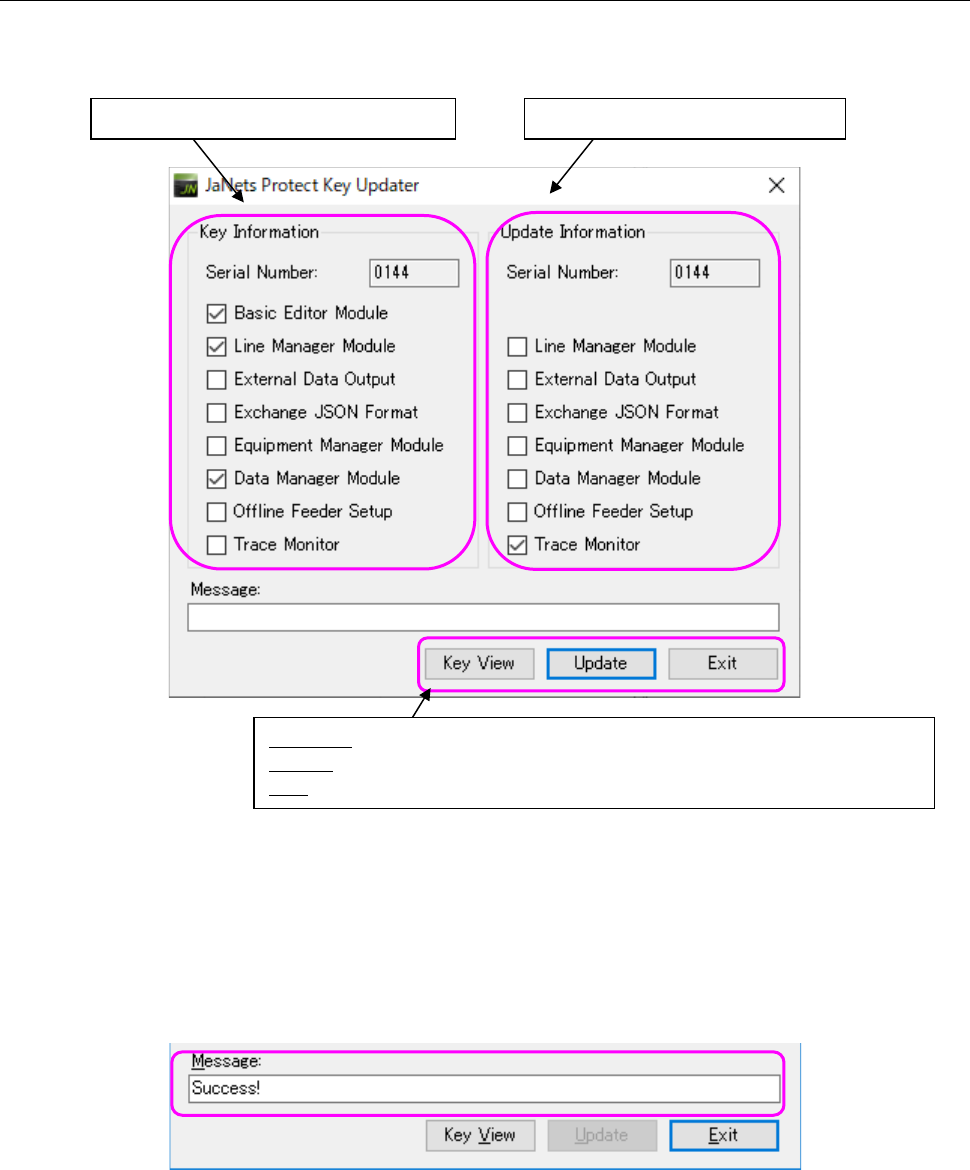
(1) The protect module license information is displayed in the “Key Information” column on the
left side of the screen, while the added JaNets license information is displayed in the “Update
Information” column on the right side of the screen.
Figure 2.6-1 " Starting up the protect module update utility
(2) After checking the displayed information, press the <Update> button. The system starts
updating the protect module.
It may take several seconds to several minutes to update the protect module.
(3) When the system finishes updating the protect module successfully, the message “Success!”
(the protect module is updated successfully) appears in the “Message” text box.
Figure 2.6-2 Message displayed when the protect module is updated successfully
You have finished adding the license here. Press the <Exit> button to terminate the protect
module update tool.
Note that the <Update> button is disabled and you cannot press it when the protect module is
updated successfully.
Protect module license information
Key View: Obtains the license information, and then displays it again.
Update: Adds the license to the protect key.
Exit: Terminates the update tool.
Added license file information
JaNets Instruction Manual 2. Installation
2-64
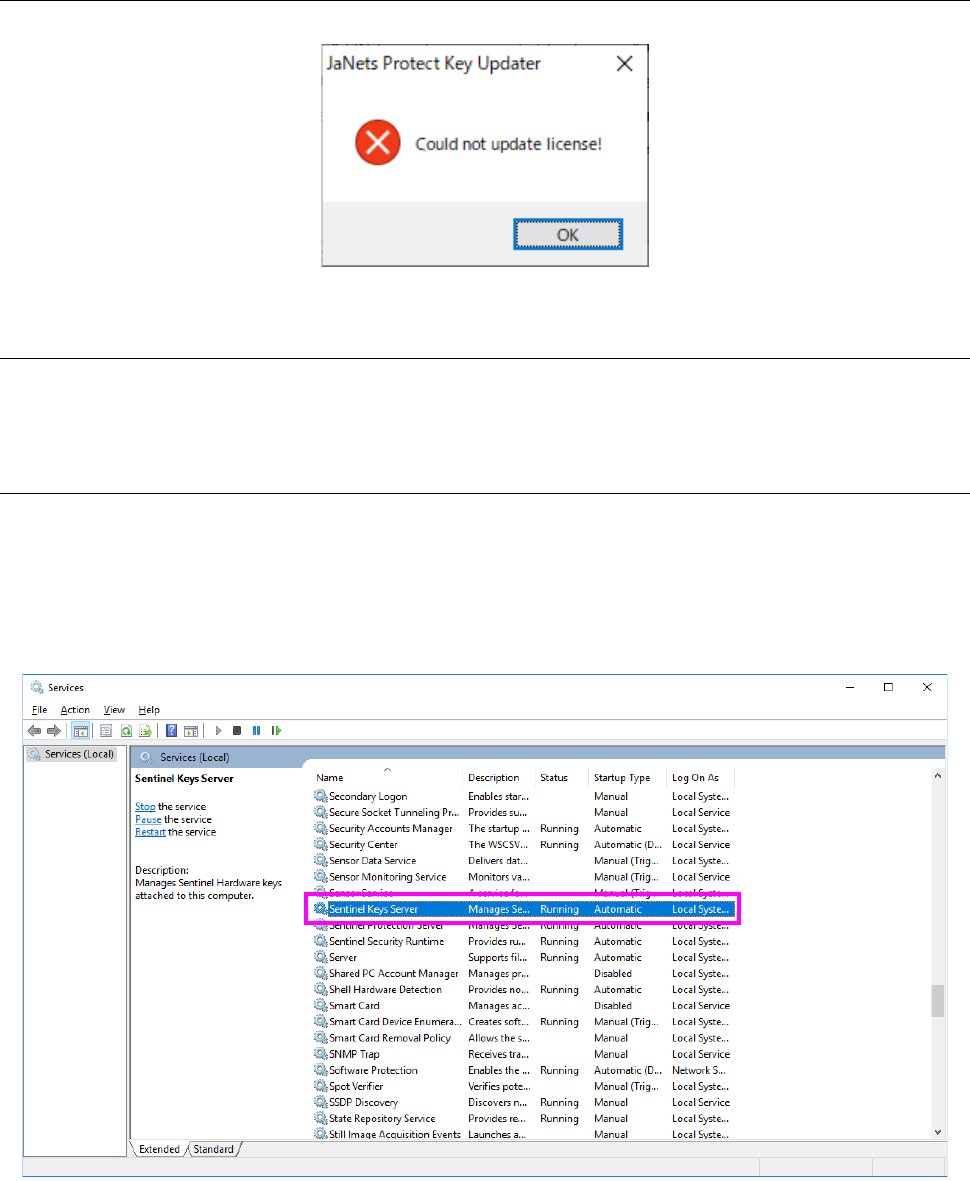
2.6.4 If the system fails to update the protect module
If the system fails to update the protect module, the following message appears on the screen.
Figure 2.6-3 Message indicating that the system failed to update the protect module
2.6.4.1 Checking the connection with the protect module
Check to see if the protect module is attached to the USB port, and then execute the update
processing again.
2.6.4.2 Checking the execution of the Sentinel SuperPro Server
Select [All Programs] – [Control Panel] – [Administrative Tools] from the “Start” menu, and then
[Services].
Check the “Sentinel Keys Server” and the “Sentinel Protection Server” from the list of services.
Confirm that “Start” is displayed in the respective “Status” column, and then execute the update
processing again.
Figure 2.6-4 List of services
If “Start” is not displayed in the respective “Status” column, start the services as shown below.