TS566R-UserGuide - 第6页
6 5. TO CONTROL SPRAY VALVE CAUTION: A 5-micron filter (TSD 800-6) must be installed with the un it to ensure pr oper air filtration. Figure 2.0 5.1 Connecting the Unit: (R efer to Figure 1 .0 and 2.0) 1. Connect the pow…
5
3. SPECIFICATIONS
4. FEATURES
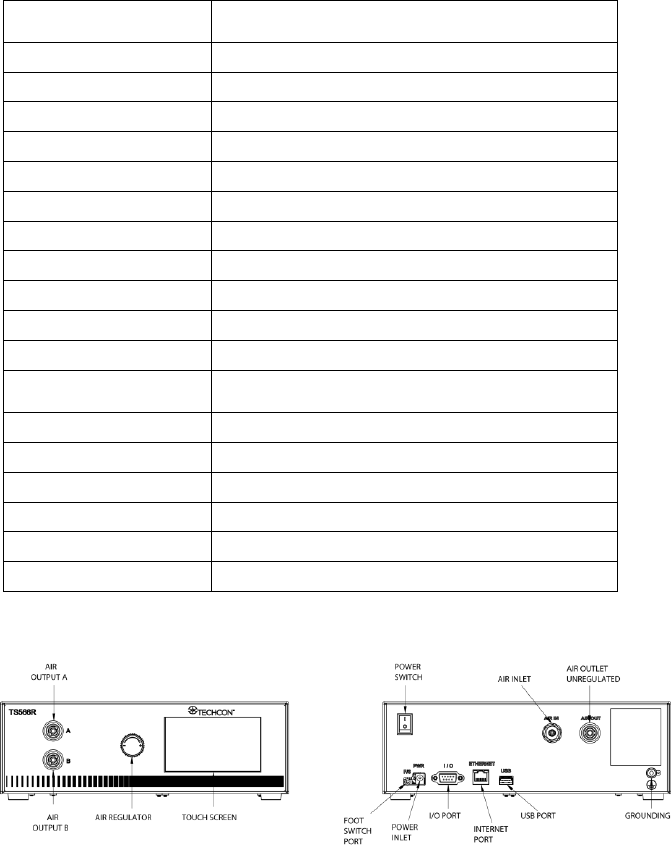
Figure 1.0
Size
290mm x 212mm x 98mm
(11.4” X 8.3” X 3.9”)
Weight
3.02 kg (6.65l bs)
Input Voltage
24VDC
Output Voltage Range
0-24 VDC
Rated Power
15W
Air Input
100 psi (6.9 bars) Max.
Air Output
0-99.9 Psi (6.9 bar)
Pollution Degree
II
Installation Category
I
Indoor Use
Altitude up to 2,000m (6,562ft)
Operating Temperature
0˚C to 50˚C (32˚F to 122˚F)
Storage Temperature
-10˚C to 60˚C (14˚F to 140˚F)
Max. Relative Humidity
80% for temperature up to 31˚C (87.8˚F) Decreasing
linearly to 50% relative humidity at 40˚C (104˚F)
Timer
0.008-99.99 seconds
Cycle Mode
Timed, Interrupt, Teach, Purge
Timing Repeat Tolerance
+/- 0.001%
Cycle Rate
900 cycles/min
Display
Touch Screen, Resistive
Meets or exceed
CE, TUV and NRTL

6
5. TO CONTROL SPRAY VALVE
CAUTION: A 5-micron filter (TSD800-6) must be installed with the unit to ensure proper
air filtration.
Figure 2.0
5.1 Connecting the Unit: (Refer to Figure 1.0 and 2.0)
1. Connect the power cord, foot switch to the back of the unit.
2. Connect Valve air hose to Port A (Not Regulated)
3. Connect Atomized air hose to Port B (Regulated)
4. Press the Power switch to turn on the unit.
Items
Description
1
Air Filter
2
Valve (not included)
3
Pressure Pot (not included)
4
Display
5
Power Adapter
6
Foot Switch

7
5.1.1 Login
1. Touch the Login Icon to enter login screen
2. Enter “0000” in Password window
3. Touch the Check Mark icon to save and exit
5.1.2 Pressure Calibration
Note: Pressure calibration must be performed when the unit is activated for
the first time.
1. Using a pressure gauge, verify that the input pressure line is delivering
approximately 100 psi
Note: If input pressure is not 100 psi, calibration will result in a
mismatch between the display pressure and the actual pressure on output
port B
2. Once you have verified input pressure, touch the Calibration icon
to enter calibration screen.