IPC 7711A.pdf - 第44页
3. Gradually reduce the coating thickness around the component body without con- tacting the board surface. Remove as much coating as possible from around component leads to allow easy removal of the leads. Clip leads of…
OUTLINE
This coating removal procedure uses a controlled, low temperature, localized heat-
ing method for removing thick coatings by an overcuring or softening means.
Two methods are covered. The first method uses various shaped, temperature con-
trolled tips, with dull edges to soften and remove the coating.
The second method uses a localized controlled jet of hot air or inert gas to soften
the coating material which is pushed away or removed by a non-marring tool.
These methods do not burn or char either the coating or printed board.
CAUTION
Soldering irons should not be used for coating removal as their high operating tem-
peratures will cause the coatings to char and possibly delaminate the printed board
base material.
The use of thinned down soldering iron tips or soldering iron heated thin cutting
blades are not recommended since they do not provide controlled heating and may
present dangerous sharp edges to the workpiece surface.
To determine the appropriate coating removal procedure the coating must first be
identified. Refer to procedure number 2.3.1.
REFERENCES
2.1 Handling Electronic Assemblies
2.2 Cleaning
2.3.1 Coating Removal, Identification of Coatings
2.4.1 Coating Replacement, Solder Resist
2.4.2 Coating Replacement, Conformal Coatings/Encapsulants
TOOLS AND MATERIALS
Brush
Heated Blade or Thermal
Parting Tool
Hot Air Tool
Knife
Small Cutters
Wood Sticks
PROCEDURE - THERMAL PARTING METHOD
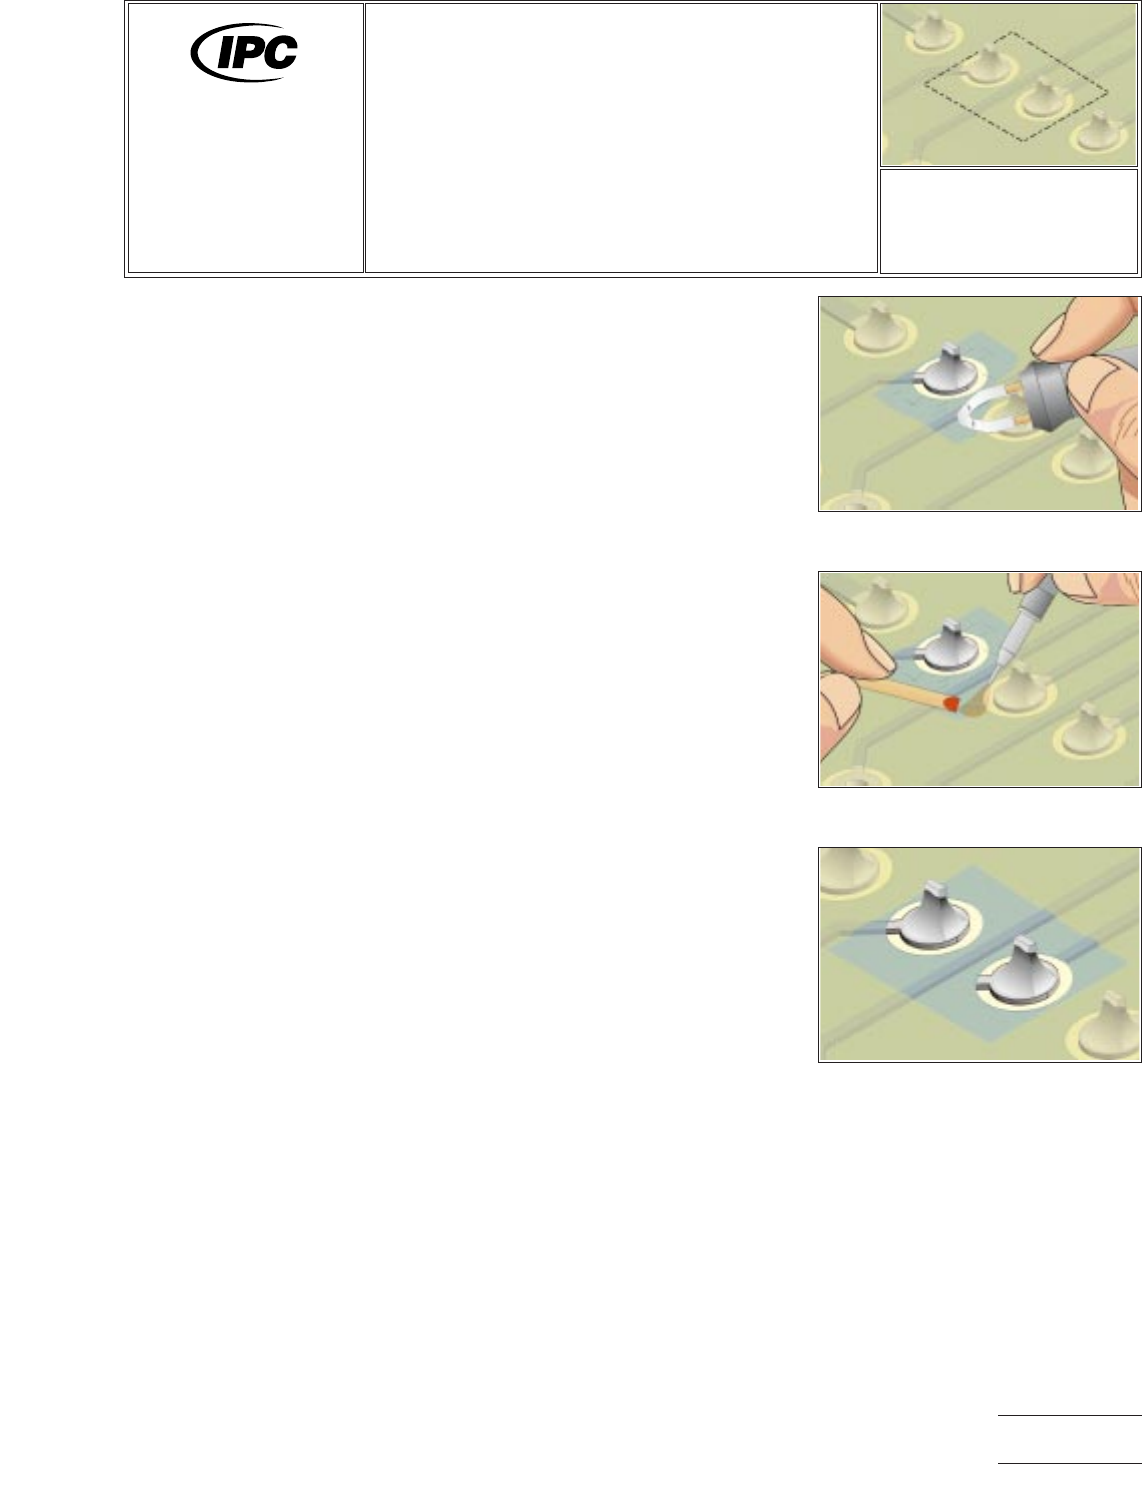
1. Select an appropriate thermal parting tip to suit the workpiece configuration. Set
the nominal tip temperature, using the manufacturer’s recommended procedure.
2. Apply the thermal parting tip to the coating, using a light pressure. The coating
material will either soften or granulate. Polyurethanes will soften and epoxies will
granulate. The tip temperature should be regulated to a point where it will effec-
tively ‘‘break down’’ the coating without scorching or charring. (See Figure 1.)
Figure 1 Apply thermal tip to soften
or granulate the material.
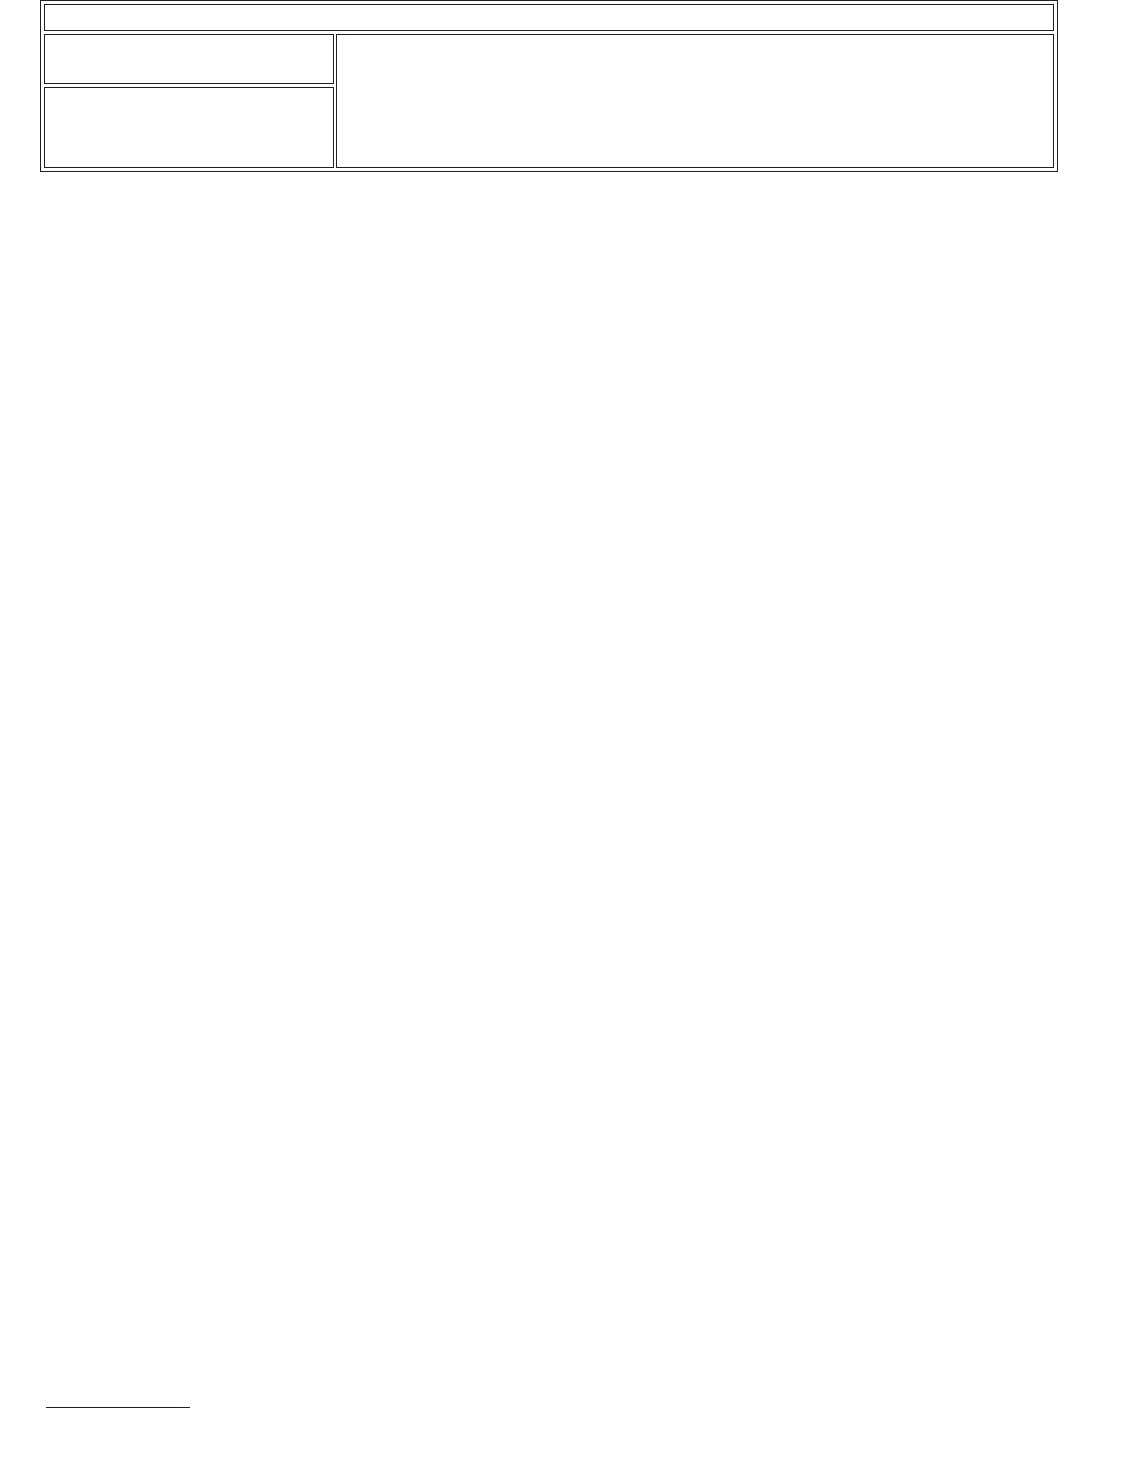
Figure 2 Apply hot air to the work
area and remove overcured coating.
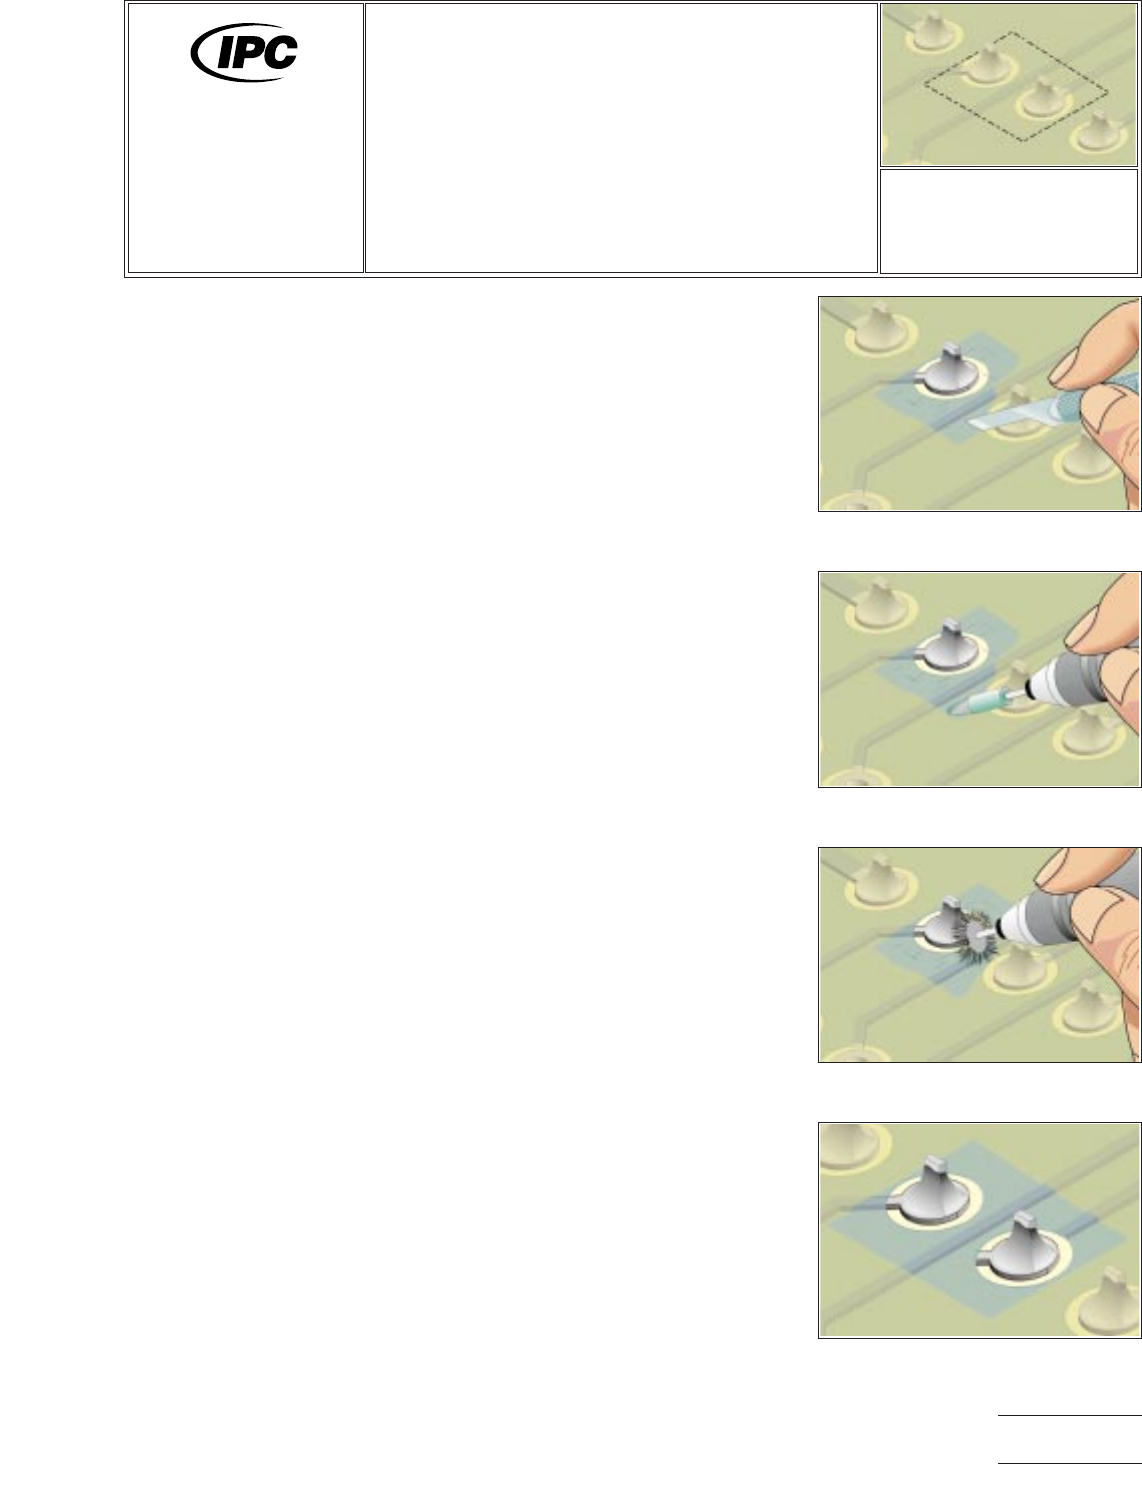
Figure 3 Removal complete.
7711A/7721A
General
Information and
Common Procedures
Revision:
Date: 2/98
Coating Removal,
Thermal Method
Number: 2.3.4
Product Class: R, F, W, C
Skill Level: Advanced
Level of Conformance: High
Material in this manual was voluntarily established by Technical Committees of IPC. This material is advisory only and its use
or adaptation is entirely voluntary. IPC disclaims all liability of any kind as to the use, application, or adaptation of this material.
Users are also wholly responsible for protecting themselves against all claims or liabilities for patent infringement. Equipment
referenced is for the convenience of the user and does not imply endorsement by IPC.
Page1of2
Copyright Association Connecting Electronics Industries
Provided by IHS under license with IPC
Not for Resale
No reproduction or networking permitted without license from IHS
--``,``,-`-`,,`,,`,`,,`---
3. Gradually reduce the coating thickness around the component body without con-
tacting the board surface. Remove as much coating as possible from around
component leads to allow easy removal of the leads.
Clip leads of component parts that are known to be faulty, thus permitting
removal of the part body separately from leads and solder joints. Low pressure
air or a brush should be used to remove the loosened coating.
4. Once sufficient coating has been removed, leaving only a small bonded joint
between the part body and printed board, heat the component body with the
thermal parting tool or hot air jet to weaken the bond beneath the component.
5. Lift the component body free of the printed board using small pliers.
NOTE
Twist the component prior to removal to shear any remaining epoxy bond to the
printed board surface.
6. Once the component body has been removed from the board surface, the
remaining coating material can be removed by additional thermal parting. The
remaining leads and solder joints are then removed by appropriate solder extrac-
tion means.
PROCEDURE - HOT AIR METHOD
By control of the gas/air temperature, flow rates and jet shape, the hot air method
can be applied to almost any workpiece configuration on both the component and
solder side of the printed board without damage.
Extremely delicate work can be handled in this manner while permitting direct obser-
vation of the heating action.
1. Set up the hot air tool per the manufacturer’s instructions. Adjust flow rate and
temperature to suit specific coating removal application.
CAUTION
Never set the gas/air temperature at a level that will cause scorching or charring
of the coating material or reflow the solder connections.
2. Apply the heated air jet to work area. Apply light pressure using a wood stick or
other non marring tool to remove the softened or overcured coating. All coating
around individual leads, solder joints and component bodies can be removed in
this manner. (See Figure 2.)
3. When the coating has been removed, use appropriate solder extraction method
to remove components if needed.
EVALUATION
1. Visual examination or UV light may be used to verify complete removal of coating.
NOTES
Coating Removal Required at Outlined Area
IPC-7711A/7721A
Number: 2.3.4
Revision:
Date: 2/98
Subject: Coating Removal, Thermal Method
Page2of2
Copyright Association Connecting Electronics Industries
Provided by IHS under license with IPC
Not for Resale
No reproduction or networking permitted without license from IHS
--``,``,-`-`,,`,,`,`,,`---
OUTLINE
This coating removal method uses various grinding and scraping tools, depending
on the composition of the coating material. A knife or dental style scraper is normally
used when a scraping method is desired. A hand held drill is normally used when a
grinding technique is desired. A wide variety of rotary abrasive materials including ball
mills may be required.
To determine the appropriate coating removal procedure the coating must first be
identified. Refer to procedure number 2.3.1.
CAUTION
Abrasion operations can generate electrostatic charges.
REFERENCES
2.1 Handling Electronic Assemblies
2.2 Cleaning
2.3.1 Coating Removal, Identification of Conformal Coatings
2.4.1 Coating Replacement, Solder Resist
2.4.2 Coating Replacement, Conformal Coatings/Encapsulants
TOOLS AND MATERIALS
Ball Mills
Brush
Cleaner
Cleaning Wipes
Hand Held Drill
Knife
Microscope
Rubberized Abrasives
Scraper
Wood Sticks
Rubber Eraser
PROCEDURE - SCRAPING
1. Clean the area.
2. Remove the damaged or unwanted coating or solder resist using a knife or
scraper. Hold the blade perpendicular to the coating and scrape from side to side
until the desired material is removed. (See Figure 1.)
3. Remove all loose material and clean the area.
PROCEDURE - GRINDING
1. Clean the area.
2. Insert an abrasive tip into the hand held drill. Abrade away the damaged or
unwanted coating. Move the tool from side to side to prevent damage to the
printed wiring board surface. (See Figure 2.)
3. Remove all loose material and clean the area.
Figure 1 Scrape away damaged or
unwanted coating.
Figure 2 Rubberized abrasives used
to remove thin, hard coating.
Figure 3 Rotary brushes are best
used to remove soft coating.
Figure 4 Removal complete.
7711A/7721A
General
Information and
Common Procedures
Revision:
Date: 2/98
Coating Removal,
Grinding/Scraping
Method
Number: 2.3.5
Product Class: R, F, W, C
Skill Level: Advanced
Level of Conformance: High
Material in this manual was voluntarily established by Technical Committees of IPC. This material is advisory only and its use
or adaptation is entirely voluntary. IPC disclaims all liability of any kind as to the use, application, or adaptation of this material.
Users are also wholly responsible for protecting themselves against all claims or liabilities for patent infringement. Equipment
referenced is for the convenience of the user and does not imply endorsement by IPC.
Page1of2
Copyright Association Connecting Electronics Industries
Provided by IHS under license with IPC
Not for Resale
No reproduction or networking permitted without license from IHS
--``,``,-`-`,,`,,`,`,,`---