YRM20_Mainte_E.pdf - 第116页
5. 1-year maintenance 3-49 Chapter 3 Periodic maintenance items 5.3 Cleaning/lubricating the W -axis and U-axis T he once-a-year cleaning and lubricating for ball screw , guide, and hexagon spline of W -axis and U-axis i…
5. 1-year maintenance
3-48
Chapter 3 Periodic maintenance items
9
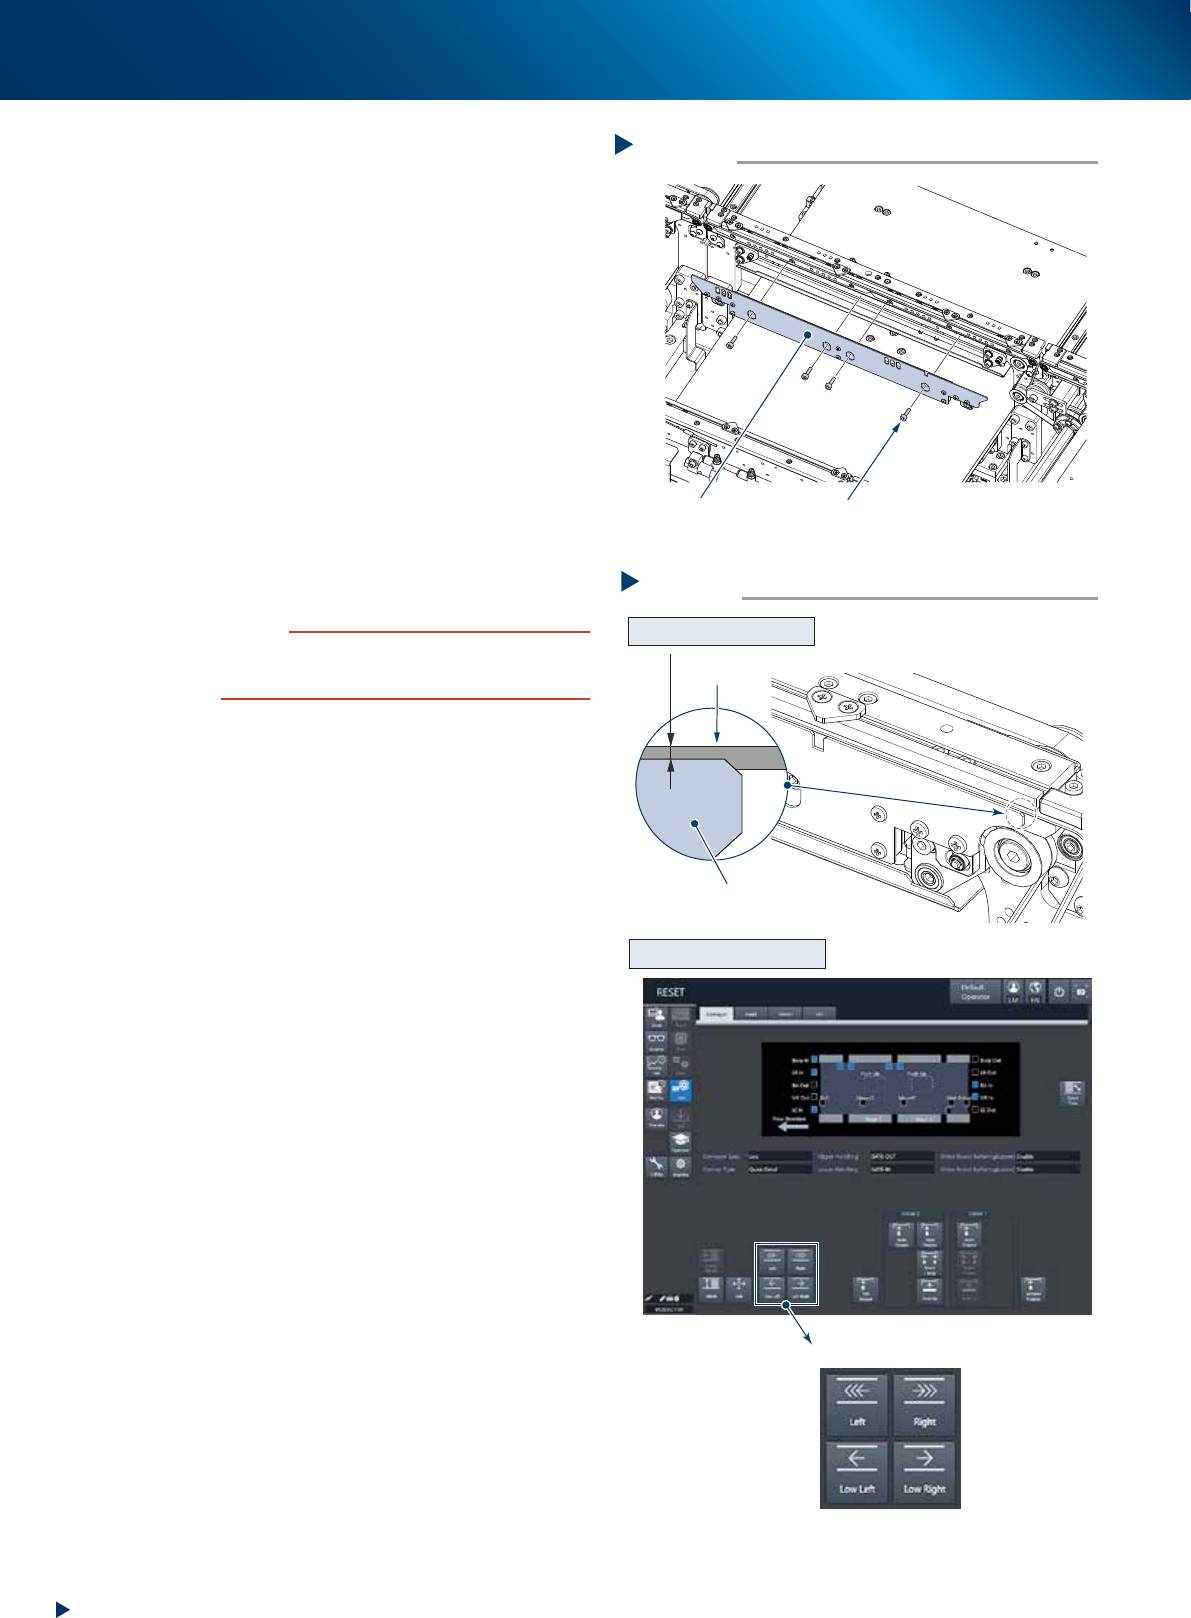
Attach board clamp plate.
1. Attach the board clamp board to the original
position. Mount it by tightening the board
mounting bolt using a hexagon wrench (3).
2. Retrieve a square cloth.
0
Check that the conveyor belt is attached
correctly.
1. Check that the upper surface of board clamp
is in a position at approx. 0.5mm lower
than that of the belt.
2. Attach the upper cover, close the machine
safety cover and attach the feeder exchange
carriage. Then release the emergency stop.
3. Press the [Conveyor drive] button on the
[Unit] - [Conveyor] screen to run the
conveyor belt and check its motion.
4. When the conveyor belt does not run evenly
or there is a slack in the belt, adjust again
the position of bracket (pulley for CV1 and
CV4).
c
CAUTION
When the upper surfaces of belt and board clamp are
almost even, the board transfer error may occur. Contact
your sales representative as such occasion.
Attaching the board clamp plate
Step 9
Board clamp plate
Mounting bolt
53368-KMX-00
Checking the attached conveyor belt
Step 10
[Conveyor drive] button
Checking the attached status
Checking the conveyor motion
0.5 mm
Board clamp plate
Belt
54305-KMX-00
5. 1-year maintenance
3-49
Chapter 3 Periodic maintenance items
5.3
Cleaning/lubricating the W-axis and U-axis
The once-a-year cleaning and lubricating for ball screw, guide, and hexagon spline of W-axis and U-axis is
required. See also "Chapter 4 Lubricating points" for details.
1
Read any board data.
TIP
Moving the push up unit of both stage 1 and stage 2 are
available by reading board data.
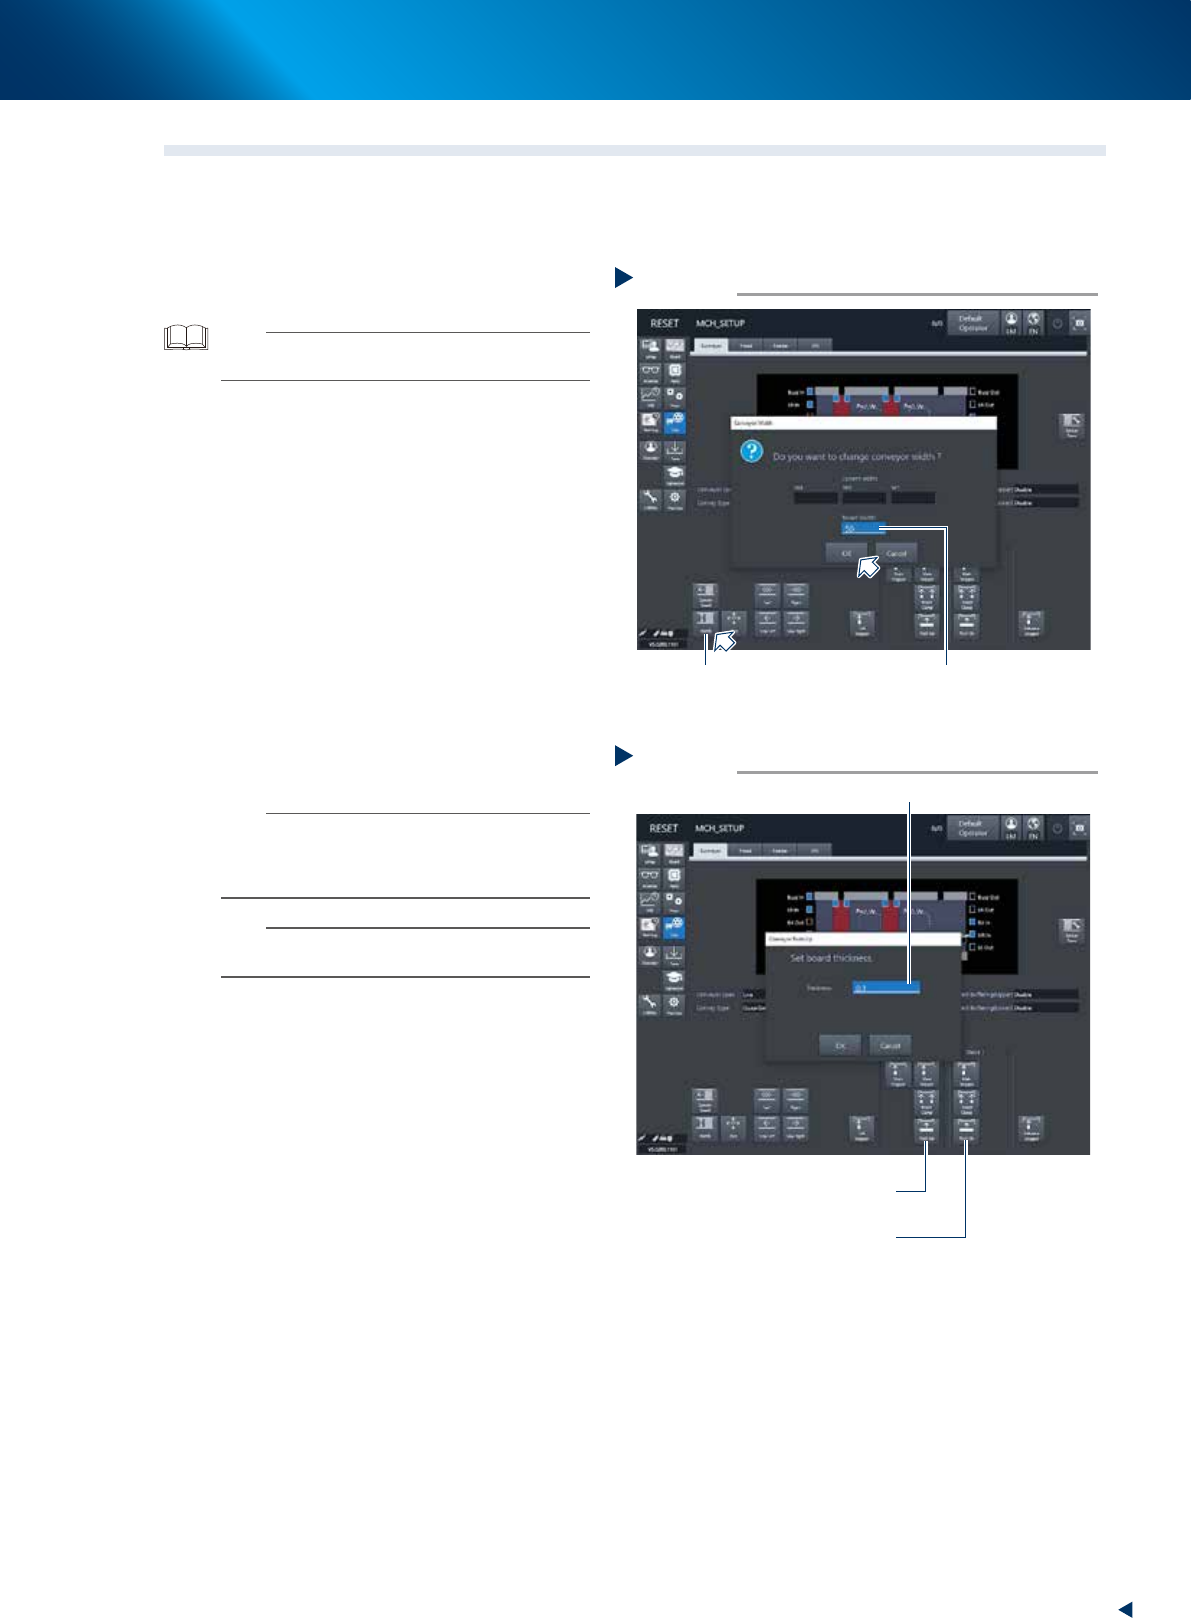
2
Set the conveyor width to the minimum.
1. Press the [Width] button on the [Unit] -
[Conveyor] screen to display the [Conveyor
width] screen.
2. Input the minimum width of "50mm" in the
"Target width" field and press the [OK]
button. Then the conveyor width is changed
to the specified.
3
Raise the push up unit.
1. Press the [Push up] button to display the
"Conveyor Pushup" screen.
2. Input "0.1 mm" in the "Board thickness" field
and press the [OK] button. Then the push up
unit raises.
3. Raise the push up units of both stage 1 and
stage 2 by the procedure above.
n
NOTE
When the board size X of the board data selected at Step
1 excesses 380mm, the [Push up] button of upstream side
is grayed-out. The upstream push up unit raises engaging
with the raise of downstream push up unit.
n
NOTE
The access to the guide and ball screw of U-axis become
easier by raising the push up units.
Minimizing the conveyor width
Step 2
[Width] button Input “50mm”
54306-KMX-00
Raising the push up unit
Step 3
Stage 1
[Push Up] button
Input “0.1mm”
Stage 2
[Push Up] button
54307-KMX-00
5. 1-year maintenance
3-50
Chapter 3 Periodic maintenance items
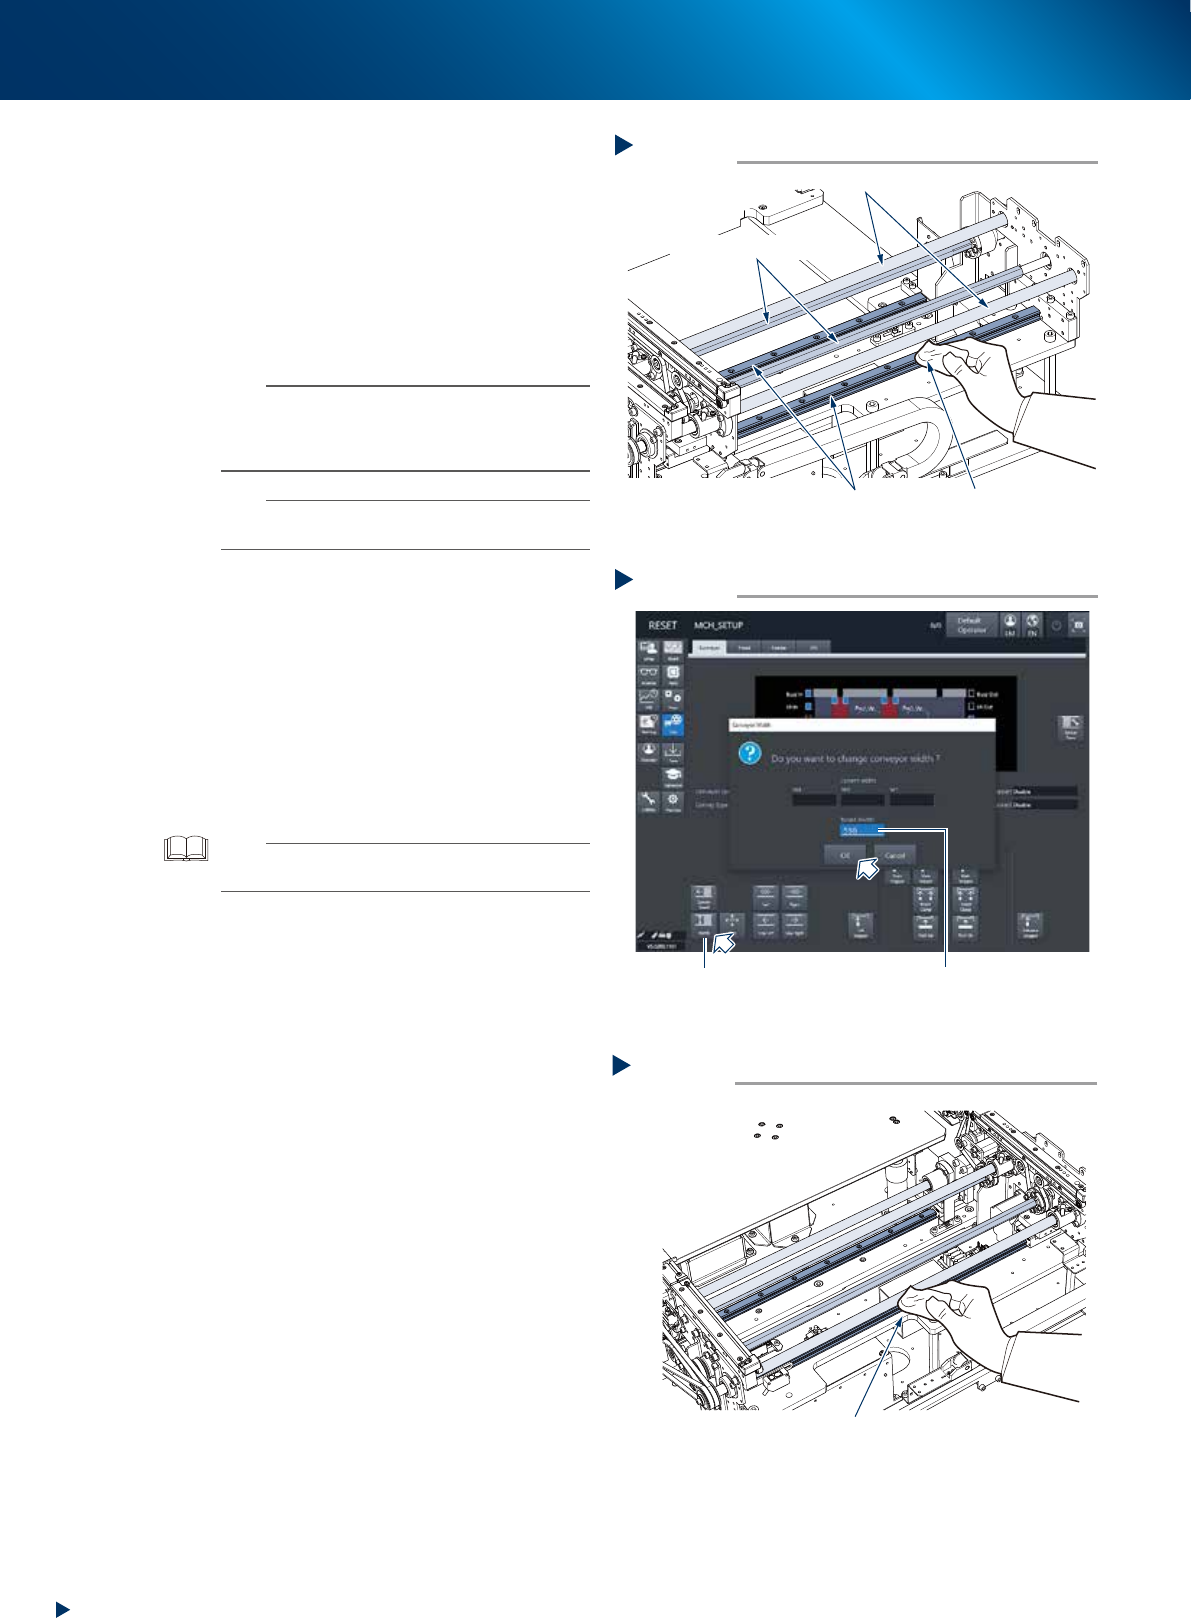
4
e
Clean each section of W-axis and U-axis.
1. Press the emergency stop button and detach
the feeder exchange carriage. Then open
the machine safety cover.
2. Remove all items sensitive to magnetic fields
such as wristwatches and magnetic ID cards.
3. Wipe away old grease or dirt from all over
the 8 ball screws, 6 guides, and 4 hexagon
spline of W-axis and U-axis, using a lint-free
cloth or similar.
n
NOTE
Carefully wipe the lead grooves of ball screw and the
grooves of guide rail during cleaning. Also, make sure
that no dust, lint and debris remain on the ball screw and
guide.
n
NOTE
See also "Chapter 4 Lubricating points" for the positions
and numbers of ball screw, guide, and hexagon spline.
5
Maximize the conveyor width.
1. Close the machine safety cover and attach
the feeder exchange carriage. Then release
the emergency stop.
2. Press the [Conveyor width] button to display
the [Conveyor width] screen.
3. Input the maximum width of "510mm" of the
dual stage type machine in the "Changed
conveyor width" field and press the [OK]
button. Then the conveyor width is changed
to the specified.
TIP
The push up unit lowers automatically by changing the
conveyor width.
6
Raise the push up unit by the same
procedure of Step 3.
e
7
Wipe away the remained grease.
1. Press the emergency stop button and detach
the feeder exchange carriage. Then open
the machine safety cover.
2. Wipe the area not accomplished at Step 4
using a lint-free cloth or similar.
Step 4
Cleaning the W-axis and U-axis
Ball screws
Guide
Hexagon spline shaft
Lint-free cloth
53369-KMX-10
Step 7
Cleaning the W-axis and U-axis 2
Wipe the remained area
53370-KMX-10
Maximizing the conveyor width
Step 5
[Width] button
Input “510mm”
54308-KMX-00