YRM20_Mainte_E.pdf - 第125页
5. 1-year maintenance 3-58 Chapter 3 Periodic maintenance items 5.6 Feeder exchange carriage 5.6.1 Cleaning and lubricating of hoisting shaft section of feeder exchange carriage Clean and lubricate the hoisting section o…
5. 1-year maintenance
3-57
Chapter 3 Periodic maintenance items
4
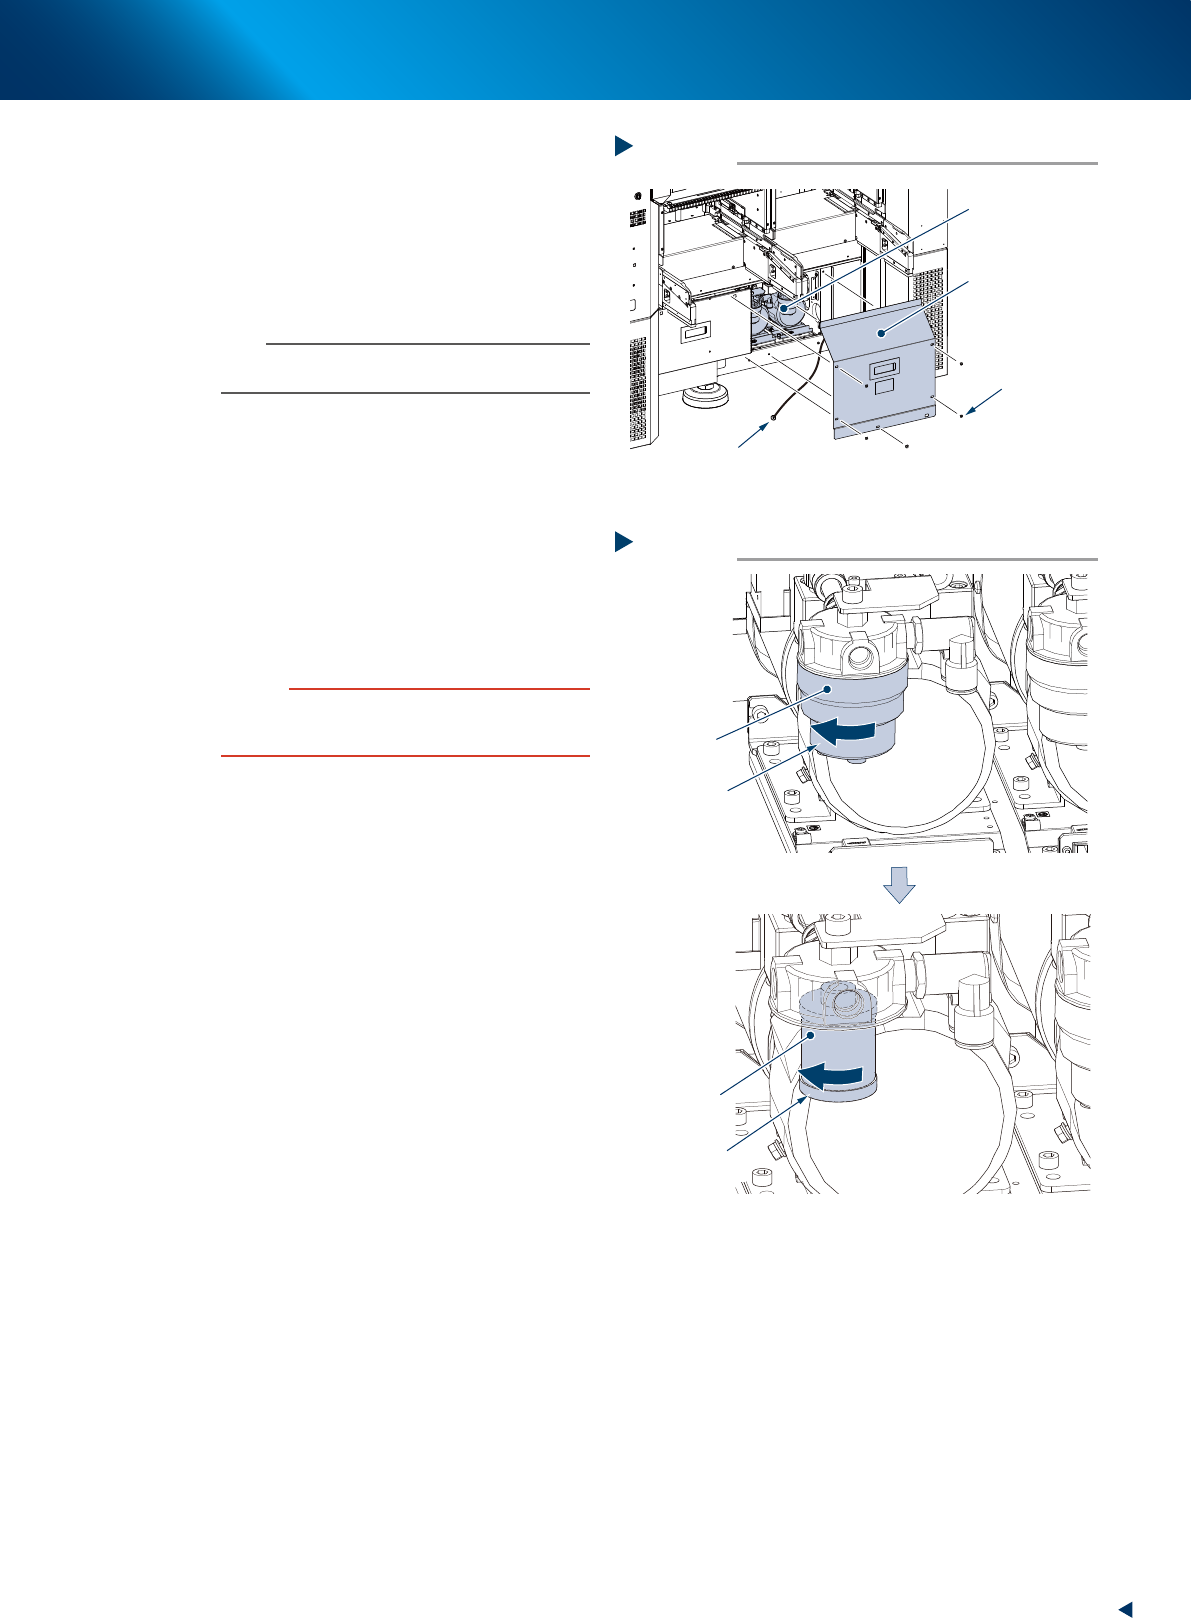
Detach the inner cover.
1. Remove 5 mounting screws of the inner
cover (front right) using Phillips screwdriver.
2. Detach the inner cover.
3. The ground wire is connected at the center
of the inner cover reverse side. Remove the
wire mounting screw using Phillips
screwdriver.
n
NOTE
The mounting screw of ground wire is used with a tooth
lock washer. Be careful not to lose it upon detaching.
5
Replace the filter element.
1. Detach the filter cup by rotating it to left.
2. Rotate the air filter element to left to detach
and replace it with a new one.
3. Rotate the filter cup to right to attach it.
6
Return the inner cover and the cutter
cover to their original positions.
1. Attach the inner cover.
2. Attach the tape cutter cover.
c
CAUTION
• Be careful not to forget the reconnecting of ground wire
to the inner cover.
• Be careful not to tuck the cable upon attaching covers.
Step 4
vacuum pump
Inner cover
(front right)
Mounting screw
Ground wire mounting screw
Detaching the inner cover
5339F-KMX-10
Replacing the filter element
Step 5
Filter cup
Rotate to arrow
direction to detach
Rotate to arrow
direction to detach
Filter element
5339K-KMX-00
5. 1-year maintenance
3-58
Chapter 3 Periodic maintenance items
5.6 Feeder exchange carriage
5.6.1
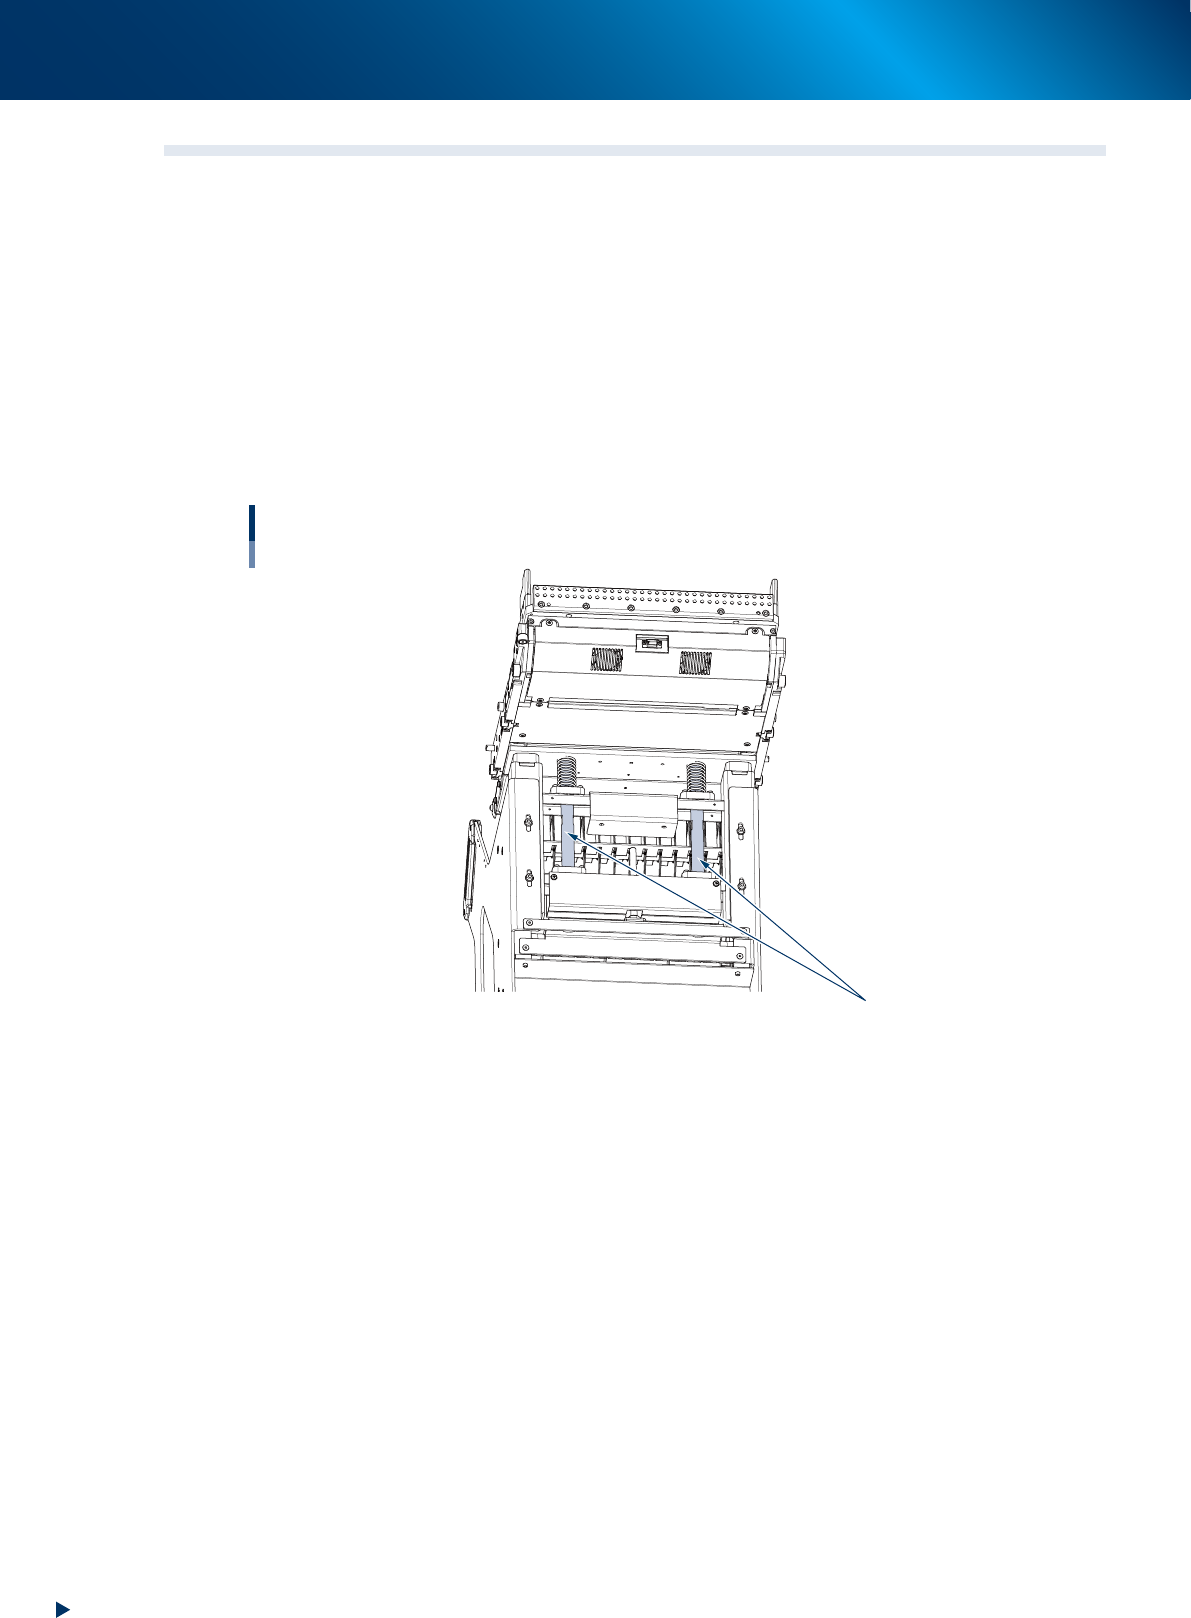
Cleaning and lubricating of hoisting shaft section of feeder exchange carriage
Clean and lubricate the hoisting section of feeder exchange carriage once a year.
1
e
Press the emergency stop button and detach the feeder exchange carriage.
2
Wipe away the deteriorated grease or dirt on 2 hoisting shaft section of feeder
exchange carriage using a lint-free cloth or the similar.
3
Apply the prescribed grease (NSL) uniformly to the hoisting shaft section of
feeder exchange carriage by hand.
Hoisting shaft section of feeder exchange carriage
Cleaning and lubricating points
Hoisting shaft section
533H8-KMX-00
6. 2-year maintenance
3-59
Chapter 3 Periodic maintenance items
6. 2-year maintenance
This section describes 2-year maintenance items.
6.1 HM head unit
6.1.1 Replacement of ejector bit
The ejector bit deteriorates its function during a long time usage. Its replacement to the new ejector bit is
recommended in every 2 years to keep the machine performance, even it depends the operating condition.
Here describes the replacement method.
c
CAUTION
A bit is non-reusable. The new one should be prepared for replacement.
1
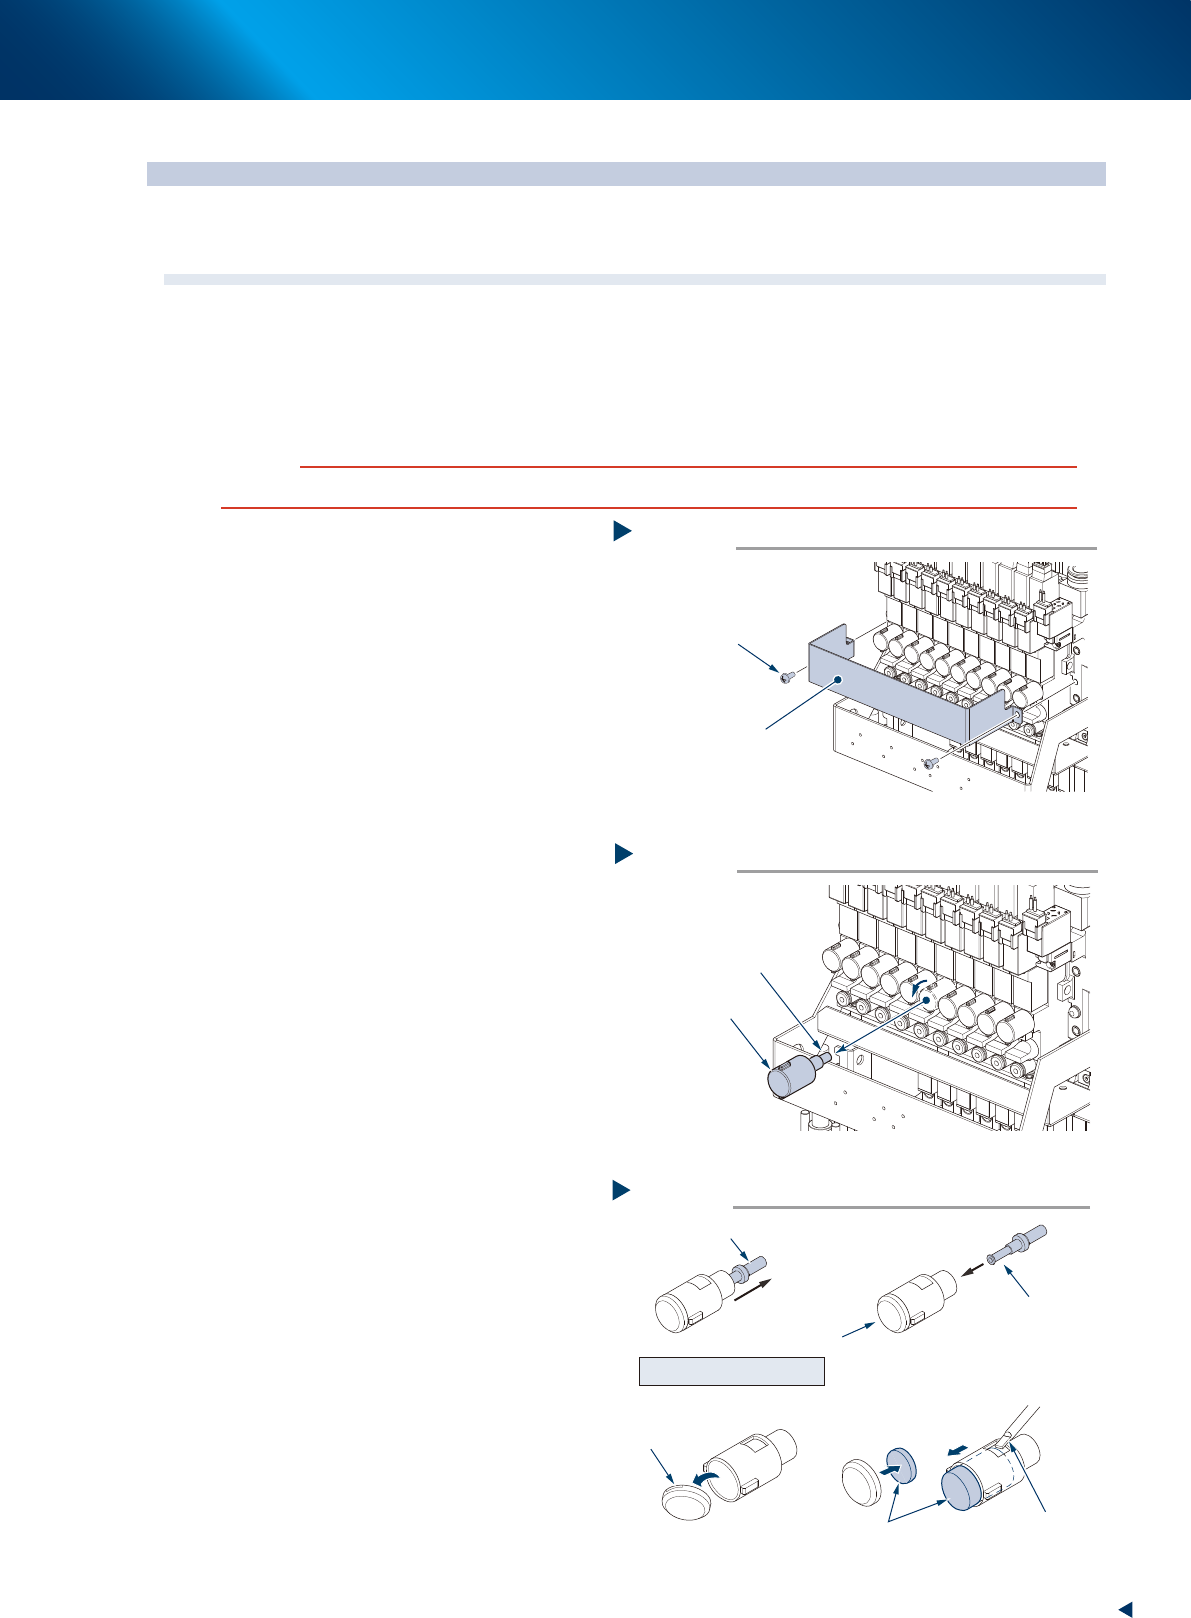
Prepare for work.
1. Remove all items sensitive to magnetic fields
such as wristwatches and magnetic ID card.
e
2. Press the emergency stop button and detach
the feeder exchange carriage.
3. Open the machine safety cover and place a
square cloth right below the target head
unit.
2
Remove the current plate using Phillips
screwdriver.
3
Remove the bit cap by rotating it to left
by hand.
4
Pull out the bit to be replaced from bit
cap and insert the new bit.
When the muffler is soiled, replace it
also.
5
Attach the bit to head.
1. Insert the bit cap to its original position and
rotate to right to fix.
2. Attach the current plate to its original
position using Phillips screwdriver.
3. Retrieve the square cloth.
Removing the current plate
Step 2
Current plate
Mounting screw (Phillips)
53394-KMX-00
Removing the bit
Step 3
Bit cap
Bit
53395-KMX-00
Replacing the bit
Step 4
Bit to be replaced
New bit
Precision flat-head
screwdriver
Notch
Remove the tip of bit cap
Tip of bit cap
Replace the muffler
Muffler
Soiled muffler
53396-KMX-00