YRM20_Mainte_E.pdf - 第151页
1. Nozzles 5-2 Chapter 5 How to replace consumable parts 1.2 Replacing O-ring at nozzle tip e 1 Detach t he nozzl e. 1. Press t he emergency stop button and detach carriage from mount er . T hen open the machine safety c…
1. Nozzles
5-1
Chapter 5 How to replace consumable parts
1. Nozzles
When the nozzle tip or O-ring is worn out due to long-term use, pickup and placement errors are
likely to occur. If the spring action of a nozzle is not smooth even after cleaning and lubricating the
nozzle, the internal spring may need to be replaced.
1.1 Replacing nozzle tip and spring
e
1
Detach the nozzle.
1. Press the emergency stop button and open
the machine safety cover.
2. Detach relevant nozzle manually.
2
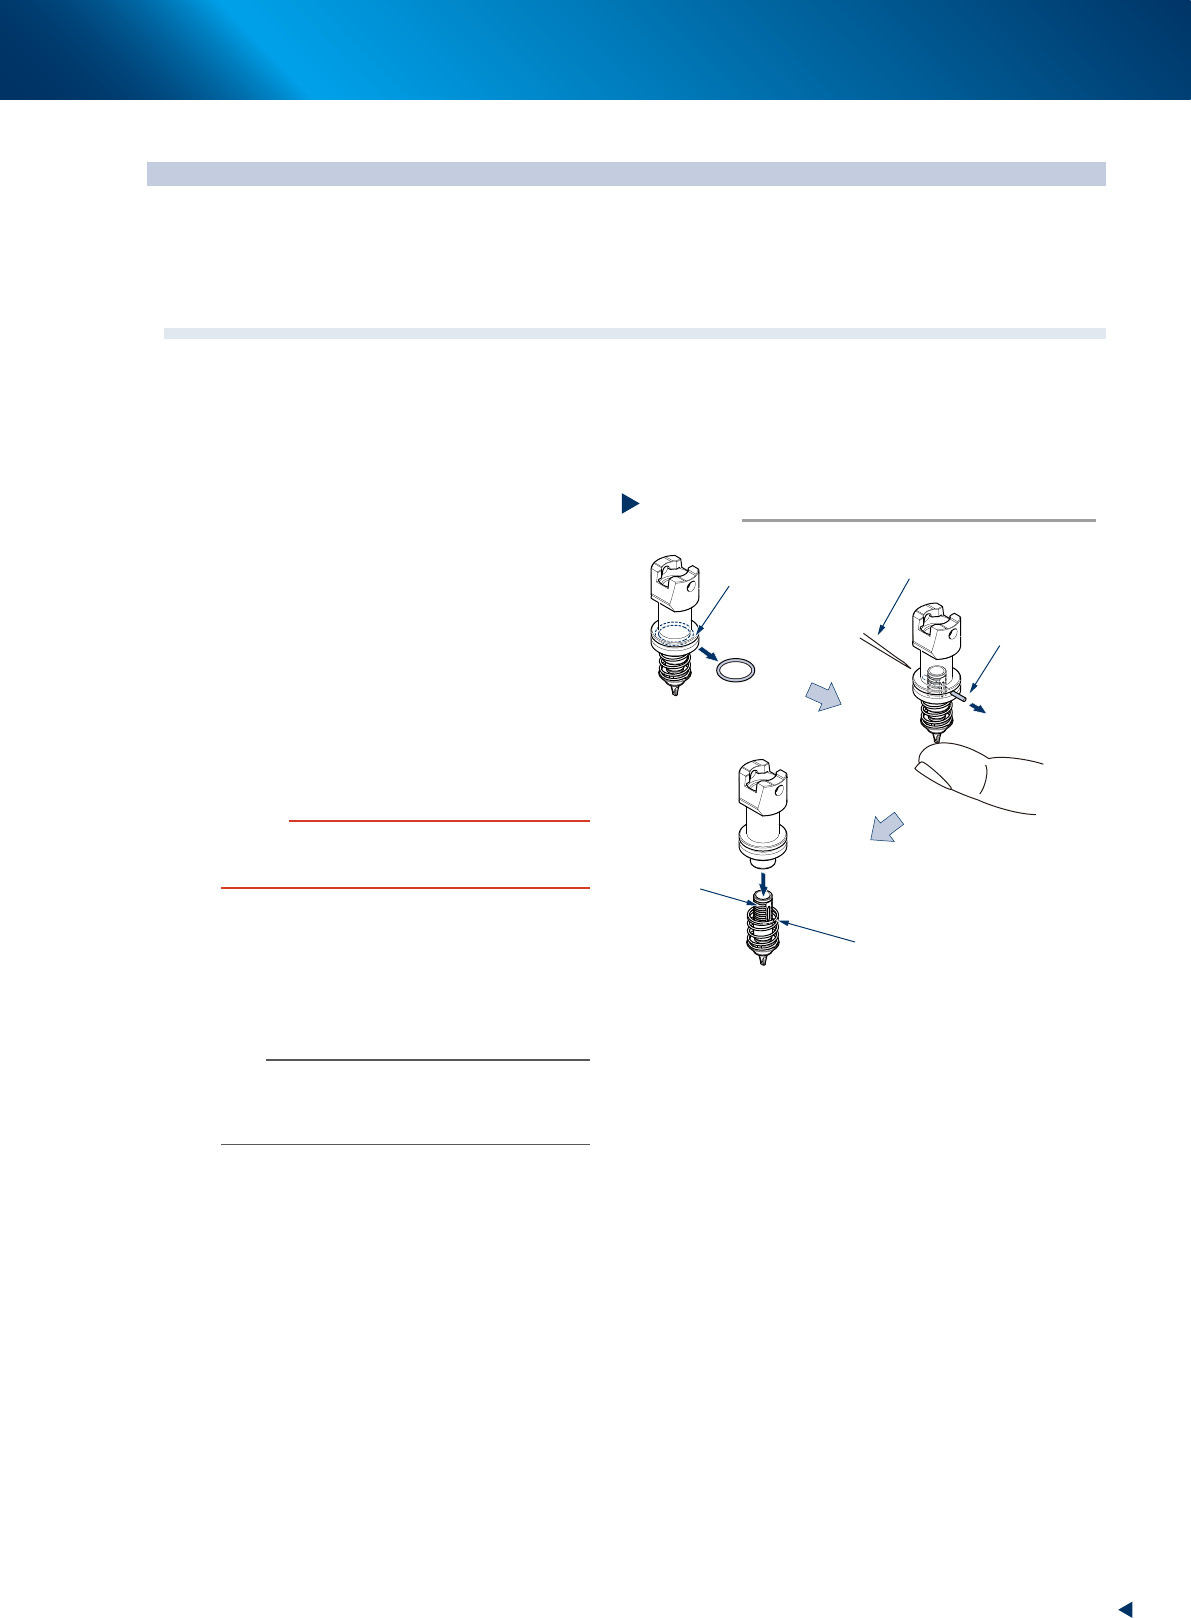
Replace the nozzle tip and spring.
1. Detach the O-ring from the nozzle.
2. Push out the pin using some needle-like
material while pushing up lightly the nozzle
tip.
3. The internal spring comes out as the nozzle
tip is detached, then replace the nozzle tip
and/or spring.
4. Mount the nozzle tip using a pin. Insert a
pin to the position which is aligning to the
nozzle tip inserting position.
5. Attach the O-ring. When it is worn or
deteriorated, replace it.
c
CAUTION
See "2.1.3 Common to all models" in Chapter 1 to check
that nozzle marking (example: 8104A, 8105A) impressed
on nozzle body matches type No. of nozzle tip.
3
Lubricate nozzle slide section referring
to "1.2.1 Cleaning and lubricating
nozzle sliding section" in Chapter 3.
4
Return nozzles to the original heads.
n
NOTE
Be sure to return the nozzle you have detached to its
mating head. When the nozzle has been detached from
the nozzle station (option), return it correctly to the storage
position where you have detached the nozzle.
Pull out
Pull out
Push out with a tweezer like material
Replacing nozzle tip
Step 2
O-ring
Pin
Spring
Tip part
53500-KMX-00
1. Nozzles
5-2
Chapter 5 How to replace consumable parts
1.2 Replacing O-ring at nozzle tip
e
1
Detach the nozzle.
1. Press the emergency stop button and detach
carriage from mounter. Then open the
machine safety cover.
2. Detach relevant nozzle manually.
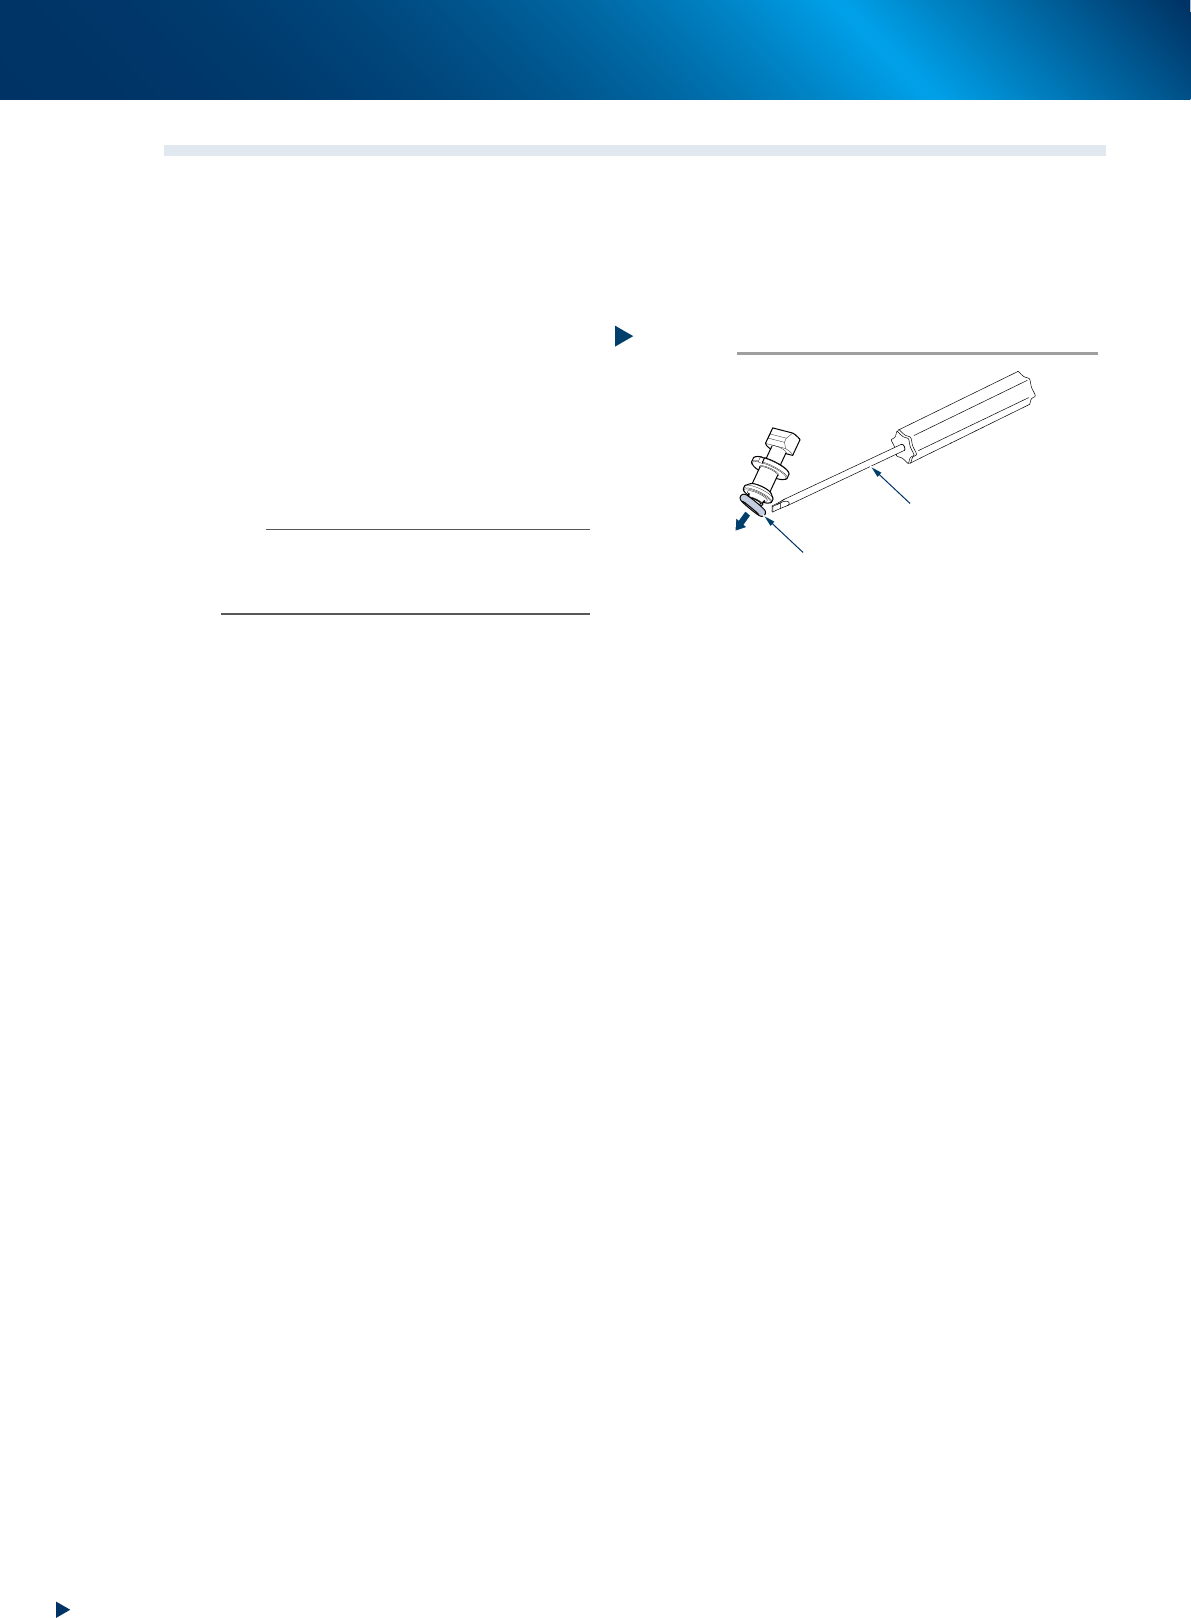
2
Detach the O-ring and replace it with a
new one. When the O-ring is difficult to
detach, use a precision flathead
screwdriver to detach it.
3
Return the detached nozzle to its
original position.
n
NOTE
Be sure to return the nozzle you have detached to its
mating head. When the nozzle has been detached from
the nozzle station (option), return it correctly to the storage
position where you have detached the nozzle.
Detaching the nozzle O-ring
Step 2
O-ring
Precision flat-head screwdriver
53501-KMX-00
2. Nozzle leaf springs
5-3
Chapter 5 How to replace consumable parts
2. Nozzle leaf springs
When a problem is found after checking the nozzle leaf springs as described in "1.1.2 Check
the condition of nozzle leaf spring" in Chapter 3, the nozzle leaf springs must be replaced. Here
describes the replacement procedure of nozzle leaf spring (hereinafter referred to as leaf spring).
c
CAUTION
As a rule, be sure to replace a pair of components even when only the nozzle leaf spring on one side deteriorates.
2.1 HM head
:
Replacing nozzle leaf springs
The following describes how to replace the nozzle leaf spring (hereafter "leaf spring"). If the leaf spring
attachment tool is provided, see "Upon using the leaf spring installation tool (option)" described later on.
e
1
Detach the nozzle.
1. Press the emergency stop button and detach
the feeder exchange carriage.
2. Open the machine safety cover and move
the head unit to the position where facilitates
your work.
3. Place a square cloth beneath the head unit.
4. If a nozzle is attached to the head which
has a leaf spring to be replaced, detach the
nozzle manually.
n
NOTE
When the machine is equipped with a nozzle station,
return all nozzles to the nozzle station.
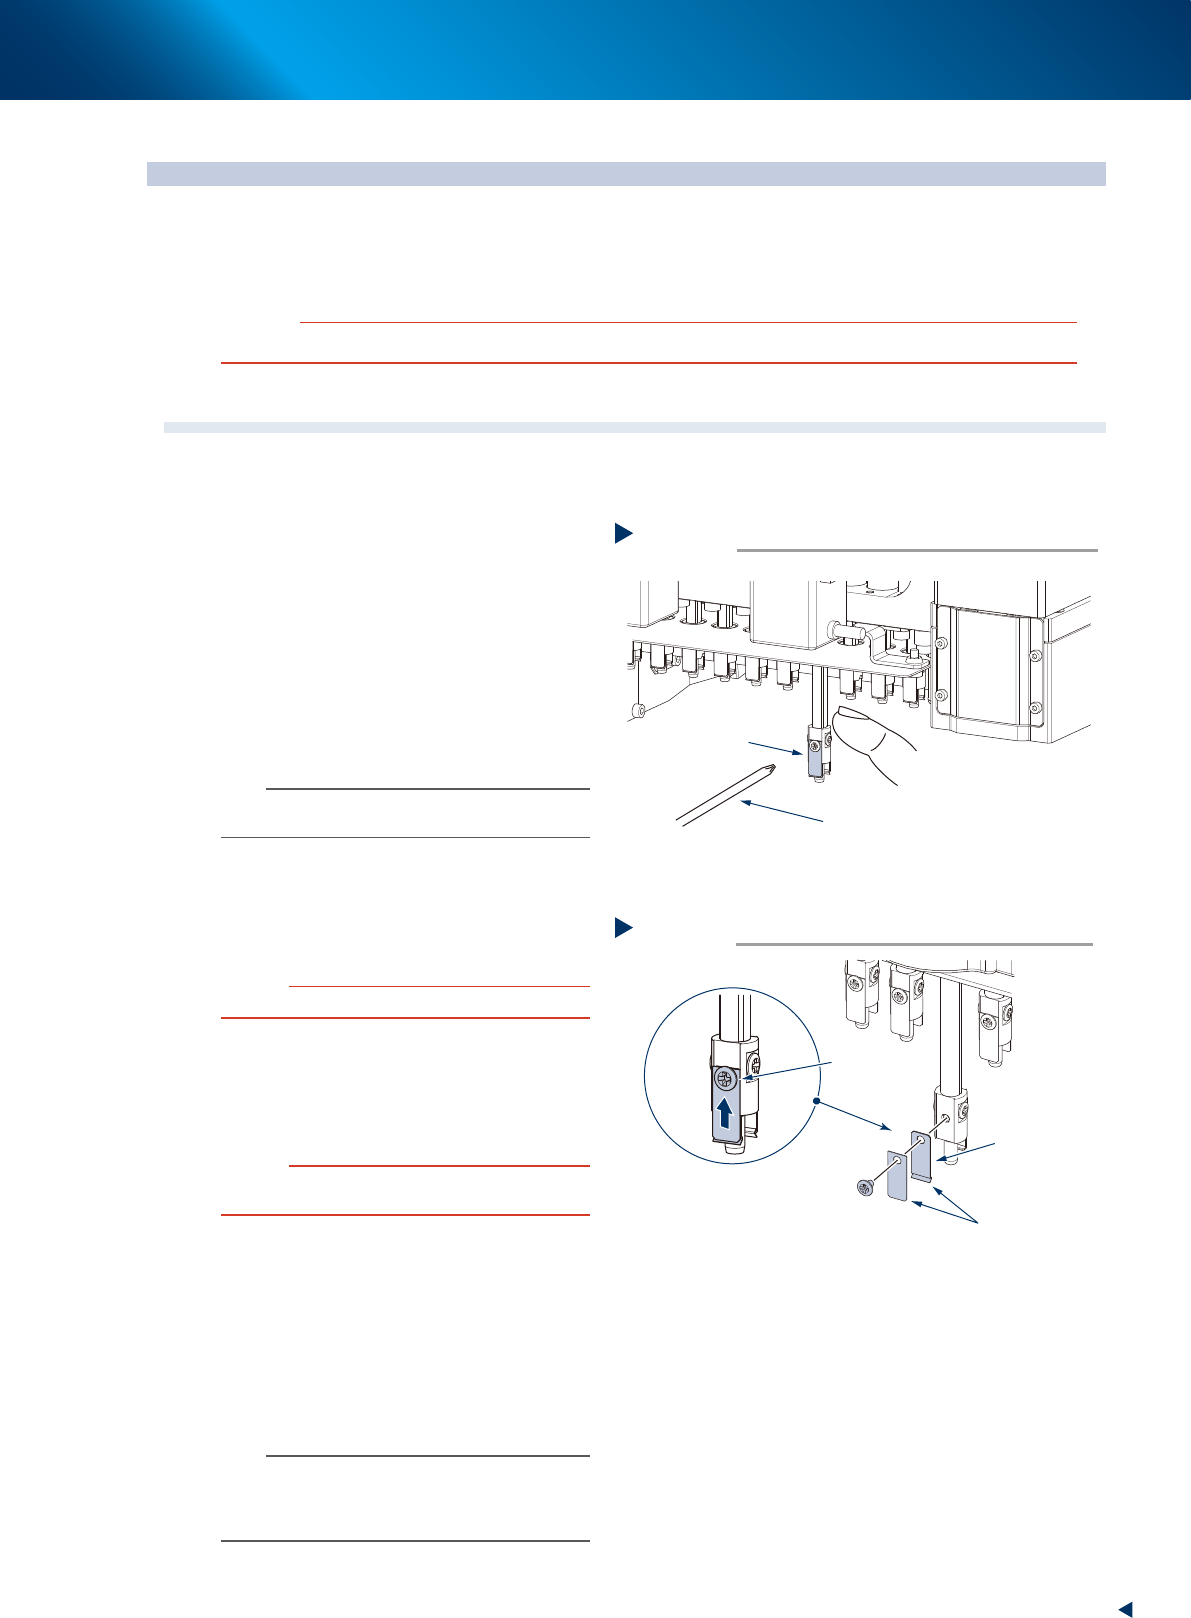
2
Detach the leaf springs to be replaced,
by removing mounting screw with a
precision Phillips screwdriver while
holding shaft.
c
CAUTION
Only remove the screw of leaf springs.
3
Attach the new leaf spring by keeping it
pushed upward and tightening mounting
screw with a precision Phillips
screwdriver to assemble leaf spring.
c
CAUTION
Always attach the leaf springs so that they become
parallel.
4
Attach the nozzle.
5
Check that the nozzle is held securely.
1. Insert the nozzle and check that there is no
gap between leaf spring and nozzle.
2. Manually detach/attach nozzle several
times to check that there is no looseness.
3. Retrieve a square cloth.
n
NOTE
Be sure to return the nozzle you have detached to its
mating head. When the nozzle has been detached from
the nozzle station (option), return it correctly to the storage
position where you have detached the nozzle.
Detaching the leaf spring
Step 2
Precision Phillips screwdriver
Leaf spring to
be replaced
53502-KMX-00
Attaching the leaf springs
Step 3
New leaf springs
Confirm
the direction
of leaf springs
Mounting screw
Tighten the mounting screw
while keeping the leaf springs
pushed upward
53503-KMX-00