YRM20_Mainte_E.pdf - 第51页
Chapter 2 Daily maintenance items Contents Before maintenance work 2-1 Maintaining head unit 2-2 Attaching/Detaching upper co ver 2-3 1. Checking the nozzle 2-6 1. 1 Checking with sof tware 2-6 1. 1.1 V acuum level when …
2. Preparing for maintenance tasks
1-17
Chapter 1 Maintenance
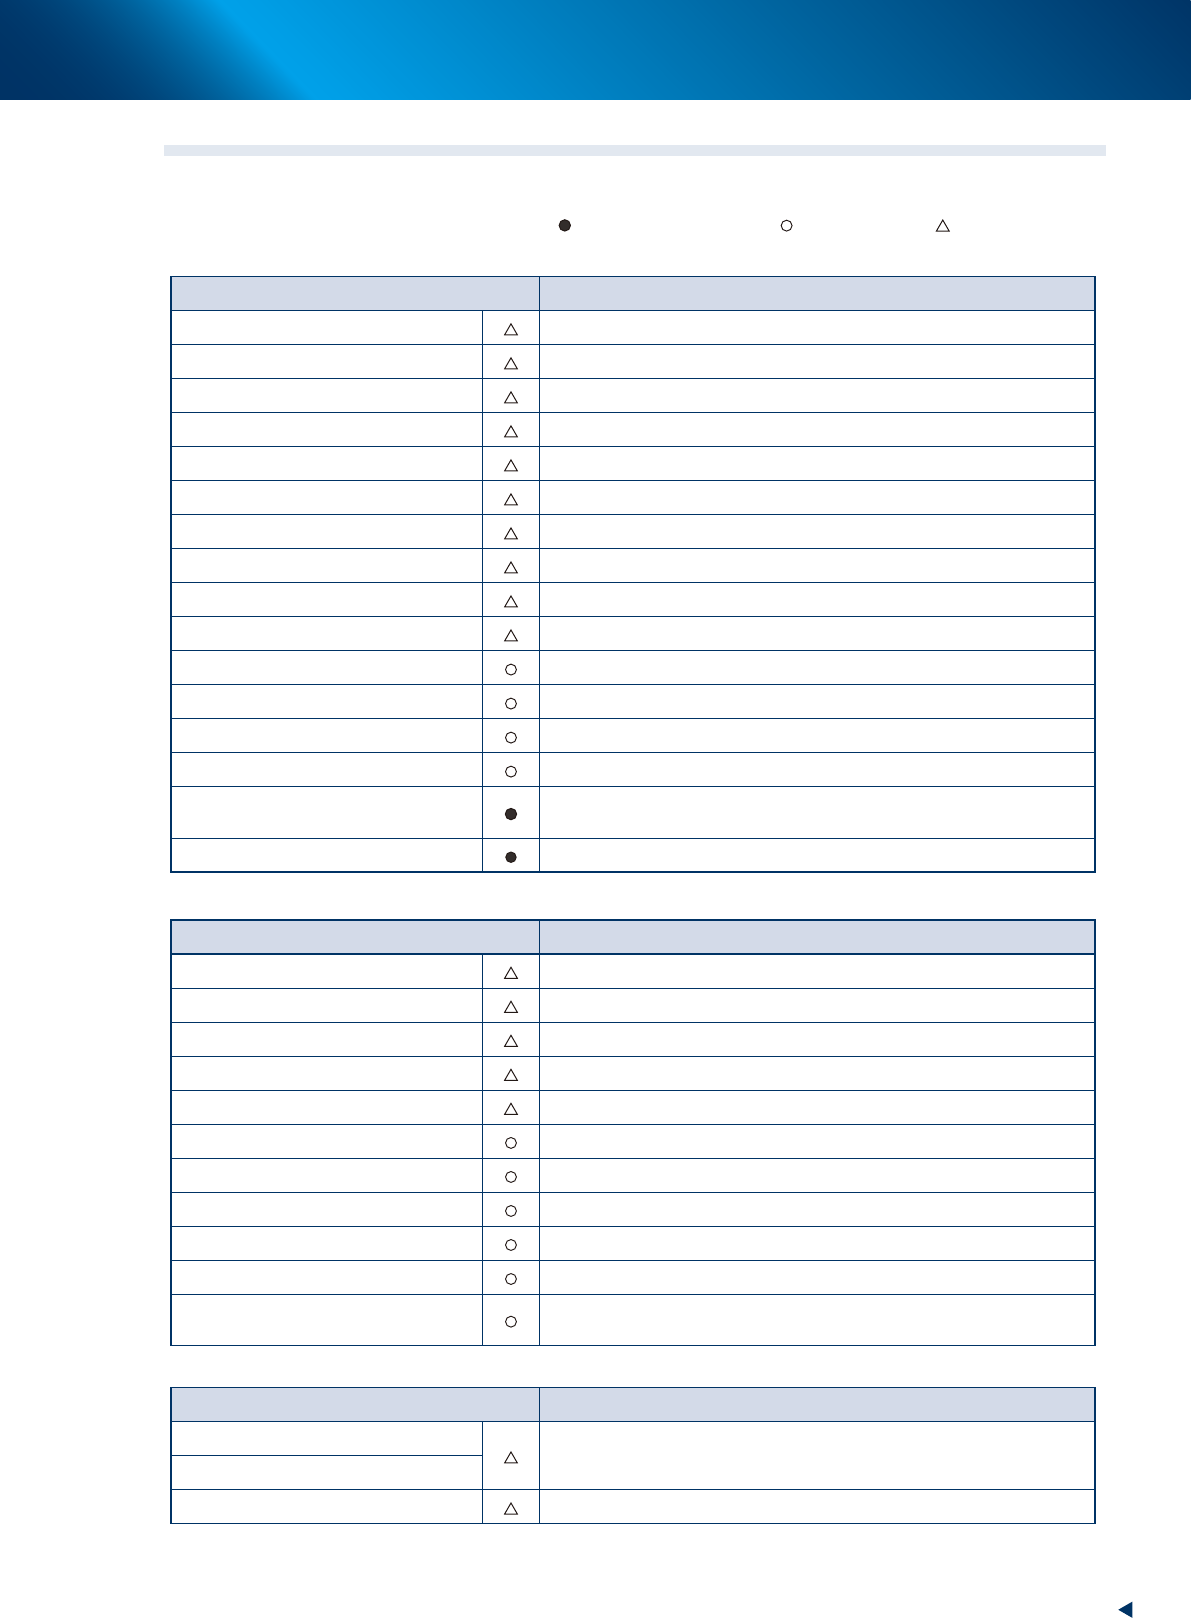
2.4 Required tools
Prepare the following tools and items necessary for maintenance.
: Delivered with machine : Optional items : Prepared by user
►
Tool list
Name Description
Phillips screwdriver
Large and small
Flat-head screwdriver
Large and small
Phillips precision screwdriver
#0, #1 (used to replace the nozzle leaf spring or valve)
Flat-head precision screwdriver
Used to remove O-ring or to replace retaining ring
Hex wrench set
1 set
Cutting pliers
Used to cut cable ties upon cleaning the inside of side view camera
Longnose pliers
Used to pull out the spool
Precision spanner
Used for spline shaft maintenance
T-type wrench
Used to replace the vacuum pump
Plastic spatula, brush
Used to clean the belt guide unit or pulley
Vacuum assembly
Used to clean the upper surface of feeder plate
Grease gun
Used to supply grease
Air blow tool
Used for cleaning
Ultrasonic bath
Used to wash nozzle
Lubricating syringe for nozzle slide
section
Used to lubricate turbine oil (VG32)
Nozzle cleaning wire
Used for nozzle cleaning
►
Other tool list
Name Description
Lint-free cloth
Use lint-free cleaning paper or cloth
Square cloth
Used to prevent the parts from lost or soiled (2 pcs)
Cleaning alcohol
Use absolute ethanol.
Paper cup or tray Used to clean the interior of spline shaft
Cable tie (100mm, 250mm)
Used to clean the interior of side view camera
Cotton swab (15cm)
Used to clean the camera prism and lighting
Lens cleaner, Lens cleaning paper
Used to clean the camera lighting
Blower brush
Used to clean the camera lighting or similar
Cleaning kit
Used to clean the interior of spline shaft
[for HM head] Leaf spring mount tool
Used to mount the leaf spring to HM head unit
[for RM head] Filter insertion tool
Used to mount multiple filters to RM head unit at once. A tweezers
can be used instead for it upon replacing nozzle shafts one by one.
►
Safety protectors
Name Description
Protection (dust-proof) goggles
Always wear these goggles and mask when using alcohol, such as absolute
ethanol or an air blow.
Protection (dust-proof) mask
Protection gloves
Always wear these gloves when using grease.

Chapter 2 Daily maintenance items
Contents
Before maintenance work 2-1
Maintaining head unit 2-2
Attaching/Detaching upper cover 2-3
1. Checking the nozzle 2-6
1.1 Checking with software 2-6
1.1.1 Vacuum level when nozzle is open 2-9
1.2 Checking the nozzles visually 2-10
2. Cleaning the feeder plate and related 2-12
3. Checking tape cutter sharpness 2-14

Before maintenance work
2-1
Chapter 2 Daily maintenance items
Before maintenance work
In most cases, maintenance should be performed after powering off the machine.
However, some maintenance tasks are performed under emergency stop conditions with the power turned
on.
In such cases, ensure adequate safety and press the emergency stop before beginning the maintenance.
Power on the machine during maintenance where any servo-axis must be operated or machine operation
checked. In this case, also ensure adequate safety before beginning the maintenance.
When operating the machine, make sure the following conditions are met.
►
Operating condition
1. Supply air pressure is kept at correct pressure.
2. All safety covers are closed.
3. All feeder exchange carriages are clamped.
4. Nozzles and other units are attached in place.
n
NOTE
The description "Cancel the emergency stop" is in the procedures of this manual. It means "rotating the emergency stop
button to release and pressing the [Ready] button to turn the servo on".
█
When performing the inspection and maintenance work, strictly observe the cautions
shown below.
• Periodic inspections and maintenance work must be performed by or under the control of a person
who has received training from YAMAHA or an authorized YAMAHA sales representative.
• Always power off the mounter before inspecting mechanical parts. Make sure that a part of human
body is not within the moving range of each axis when inspecting or maintaining the machine.
• Do not allow foreign objects to enter during inspection or maintenance.
• Use only the lubricants and greases specified by YAMAHA or YAMAHA sales representatives.
• When the machine needs to be replaced the parts, use parts approved by YAMAHA or YAMAHA
sales representatives.
• Do not modify the machine or the parts. Any modifications made by the customer may deviate from
the normal specifications and may interfere with safety assurance.
█
When performing the replacement of consumable parts, strictly observe the cautions
shown below.
• Replacement of consumable parts must be performed by or under the control of a person who has
received training from YAMAHA or an authorized YAMAHA sales representative.
• When performing the replacement of consumable parts, always press the emergency stop button.
• Do not allow foreign objects to enter during the parts replacement.
• Use only the replaceable parts specified by YAMAHA or YAMAHA sales representatives.
• Do not modify the machine or the parts. Any modifications made by the customer may deviate from
the normal specifications and may interfere with safety assurance.