YRM20_Mainte_E.pdf - 第71页
1. Weekly maintenance 3-4 Chapter 3 Periodic maintenance items █ Attaching/dataching nozzle holder ► Detaching 1 Store al l the nozz les. 1. Open [Unit] - [Head] scr een. 2. Select the table where t he holder is to be de…
1. Weekly maintenance
3-3
Chapter 3 Periodic maintenance items
█
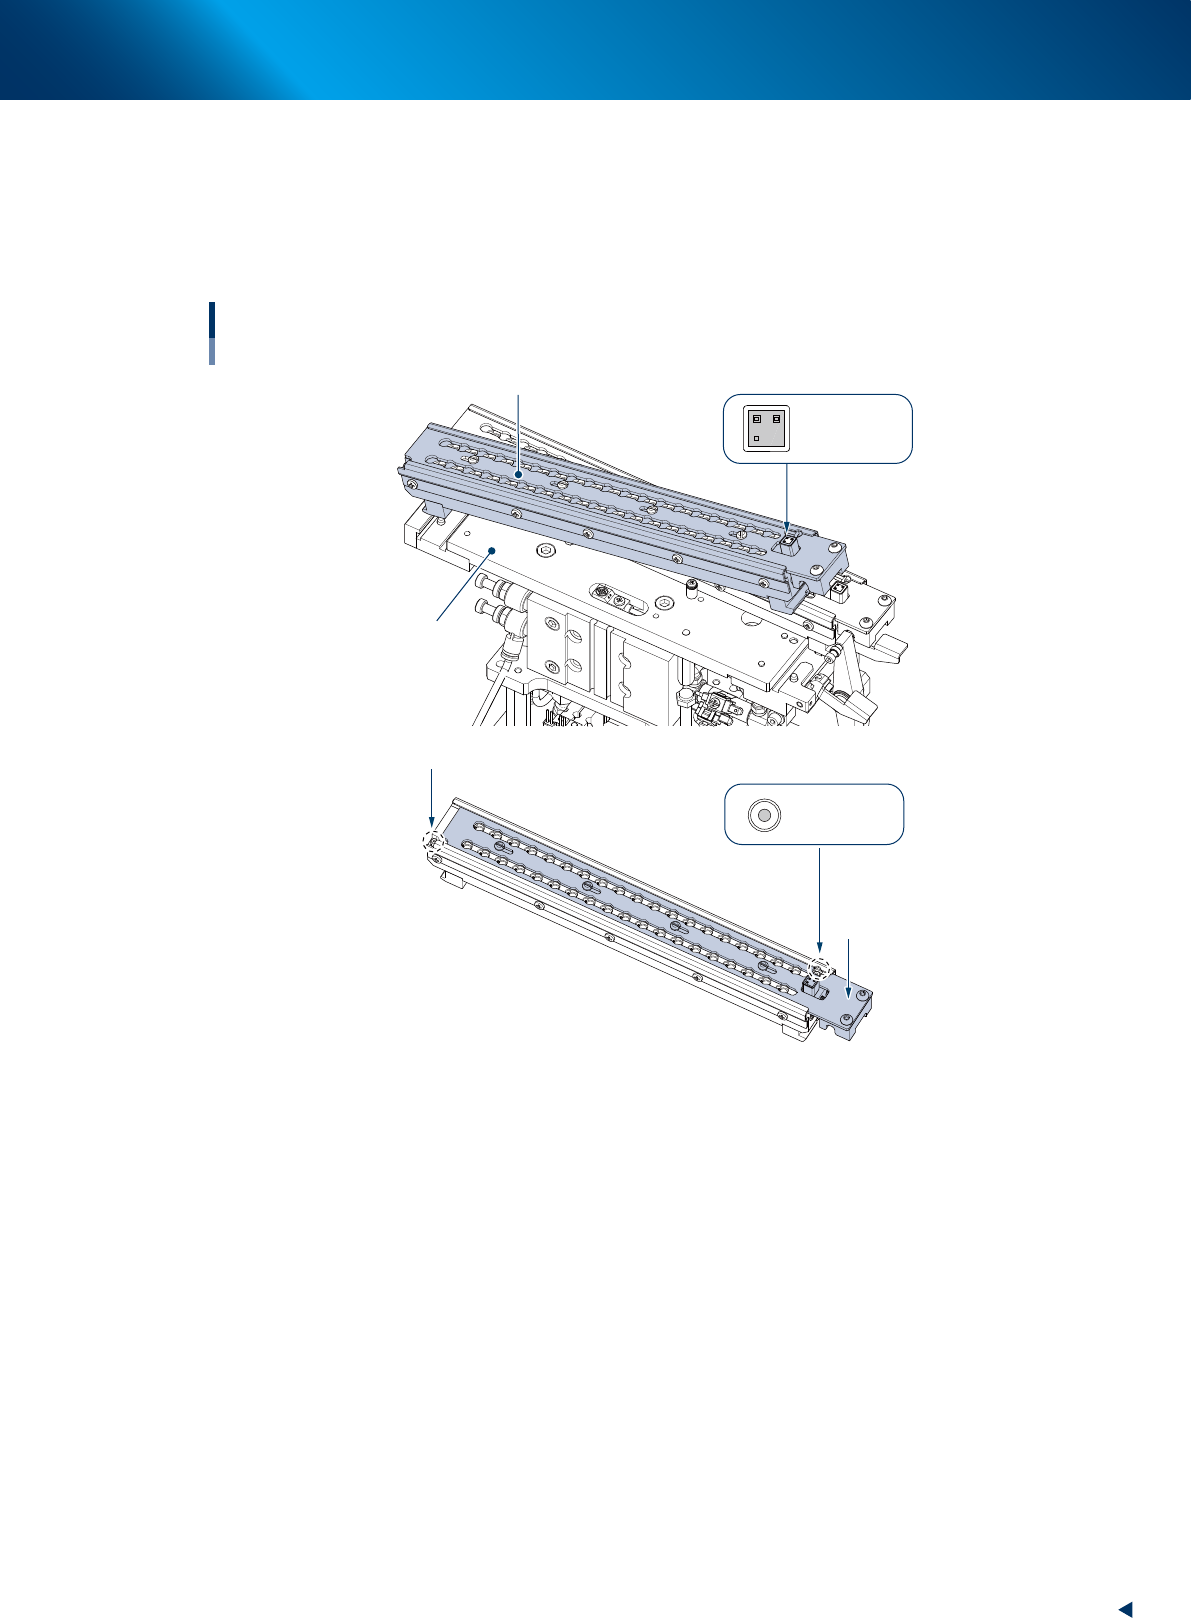
Nozzle holder (removable)
The nozzle station for YRM20 (optional) is consisted of the base unit and nozzle holder (hereinafter
referred to as holder) illustrated below, so that the nozzles can be removed by whole holder installed.
Detach the whole holder when all the nozzles are required to be removed for maintenance work or so,
or when the offline setup is required.
Nozzle holder detached
Base unit
Shutter
ANC MACS
ANC MACS
Nozzle station
Nozzle holder (removable)
Nozzle holder (removable)
QR code label
53310-KMK-10
►
Precaution for using removable holder
• Avoid soiling or scratching the QR label and ANC mark upon attaching/detaching the holder.
• The shutter should be closed upon attaching/detaching the holder.
• Confirm there is no chip or dirt in the holder upon storing nozzles.
• Confirm there is no chip or dirt at base section upon attaching the holder.
1. Weekly maintenance
3-4
Chapter 3 Periodic maintenance items
█
Attaching/dataching nozzle holder
►
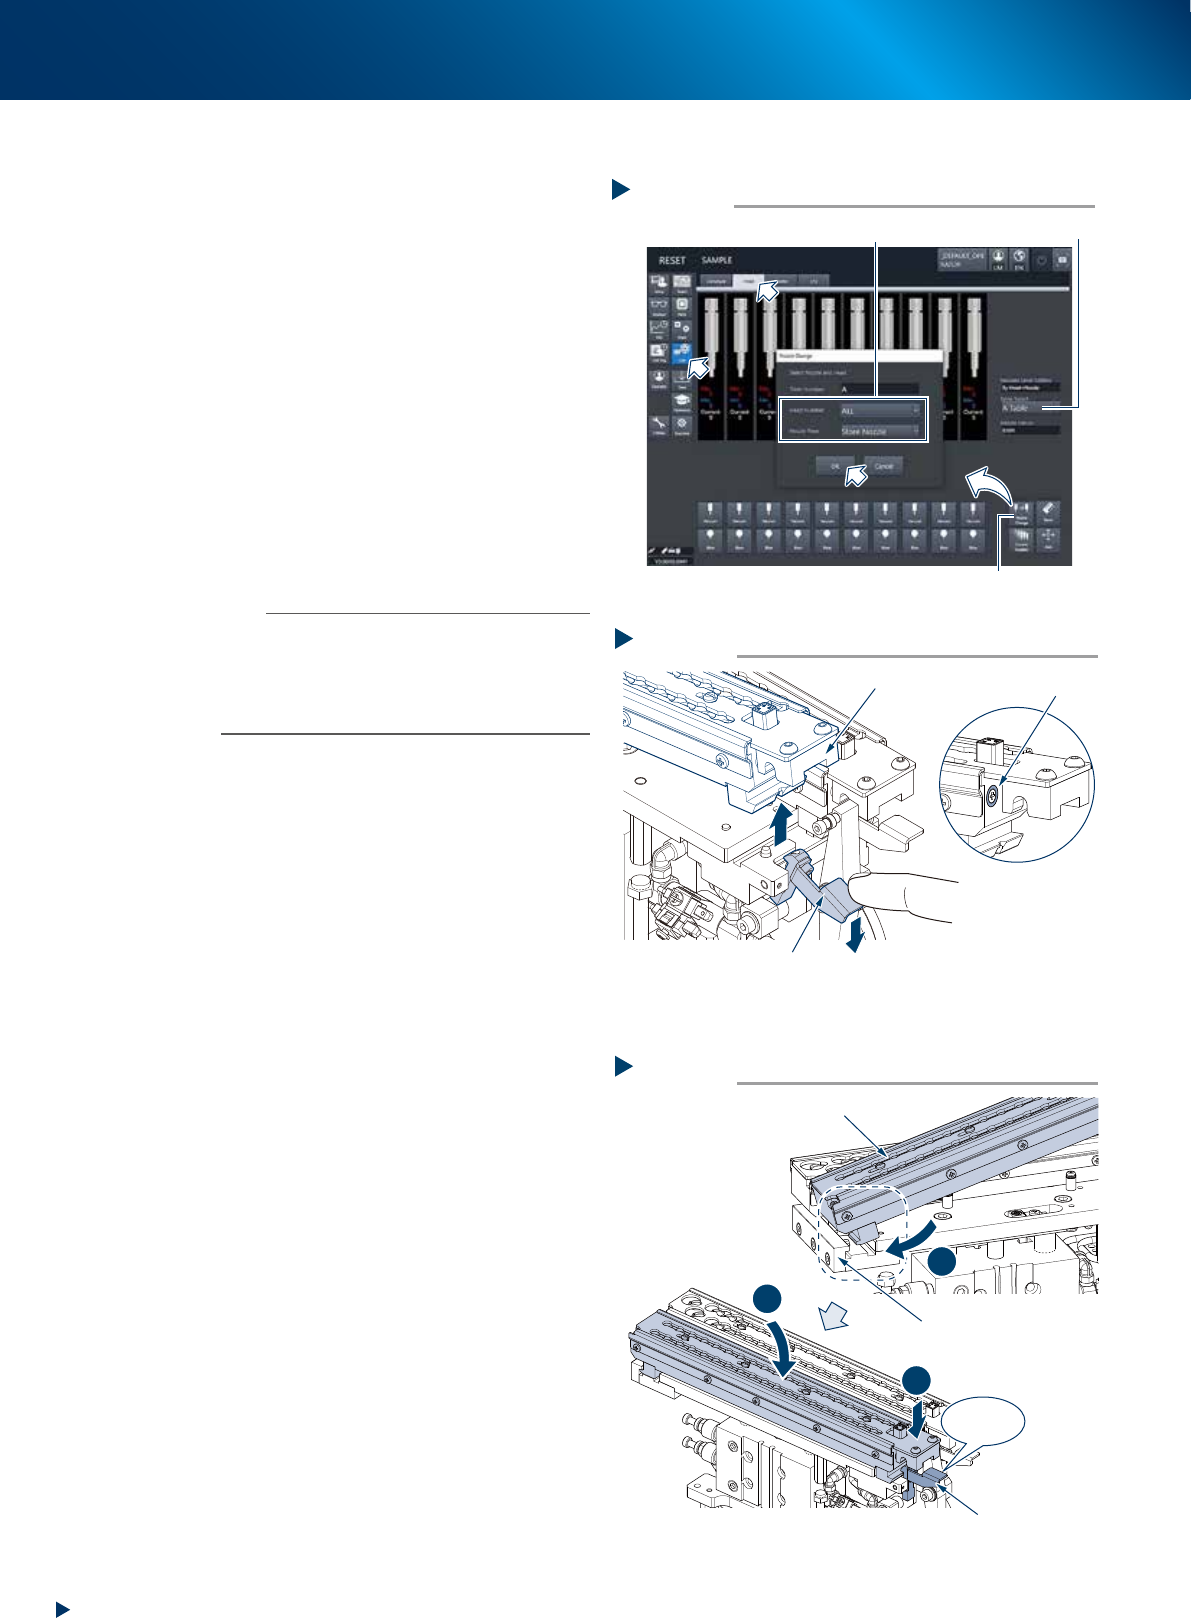
Detaching
1
Store all the nozzles.
1. Open [Unit] - [Head] screen.
2. Select the table where the holder is to be
detached for "Table Select".
3. Press the [Nozzle Change] button. Select
"ALL" for "Head Number" and select" Store
Nozzle" for "Nozzle Type" on the" Nozzle
Change" screen.
4. Press the [OK] button to return all nozzles to
the nozzle station.
e
2
Press the emergency stop button and
open the safety cover.
3
Pull down the holder retaining lever and
detach the nozzle holder upward.
n
NOTE
The nozzle holder shutter is equipped with magnet and it
is closed after detaching the nozzle holder.
The nozzle can be detached while shifting the shutter by
hand.
Moreover, do not make upside down the nozzle holder
with opening the shutter as the nozzles may drop off.
►
Attaching
1
Check that there are no dirt or foreign
matter on the base unit.
2
Return the holder to base unit.
1. insert the nozzle holder likely to hook it into
the attaching block section of base unit.
2. Press down the holder to the holder retaining
lever side while using the attaching block
side as supporting point.
3. Then push down the nozzle holder until it
clicks.
Step 3
Magnet
Detaching holder
Holder
Holder retaining lever
5331A-KMX-10
Step 2
Click!
1
2
3
Attaching holder
Holder retaining lever
Holder
Mounting block
5331B-KMX-00
Step 1
Select “ALL” for Head Number, “Store Nozzle” for Nozzle Type
[Nozzle Change] button
Table Select
Storing nozzles
54300-KMX-00
1. Weekly maintenance
3-5
Chapter 3 Periodic maintenance items
1.2 Nozzle cleaning
1.2.1 Cleaning and lubricating nozzle sliding section
e
1
Detach nozzles.
1. Press the emergency stop button and open
the machine safety cover.
2. Detach nozzle from the head.
When the nozzle station is equipped.
2. Store the nozzles and detach the whole
nozzle holder.
3. Open the nozzle station shutter and detach
nozzles.
2
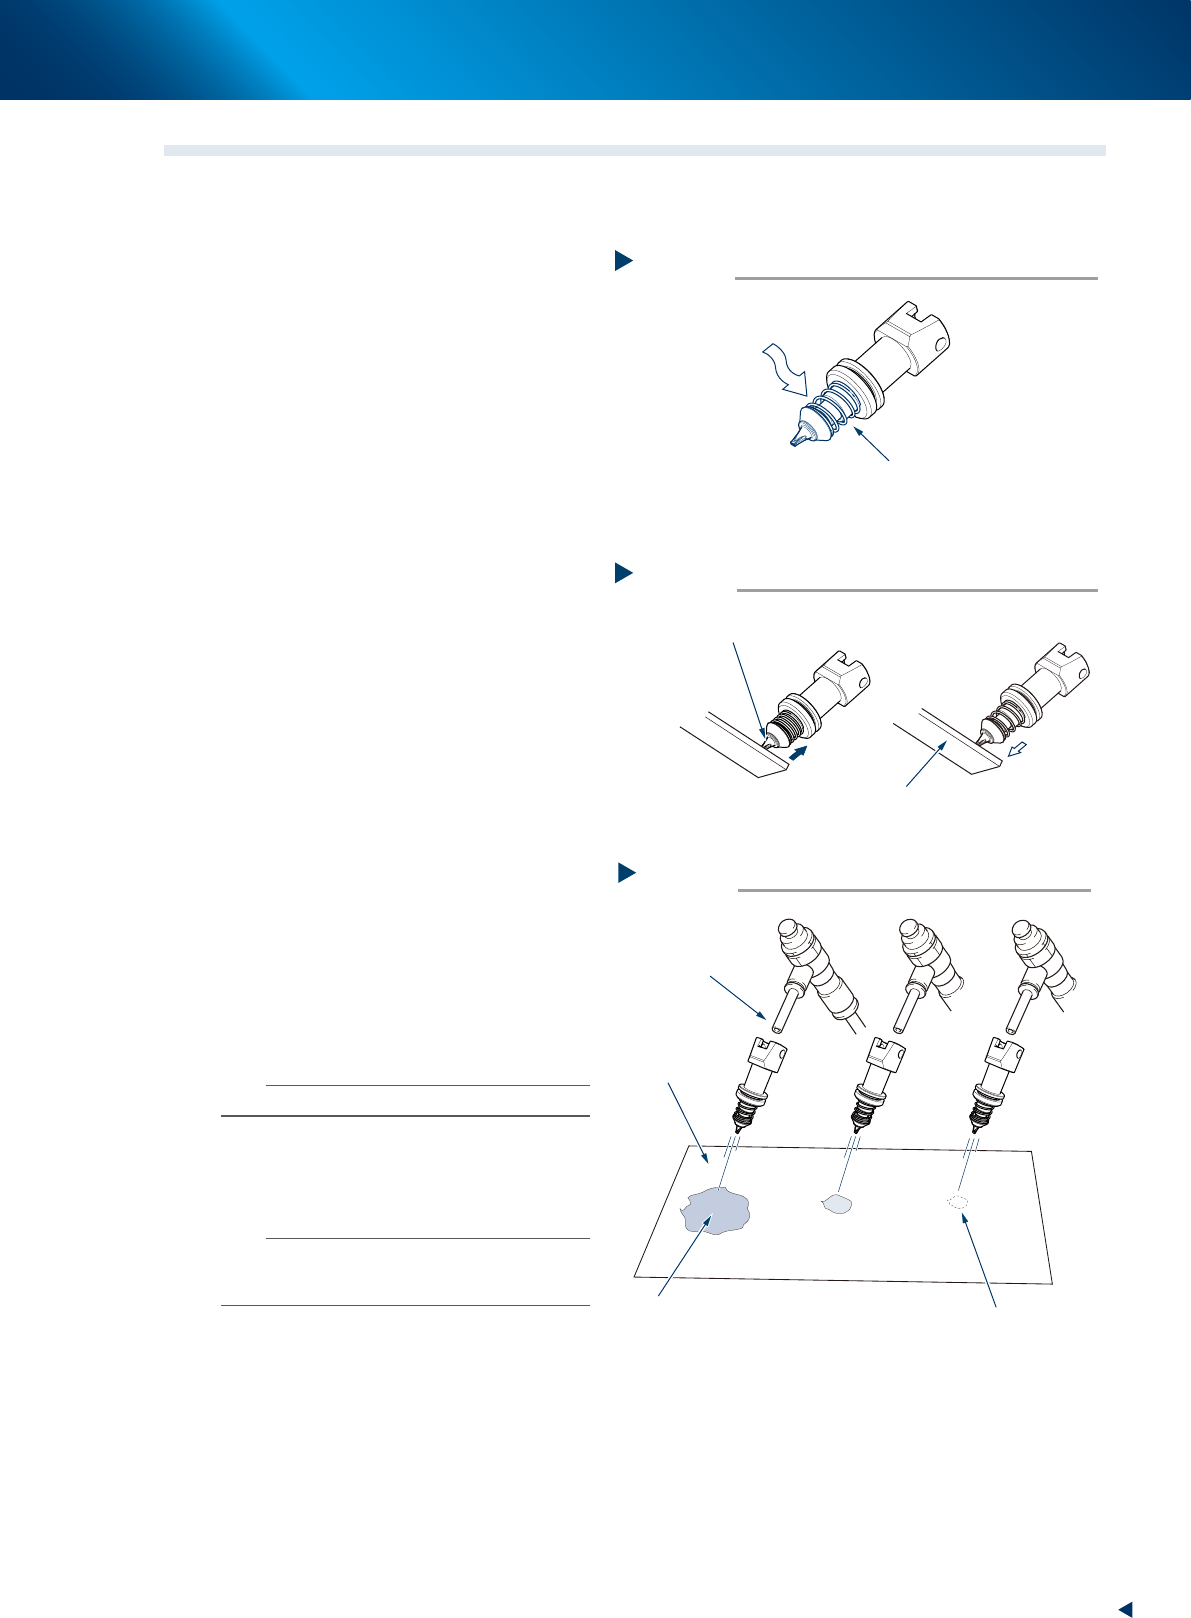
Clean the slide section.
Apply absolute ethanol to the slide section.
Push the nozzle tip several times to repeat the
buffing action (spring action) to clean the slide
section. After cleaning, blow the air to remove
absolute ethanol.
3
Lubricate the slide section.
Using a precision screwdriver or similar tool
with a pointed tip, apply a small amount of
turbine oil (just enough so that it sinks in) to the
slide section.
4
Check the nozzle spring action.
1. Press on the nozzle tip several times to
spread turbine oil with a plate or similar.
2. Wipe away excess oil from around the
nozzle using lint-free cloth.
5
Remove excess oil remaining in the
nozzle.
1. Air blow with the air blow tool for about 5
seconds from the nozzle tip side, and about
5 seconds from the nozzle mounting side.
2. Repeat this process a few times to remove
excess turbine oil remaining in the nozzle.
n
NOTE
A thin coat of oil is enough to lubricate the slide section.
6
Check that the oil is removed.
Use a commercial oil-blotting paper to check
the residual oil inside nozzle if necessary.
n
NOTE
Performing step 5 is usually sufficient to remove oil
remaining in the nozzle. However, if oil still remains, blow
air through the nozzle once again.
7
Return nozzles to original positions.
1. Check again that no oil remains in the
nozzle.
2. Return the nozzle to the original head.
When the nozzle was removed from nozzle
holder, store it its original place and return
to nozzle station.
Lubricating the slide section
Step 3
Slide section
A small amount of turbine oil,
using a precision screwdriver
53302-KMX-00
Checking the spring action
Step 4
Tip of nozzle slide section
Plate
53303-KMX-00
Checking for residual oil
Step 6
Oil will appear after blowing air (first time)
for about 5 seconds from the nozzle tip.
Repeat the air blow for about
5 seconds each from the nozzle tip
and from the attachment side.
This task is finished
when oil no longer appears.
Oil blotting paper
Air blow tool
53304-KMX-00