YSM40R_Mainte_E.pdf - 第105页
3-35 3 Periodic maintenance items 3. 3-month maintenance This section describes 3-month maintenance items. 3.1 MU head 3.1.1 Cleaning/replacing the air filter T he filters should generally be inspected about every 3 mont…
3-34
3
Periodic maintenance items
4
Set new filter into hole of filter
insertion tool.
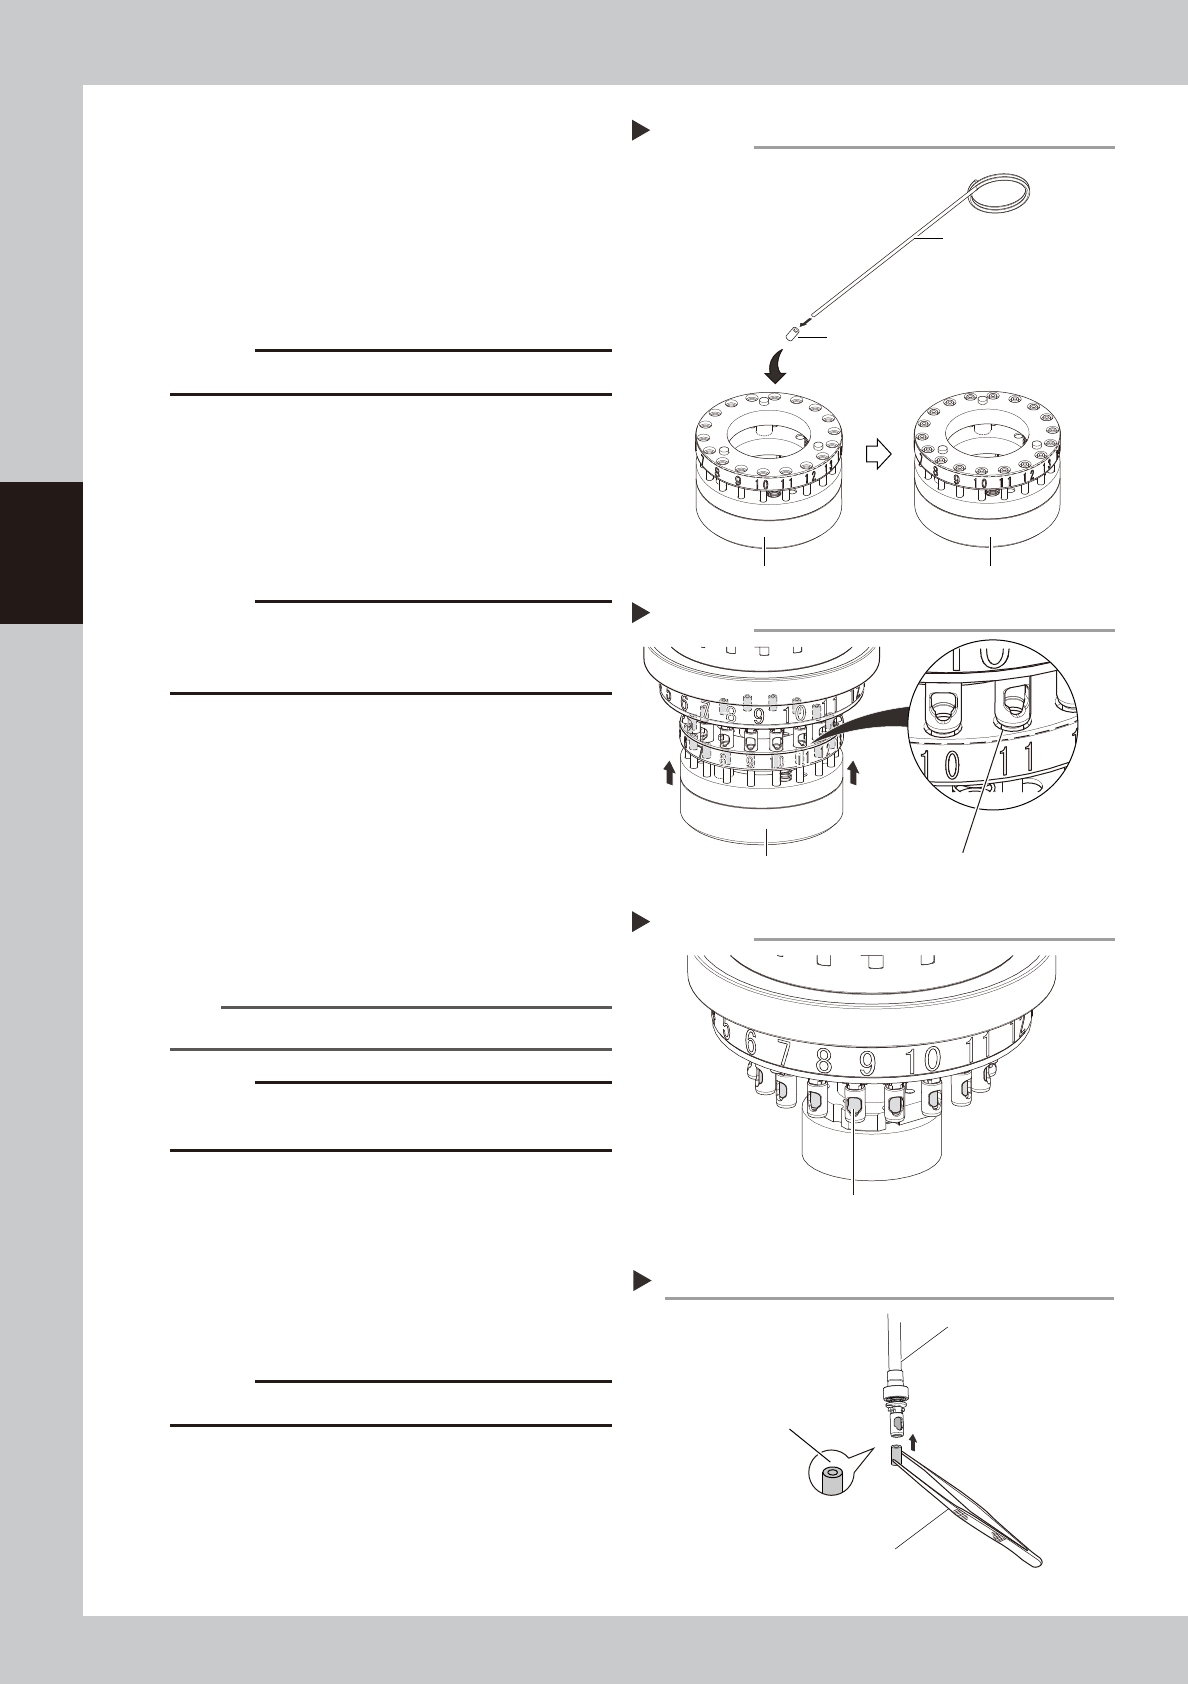
1. Insert needle pierce into hole of filter.
2. Insert filter deeply into hole of tool. At this
time, align the hole number with the
number of shaft which filter is to be
replaced.
533F7-N9-00
c
CAUTION
Make sure to set the filter facing up the hole side.
5
Insert tool into shafts.
1. Align the tool hole number with the
number of shaft which filter is to be
replaced.
2. Push up the tool completely to arrows'
direction as shown on the right.
c
CAUTION
Make sure to push up the tool completely. If pushing up
the tool incompletely or insertion position is deviated,
filters get deformed.
533F8-N9-00
6
Check that filters are set correctly.
Detach the tool and check that filters are
surely inserted into shafts.
533F9-N9-00
7
(If nozzles are detached manually)
Return nozzles to original positions.
1. Return nozzles to original positions.
2. Remove the square cloth.
n
NOTE
Make sure to return detached nozzles to the head.
c
CAUTION
Make sure to return all nozzle shafts to the original
position when lowered nozzle shafts manually.
n
Replacing filter without filter insertion tool
Insert filter with tweezers into shaft. Then insert filter
deeply into the shaft with the tip of tweezers.
c
CAUTION
Make sure not to deform filter or damage to shaft.
53339-N9-10
Setting filters
Step 4
Filter
Needle pierce
n Example: Replacing filters for all heads
Filter insertion tool All filters are set.
Inserting tool
Step 5
Push up tool aligning numbers. Check that shaft tip and
tool hole are aligned.
Checking filter insertion
Step 6
Check that filters are surely inserted.
Inserting filter with tweezers
Nozzle shaft
Hole side must face up.
Tweezers
3-35
3
Periodic maintenance items
3. 3-month maintenance
This section describes 3-month maintenance items.
3.1 MU head
3.1.1 Cleaning/replacing the air filter
The filters should generally be inspected about every 3 months, although this depends on the supply air
condition and the operating time. If the filter is contaminated slightly, it can be cleaned by using an air blow
tool. Replacing the filter is recommended when it can no longer be adequately cleaned by air blowing.
1
Prepare for work.
e
1. Remove all items sensitive to magnetic fields such as wristwatches and magnetic ID cards.
2. Press the emergency stop button and then open the machine safety cover
3. Use the CLAMP ON/OFF switch to lower the feeder exchange carriage and detach it.
4. Move the head unit to convenient position to work and place a square cloth under the head unit.
2
Loosen the filter mounting plate.
Use a Phillips screwdriver to loosen the
screws that hold the filter mounting plate.
3
Remove the filter cap.
The filter cap and filter can be removed
after the filter mounting plate has been
loosened and lowered. Hold the filter cap
and pull it out toward the front of the head.
53335-N9-00
4
Clean the filter.
If the filter is only lightly soiled, it can be
cleaned by the air blow tool, and then
reused.
53336-N9-00
n
NOTE
If there are heavy dust deposits in the filter or the filter
has discolored, replace it with a new filter (KLF-M7156-
00X). As a general guide, the filters should be replaced
once every 3 months, although this depends on the
operating time of the machine. Regular filter
replacement is recommended.
5
Reattach the filter cap.
1. Reattach the filter cap to the filter, and
return the filter to its original position.
2. Place the filter mounting plate over the
filter and use a Phillips screwdriver to
secure it.
c
CAUTION
Make sure that the filter caps are fully inserted before tightening the screws to hold the filter mounting plate.
6
Clean the bottom filter in the same manner.
1. Clean the bottom filter in the same manner as they are attached on both top and bottom.
2. Remove the square cloth after completing all works.
TIP
See "How to check for clogged nozzles (on the [Unit]-[Head] tab screen)" in Chapter 2 to check vacuum level after
replacing filters. If it cannot reach normal level, perform "5.1.1 Cleaning the spline shaft" in this chapter.
Removing the filter cap
Step 2, 3
Filter cap
Filter
Filter mounting
plate
Lock
Release
Cleaning the filter
Step 3
Filter
Air blow tool
3-36
3
Periodic maintenance items
3.1.2 MU head: Checking spline shaft Z-axis operation
This section describes how to check the spline shaft Z-axis operation of MU head.
e
1
Move the head unit.
1. Press the emergency stop button and then open the machine safety cover.
2. Use the CLAMP ON/OFF switch to lower the feeder exchange carriage and detach it.
3. Move the head unit forward.
2
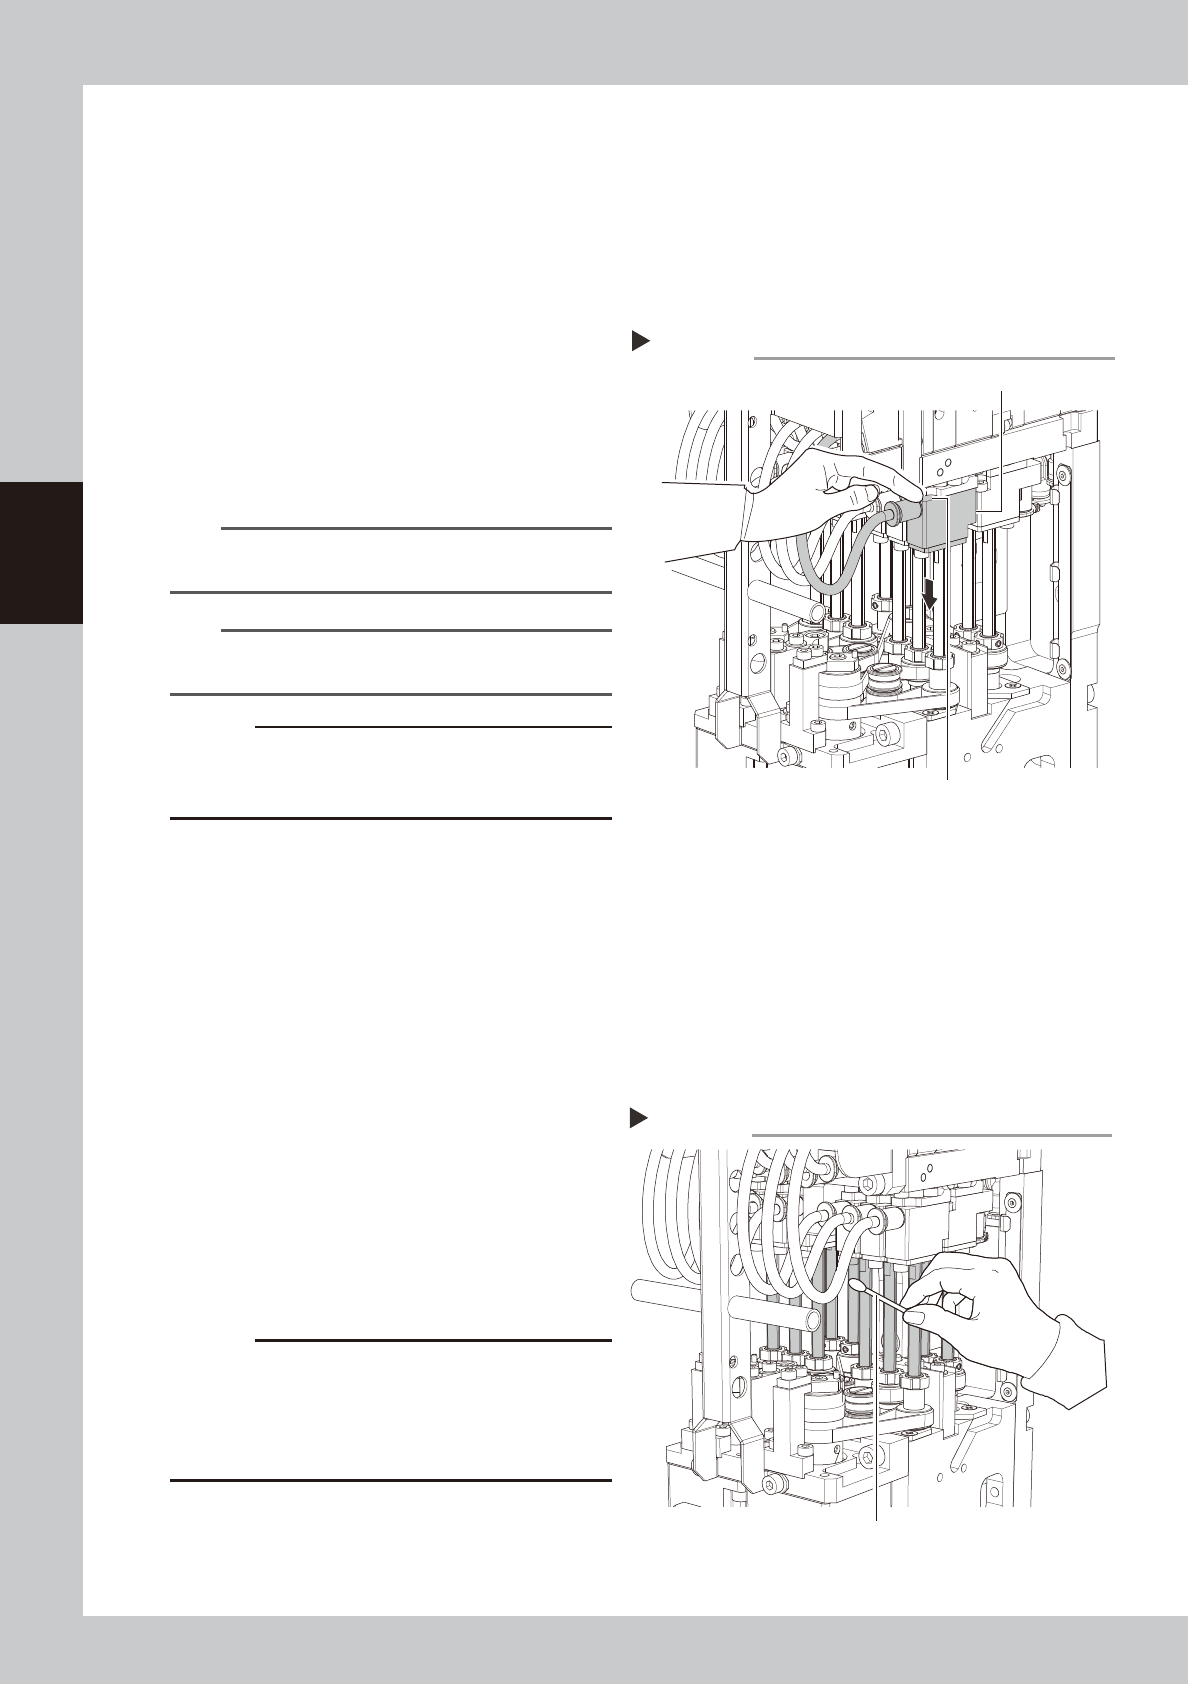
Move up/down spline shaft Z-axis.
Press down the bottom of joint block for
spline Z-axis with finger. It returns to the
original position by releasing finger.
Check that no heaviness, unsteady
movement, or abnormal sound compare to
the other spline shaft is found.
533G0-N9-00
TIP
Check the rear row heads by slightly lowering heads
near them.
n
NOTE
Do not touch the shaft as the surface may get rusted if
lacking grease.
c
CAUTION
Fatal error may occur if operating a machine with
unsteady movement of spline shaft. Stop the machine
in this case and contact YAMAHA sales representatives.
3.1.3 MU head: Checking/cleaning around spline shaft
Check and clean the area around the spline shaft of MU head.
e
1
Move the head unit.
1. Press the emergency stop button and then open the machine safety cover.
2. If the machine is carriage type, detach carriage to easily access to the head unit.
3. Move the head unit forward.
2
Visually check around spline shaft.
Check that no dust or dirt is found on the
spline shaft.
3
Clean the spline shaft.
If dust or dirt is on the spline shaft, wipe it
with lint-free paper or cotton swab.
3G1-N9-00
c
CAUTION
Do not completely wipe off grease on spline shaft
surface as the surface may get rusted due to the lack
of grease. However, apply grease for anti-rust with the
procedure on next page if the grease is wiped off due
to cleaning.
Checking Z-axis operation
Step 2
Press down here with finger.
Joint block
Cleaning spline shaft
Step 3
Cotton swab