Oxford ICP-CVD SOP.pdf - 第5页
Page 5 of 11 B) Vent chamber, load your sample, pump chamber 1) Vent the L oadlock: a) Visually check that the wafer has been unloaded into the loadlock b) Click System M enu , th en Pump ing c) Under the loadl ock inter…
Page 4 of 11
5.
Run the recipe
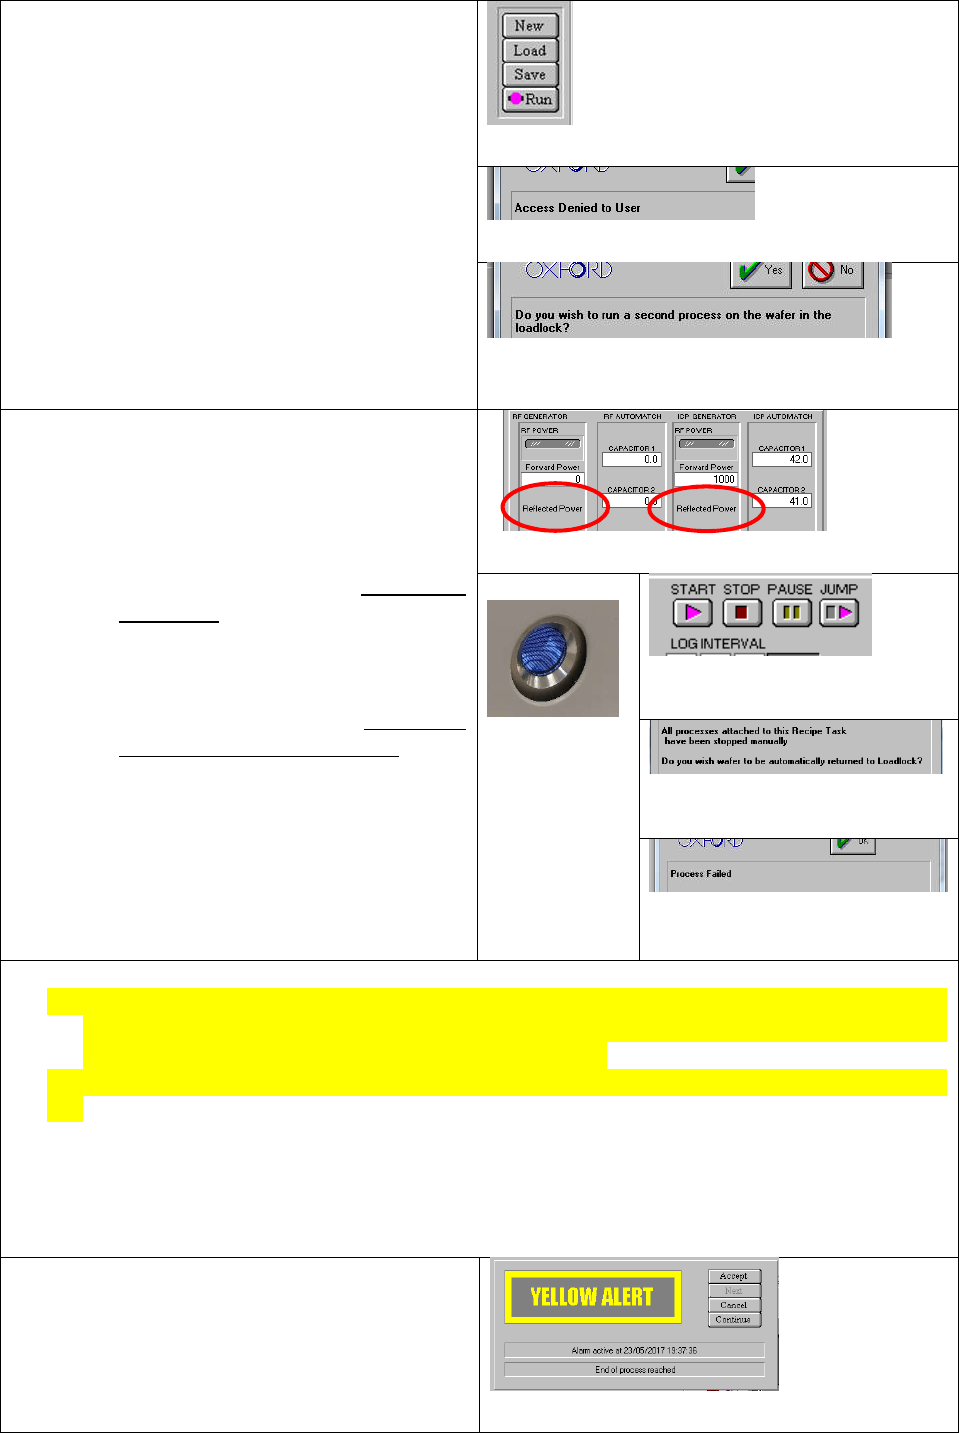
a) From Recipes page, click “Run”, will hear
pump whirring get louder
i) NOTE: Do not click “Save” from the
Recipes page, it will bring up the
“Access Denied to User” popup
ii) NOTE: sample will be loaded from
loadlock into chamber automatically
b) When dialog box comes up asking to “run a
second process”, click yes. The first process
that was run was the previous user’s
cleaning process
c) Process page will come up automatically
Figure 14. Run button on Recipes page
Figure 15. Access Denied popup, if a User tries to save a recipe
Figure 16. "Run a second process" popup.
6.
Monitor Process
a) Wait through “Pump” and “Purge” steps (5
minutes)
b) Once “Dep” step begins, watch RF power
stabilize on screen
i) If Reflected RF (red circles in picture)
does not stabilize at <5W, contact the
MNFL staff
c) Watch for plasma to ignite and stabilize in
chamber;
i) NOTE: if plasma is not visible once RF
power has stabilized, abort the
process, inform the MNFL staff
Figure 17. RF generator portion of Process Chamber page.
Figure 18. Plasma
in the chamber
Figure 19. Stop, Pause, and Jump
buttons.
Figure 20. Process aborted popup.
Always click yes!
Figure 21. Process Failed popup[
To abort a process, click the STOP button, on the process page
a) NOTE: If you stop a process, or it aborts due to a hardware fault, a dialog box will pop up asking if
you want your sample moved to the loadlock. Always click yes!!! You cannot unload your sample
manually, so if you click no, the staff will have to assist you
b) NOTE: NEVER CLICK THE ‘STOP ALL AUTO PROCESSES’ button in the top-right corner of the screen
c) The PAUSE and JUMP buttons allow you to a) temporarily shut off only the RF (Don’t do this,
reignition may not occur correctly), and b) skip the rest of the current step (avoid skipping steps
unless you need to shorten the actual deposition time mid-process)
d) A successfully-aborted process will result in your wafer being returned to the loadlock, where
you’ll see the “Yellow alert”, and a “Process Failed” popup. Remove your wafer, and contact the
MNFL staff
a)
Once process is complete, a “Yellow Alert”
pop-up will appear
b) Click on it, click “Continue”
Wait ~30s for wafer unload sequence to finish
Figure 22. Yellow Alert popup
Page 5 of 11
B) Vent chamber, load your sample, pump chamber
1)
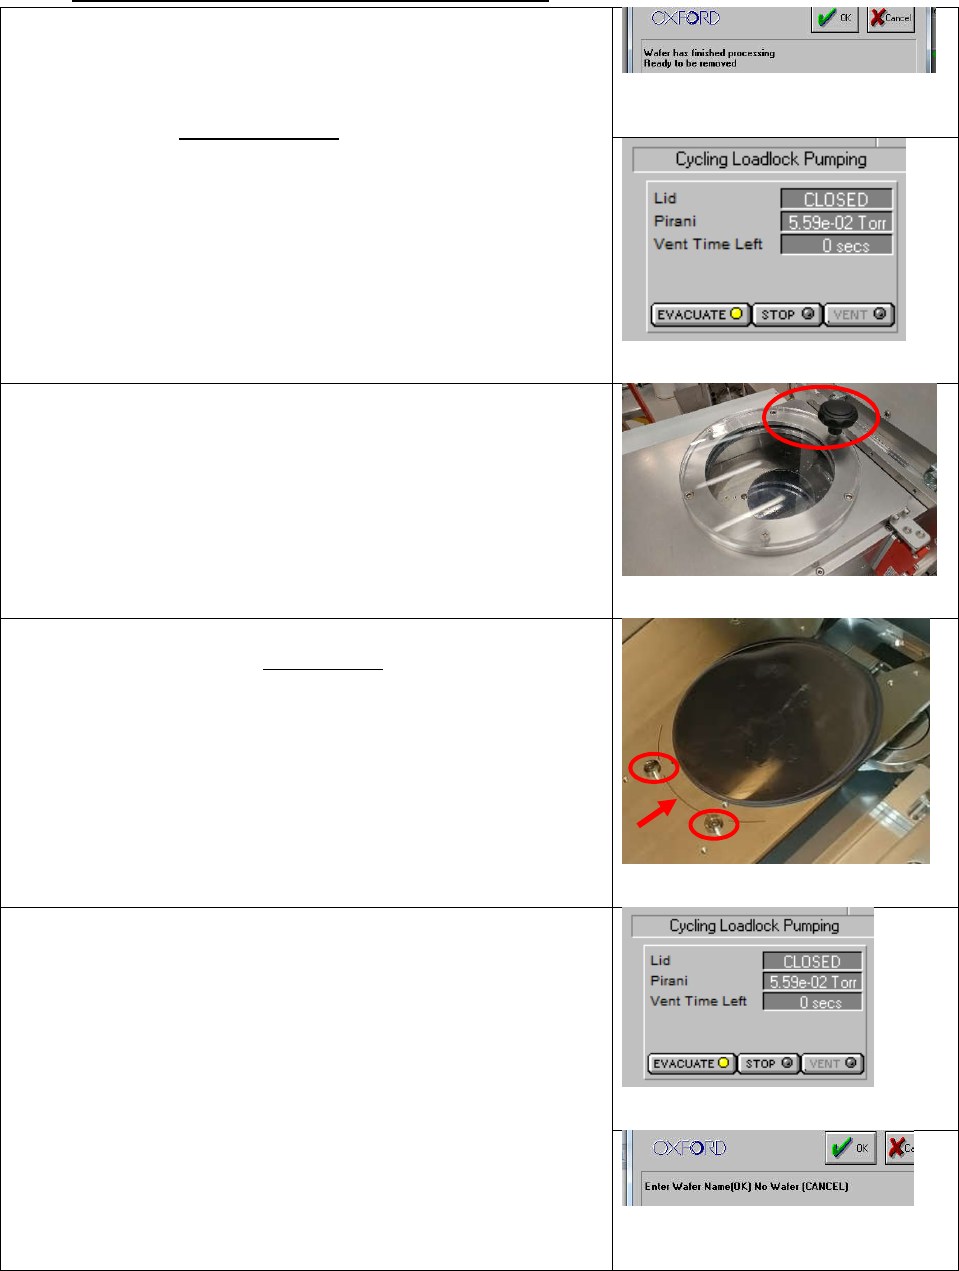
Vent the Loadlock:
a) Visually check that the wafer has been unloaded into the
loadlock
b) Click System Menu, then Pumping
c) Under the loadlock interface, click Stop
d) A popup, “Wafer ….. has finished processing”. Click OK
e) Click Vent
f) Wait until “Vent Time Left” countdown reaches 0. This will
take 4 minutes.
Figure 23. "Wafer has finished processing"
popup
Figure 24. Loadlock pump/vent interface
2)
Open the loadlock
a) Pull upwards on the black knob on the loadlock door
(circled). No twisting.
i) It will be slightly difficult to open, the interlock switch
sticks
ii) Place your elbow against the hinge for better leverage
Figure 25. Loadlock lid. Grab by knob
3)
Load your sample
a) If using your hands, double-glove before handling wafer
b) Gently place your 4” carrier wafer (or 4” sample wafer) on
the loadlock tray, up against the round cams (circled), with
the flat facing towards the process chamber
c) Make sure the edge of your sample lines up with the
circular marker line (arrow)
i) NOTE: if you cannot get the wafer aligned to the
marker line (off by >1mm), contact the MNFL staff
Figure 26. Marker line and pins in loadlock.
4)
Pump the loadlock
a) Close the loadlock door
b) Click “Stop”, then “Evacuate”
c) In the popup, enter a sample name. Press “OK” to indicate
a wafer in the loadlock, or “CANCEL” to indicate no wafer
in the loadlock
d) When "Cycling Loadlock Pumping" is displayed, the
vacuum is good enough for your recipe to be run
Figure 27. Loadlock Pump/Vent interface
Figure 28. "Name the wafer" popup. OK for
YES wafer, CANCEL for NO wafer

Page 6 of 11
C) Load and run desired recipes
5)
Select and Run the desired recipe
a) Follow steps 3-6 from section C (conditioning run). Summarized:
i) From Recipes page, load the desired recipe
ii) Change the time of the “Dep” step, press OK
iii) Press Run
iv) Wait for plasma to ignite and stabilize; make sure plasma is stable before leaving tool
D) Vent loadlock, unload sample, load dummy wafer, pump loadlock
1)
Vent loadlock
a) Follow procedure from section B
2) Unload sample
a) If using hands, double-glove before retrieving your sample
3) Load dummy wafer
a) the clean wafer you used for your conditioning run, or a clean 4” Si wafer
4) Pump loadlock
a) Follow procedure from section B