EUKYX-199-2100_G5S2_Instruction_Vol2_E.pdf - 第268页
EUKYX 6-31 199-2100 7.2 "Place Pos T each" Window 7 .2. 1 "Recognition" Windo w for Placement Position T eaching When the "Plac e Pos T each" wi ndow is opened and the [ Cy c le run] button …

EUKYX
6-30199-2100
7.2 "Place Pos Teach" Window
[3] Placement Data
The pattern program position presently referred and the position resultant from the teaching are
indicated.
[4] [Cycle run] Button
When the [START] button on the operation panel is pressed within 10 seconds after pressing this
button, the "Recognition" window appears and the X/Y beam starts moving automatically in
succession according to the pattern program. When the [STOP] button on the operation panel is
pressed during the movement, the X/Y beam stops after the 1-step operation.
Select [High], [Mid] or [Low] for the movement speed in this selection box.
[5] Step Move Mode
Specify the step for the step movement.
Back Step : The window is moved to the recognition window for the previous step to
the selected step.
Select Step : The window is moved to the recognition window for the selected step.
Next Step : The window is moved to the recognition window for the next step to the
selected step.
[6] Teach Data
Select "P-Data" or "O-Data" on which the placement position is taught in this selection box.
[7] [TEACH] Button
The teaching operation is performed at the present position.
[8] [Cncl Dt] Button
When pressed, this button cancels the placement position that was saved temporarily.
[9] Symbol
The symbol for the pattern program is displayed in this data box.
O-Data Comment
The O-Data Comment in the pattern program is displayed in this text box.
P-Data Comment
The P-Data Comment in the pattern program is displayed in this text box.
[10] [Save/End] Button
The new placement position teach result is saved and the teaching operation is ended.
[11] [PCB XFER] Button
Displays the “PCB XFER“ window.
See “6.1 “Local” Tab Sheet” for
“PCB XFER“ window.
Note
Note
EUKYX
6-31199-2100
7.2 "Place Pos Teach" Window
7.2.1 "Recognition" Window for Placement Position Teaching
When the "Place Pos Teach" window is opened and the [Cycle run] button or any of the step
operation mode buttons is pressed, the following recognition window is displayed.
[1]
[3]
[2]
Graphic
Development
F2F38
[1] Current Machine Status
"RUN", "STOP", "PAUSE", etc., will appear here, indicating in which mode the machine is set.
Depending on which mode the machine is set in when the recognition window is opened, different
buttons appear on the recognition window.
[2] Recognized Image Display Area
Recognized images (images captured by cameras) are displayed in this area.
EUKYX
6-32199-2100
7.2 "Place Pos Teach" Window
[3] Image Operation Buttons
When the machine is in the "STOP" mode, the following buttons can be used to enlarge or move
the image in the recognized image display area.
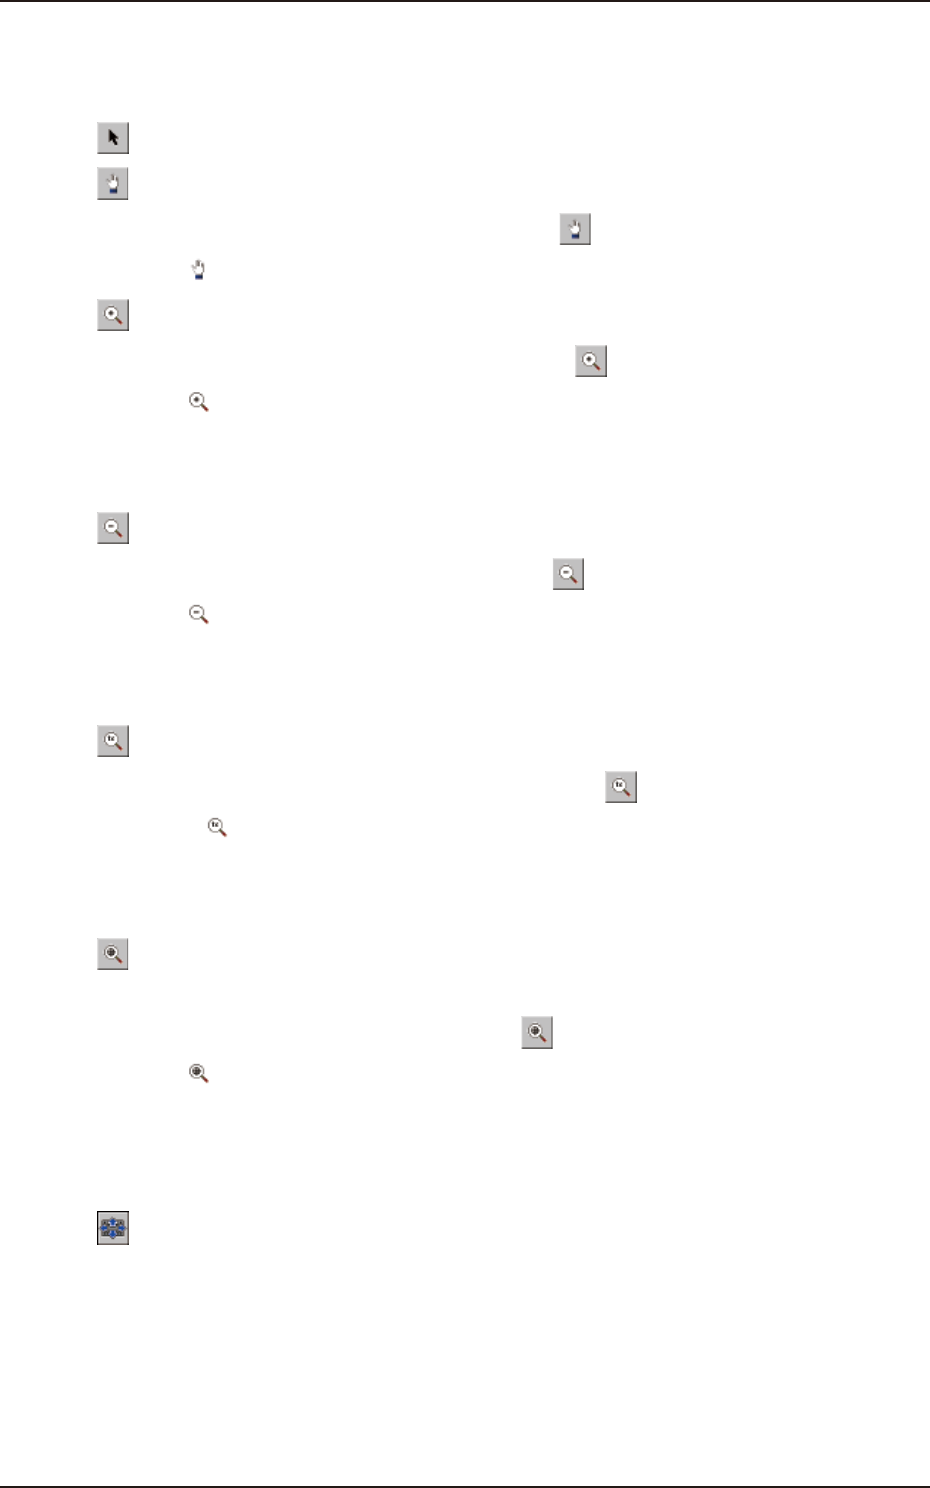
[
] Button : Normal Operation Mode
[
] Button : Image Movement Mode
After changing to the image movement mode using the [
] button (the shape of the pointer is
changed to
mark), drag the image to be moved (with the left button on the mouse pressed).
[
] button : Image Enlargement Mode
After changing to the image enlargement mode using the [
] button (the shape of the pointer is
changed to
), when the image to be enlarged is touched, or the left button of the mouse is
clicked on the image, the image is enlarged from the pointer position as the center.
When the image is to be enlarged with its position fixed, place the pointer on the center of the
image before the enlargement operation.
[
] Button : Image Reduction Mode
After changing to the image reduction mode using the [
] button (the shape of the pointer is
changed to
) when the image to be reduced is touched, or the left button of the mouse is
clicked on the image, the image is reduced from the pointer position as the center.
When the image is to be reduced with its position fixed, place the pointer on the center of the
image before the reduction operation.
[
] Button :Image Real-Size Display Mode (Captured image is displayed in real-size).
After changing to the image real-size display mode using the [
] button (the shape of the pointer
is changed to
), when the image to be displayed in real-size is touched, or the left button of the
mouse is clicked on the image, the image is displayed in real-size from the pointer position as the
center. When the image is to be displayed in real-size with its position fixed, place the pointer on
the center of the image before the image real-size display operation.
[
] Button :
Image Fitting Mode (the image is displayed fully using the recognition image display domain.)
After changing to the image fitting mode using the [
] button (the shape of the pointer is
changed to
), when the image to be fit is touched, or the left button of the mouse is clicked on
the image, the image is displayed fully using the recognition image display domain, from the pointer
position as the center.
When the image is to be displayed in the image fitting mode with its position fixed, place the
pointer on the center of the image before the image fitting operation.
[
] Button :
Using this button, the image displayed in the display area in the recognition window can be moved
to the desired position.