00195963-03_MM SWS-EN.pdf - 第24页
Interval Task Page Equipment / spare parts Vacuum syst em Checking the vacuum per formance, rem oving dirt 3.15.1 Ethyl alcoh ol, lint - free cloth 6 months Die ejecto r Checking the die ejec tor for vacuum leak s 3.8.9 …

23
Interval
Task
Page
Equipment / spare parts
Gripper
Lubricating the Z guide
3.12.4
Multipette, Lubcon Thermoplex
ALN 1001/00 (left location)
SIPLACE cleaning tissue (right
location)
Magazine lift
Cleaning Z guides and Z spindle
3.13.3
SIPLACE cleaning tissue
Wafer changer
Cleaning the guide rail
3.16.1
SIPLACE cleaning tissue
Wafer table
Cleaning the optical sensors
3.17.3
optical cloth
Wafer table
Cleaning the X and Y spindles and the linear
guides
3.17.4
SIPLACE cleaning tissue
3 months
Die ejector
Cleaning the magnets and ceramic spheres
of the needle system
3.8.3
Lint-free cloth, ethyl alcohol,
cleaning buds, lint-free
Die ejector
Checking the suppression pins of the needle
system
3.8.5
None
Die ejector
Cleaning the prism and the magnetic contact
surfaces at the centering unit
3.8.4
Lint-free cloth, ethyl alcohol,
cleaning buds, lint-free
Die attach unit
Checking the nozzle attachment for leaks
3.9.2
SWS GUI
Die attach unit
Checking the suction plates at the nozzle
take-up for leaks
3.9.3
Suction plates if necessary
Flip unit
Checking the reject bins: emptying, cleaning
the contact surfaces
3.11.5
Lint-free cloth
Flip unit
Making sure, that the rotary part can be
moved easily (it must not get caught in the
raceway)
3.11.2
None
Flip unit
Checking the nozzle attachment for leaks
3.11.3
None
Flip unit
Checking the suction plates at the nozzle
take-up for leaks
3.11.4
Suction plates if necessary
4 months
Die ejector
Checking the sealing ring at the needle sys-
tem and the centering unit for leaks
3.8.6
None
Die ejector
Lubricating the shaft for the Z movement at
the needle system
3.8.7
Spray grease (aerosol)
Die attach unit
Lubricate the Retract Unit and Checking for
Ease-of-Movement
3.9.4
Oil dispenser with Structovis
GHD
Flip unit
Lubricating the linear guides from Rotary
part
3.11.6
Multipette, Lubcon Thermoplex
ALN 1001/00
Interval
Task
Page
Equipment / spare parts
Vacuum system
Checking the vacuum performance, removing
dirt
3.15.1
Ethyl alcohol, lint-free cloth
6 months
Die ejector
Checking the die ejector for vacuum leaks
3.8.9
SWS GUI
Die ejector
Checking the rotary locking for ease-of-move-
ment
3.8.8
None
Elastic couplings of the spindle drives
Checking for correct function, visual check,re-
tightening the fastening
3.10.1
3.10.2
3.10.3
None
Checking the energy chain for Ease-of-Move-
ment and the correct position of the latches
3.7.4
None
Magazine lift
Cleaning the guide of the sliding door
3.13.4
Ethyl alcohol, lint-free cloth
Visual check and cleaning of the machine
interior
3.7.3
Brush, vacuum cleaner, clean-
ing buds, lint-free
1 year
Die ejector
Cleaning the linear guide
3.8.10
SIPLACE cleaning tissue
Die attach unit
Checking the vacuum part for leaks
3.9.5
None
Flip unit
Checking the connected cables and lines for
a secure fit and signs of wear
3.11.7
None
Interval
Task
Page
Equipment / spare parts
PC
Cleaning the PC filter
3.14.1
Filter
PC
Checking the PC fan for correct function
3.14.2
None
Vacuum system
Vacuum pump: Changing the membrane
3.15.3
Membrane of the vacuum
pump
Vacuum system
Checking the valves for leaks
3.15.2
None
If necessary
Die ejector
Checking the ejection needle for breakage
3.8.2.1
3.8.2.2
None
Wafer table
In case of frequent product changes: Check-
ing the O-rings of the wafer support rails for
leaks and, if necessary, replacing and greas-
ing them
3.17.2
UNISILIKON L250L
25
General Maintenance Work
Emptying Reject Bin and Vacuuming the Nozzle Changer
Interval Daily
Equipment Vacuum cleaner, waste bin, collecting container
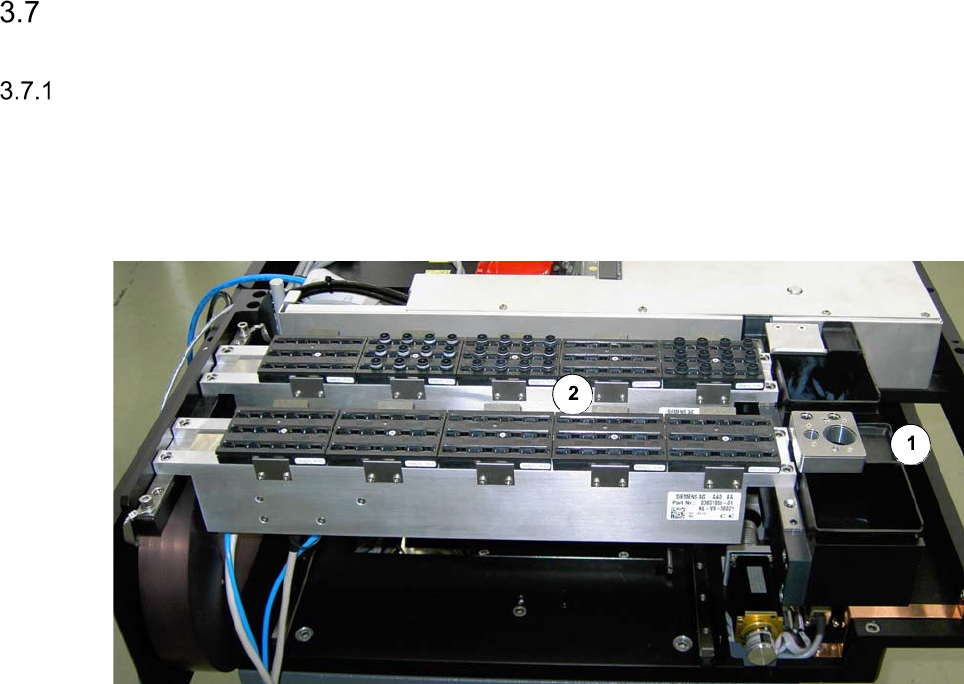
Nozzle changer and reject bins
Legend
[1] Reject bin
[2] Nozzle changer
Emptying the reject bin
Remove the reject bin and empty it into the collecting container.
We recommend that you empty the reject bin every day, since this will show whether a certain
component is being rejected frequently. Determine the cause of the error using the Track Er-
ror menu or OIS.
Clean around the reject bin with the vacuum cleaner and replace the bin.
The inside of the placement machine should be free of loose components since these can
cause faults if they get caught between moving parts.
Vacuuming the nozzle changer
Keep the vacuum cleaner nozzle at least 1 cm away from the nozzles to prevent any damage.
Vacuum the nozzle changer. The nozzle changers should be free of dirt and loose compo-
nents since these could prevent nozzles being picked up and set down correctly.