KE2040Instruction Manual Ver2.01,REV04.2003.6.25.pdf - 第460页
6 − 1 CHA PTER 6 TEA CHING This chapter describes how to perfor m teaching operation. There are t wo types of teaching ; one is f or coordinates and t he other f or r ecognition. This section st arts describing teaching …
5 − 96
5.3 Commands
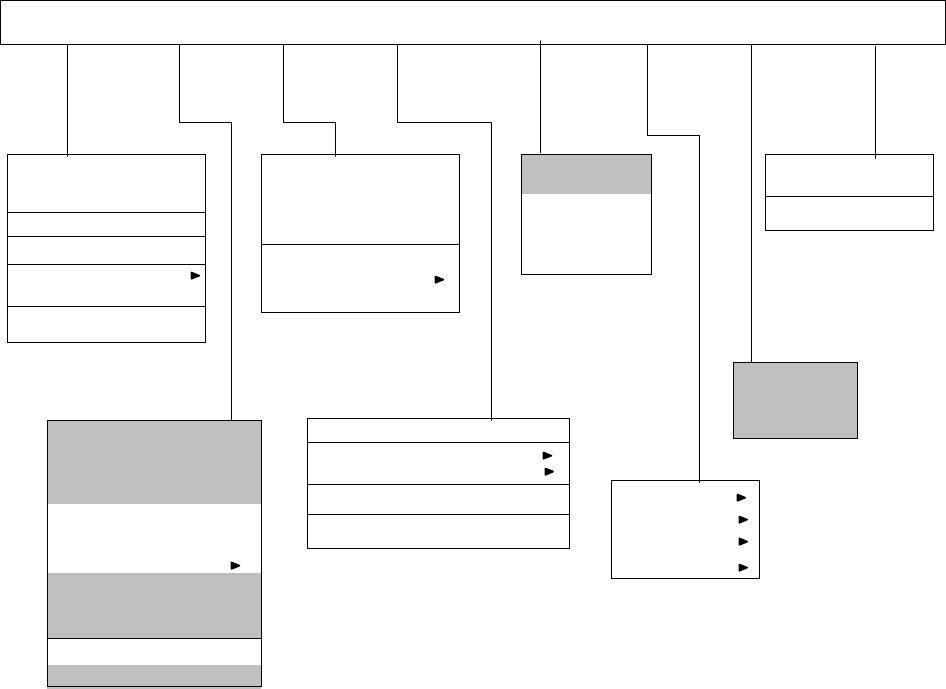
Command list
The commands to be invoked from Vision data are shown below. Commands shown in a
hatched area indicate that they cannot be selected when the input focus is located in Vision
data.
File (F) Edit (E) Data (C) Optimization (O)
Display
(V)
Machine operation Database (D) Help (H)
Create new (N) Ctrl+N
Open (O)… Ctrl+O
Overwrite&save (S) Ctrl+S
Save As (A)…
File information (I)
Print (P)
Environment setting (C)
End of program editing (X)
PWB data (B)
Placement data (P)
Component data (C)
Pick data (I)
Vision data (V)
Data completion status (S)…
Station data (E)
Data coherence check (L)
Component form
Component list
Vision Form
Vision List
Feeder layout…
Tool bar
Command (C)
How to use Help (H)
Version information (A)
Cut (T) Ctrl+X
Copy (C) Ctrl+C
Paste (P) Ctrl+V
Insert line (I)
Double line (U)
Jump (J)… Ctrl+G
Search (S)… Ctrl+F
Search next item (N) F7
Replacement (L)
Cell copy (O) Ctrl+E
Cell paste Ctrl+R
Sort (R)
Change Component Name (H)
Matrix copy (M)
Vision copy (V)
Optimization (O)…
Division placement data (P)
Nozzle layout (N)
Number of components to be fed… (S)
Status display (D)…
Register (B)…
Call list (C)…
Re-search (R)
Transport (T)
Measurement (M)
Confirmation (C)
Management (A)
6 − 1
CHAPTER 6 TEACHING
This chapter describes how to perform teaching operation.
There are two types of teaching; one is for coordinates and the other for recognition.
This section starts describing teaching operation from how to operate the HOD which is
basically used for these two types of teaching operations.
6.1 How to Use the HOD
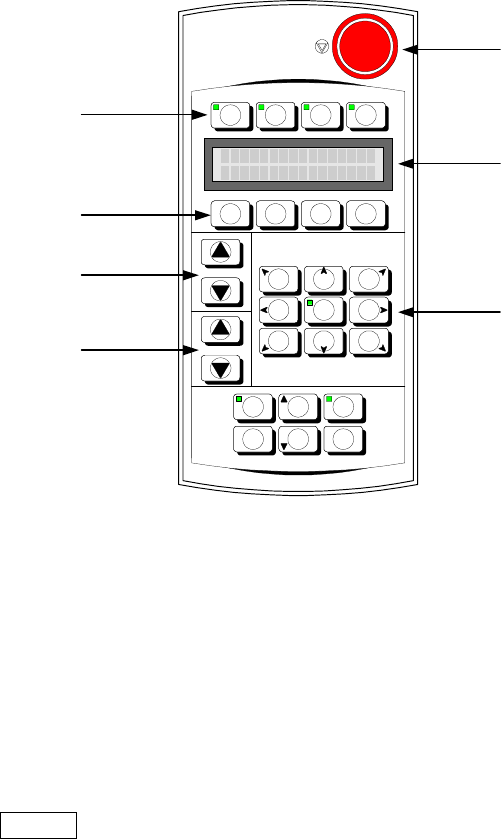
The appearance of the HOD is shown in Figure 6-1 below:
Figure 6-1 Appearance of the HOD
Use the DEV. NAME key to select a device other than the camera and HMS. To
select such a device, press either of two DEV. NAME keys (up or down direction) to
display the device name you want to select on the LCD.
Use the No. key to display (select) the device name and device number.
Use the ENTER key to validate your selection.
Use the move key to move the X- and Y-axes.
-X+Y +Z+Y +X+Y
-
θ
θθ
θ
-X +
θ
θθ
θ
+X
-X-Y -Z-Y +X-Y
FAST
DEV.NAME
No.
J U K I
F1 F2 F3 F4
NEXT
PREVIOUS PAUSEWINDOW
CANCEL ENTER
HMS CAMERA
VACUUM
ON/OFF
HEAD
Device selection keys
Function keys
No. keys
DEV. NAME
(
device name
)
ke
y
s
Move keys
Liquid crystal display
(
LCD
)
Emergency switch

6 − 2
6.2 Functions
(1) Coordinates teaching
The device names which can be taught and the teaching items are shown in Table
6.1 below. Note that the device names which are options not installed and those
designated as “Not to be used” on the Machine Setup menu cannot be selected.
Table 6.1 Teaching device and teaching items
Teaching coordinates (
○
): can be taught
Teaching device
X/Y
coordinates
Z coordinates
θ coordinates
Mark recognition
parameter
MNLA Head
○ ○
FMLA Head
○ ○
Bad mark sensor
○
OCC camera
○
○
OCC2 camera
○
○
HMS
○ ○
The 1 POINT, 2 POINT, and 3 POINT device keys on the HOD become effective
when OCC camera is selected as the teaching devices. The 1 POINT key is the
default key when a device is selected.
When any other device key on the HOD is pressed while the machine is teaching
coordinates, the newly selected device moves to the coordinates defined by the
currently selected device, thus switching the device to be taught.