KE2010.Instruction Manual.Ver.2.01,Rev.08.pdf - 第132页
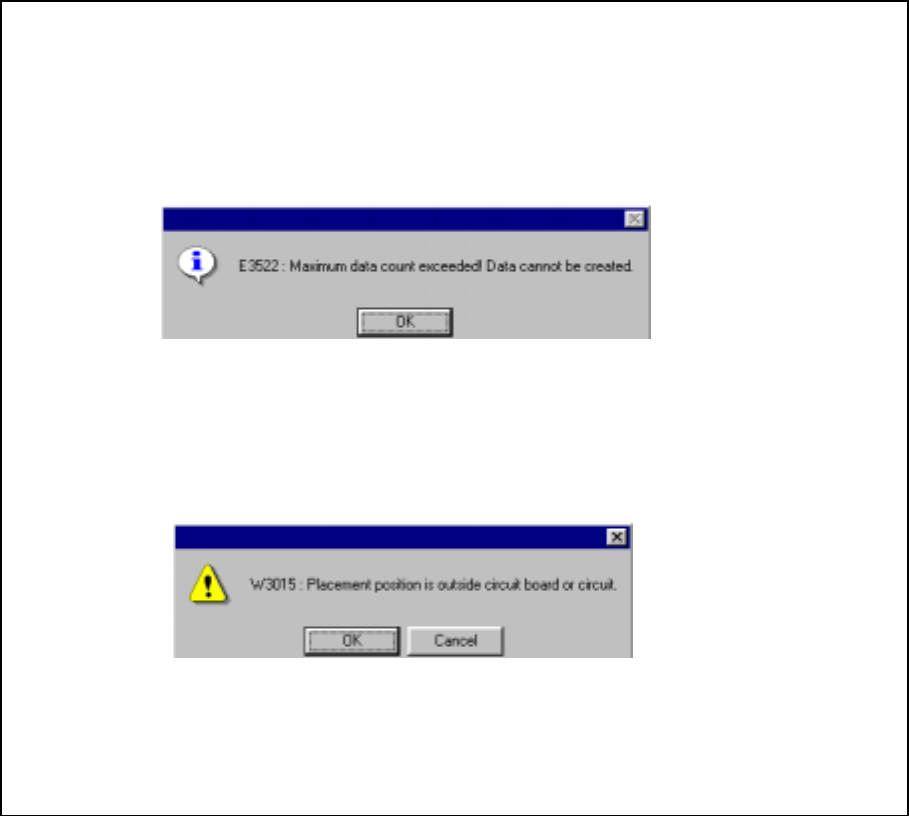
4 − 25 When an error occurs In the f ollowing cases, an error occurs, and the m achine displays the respective error dialog box as shown below . ① W hen the maximum num ber of data record s exceeds the input limit − OK: …
4 − 24
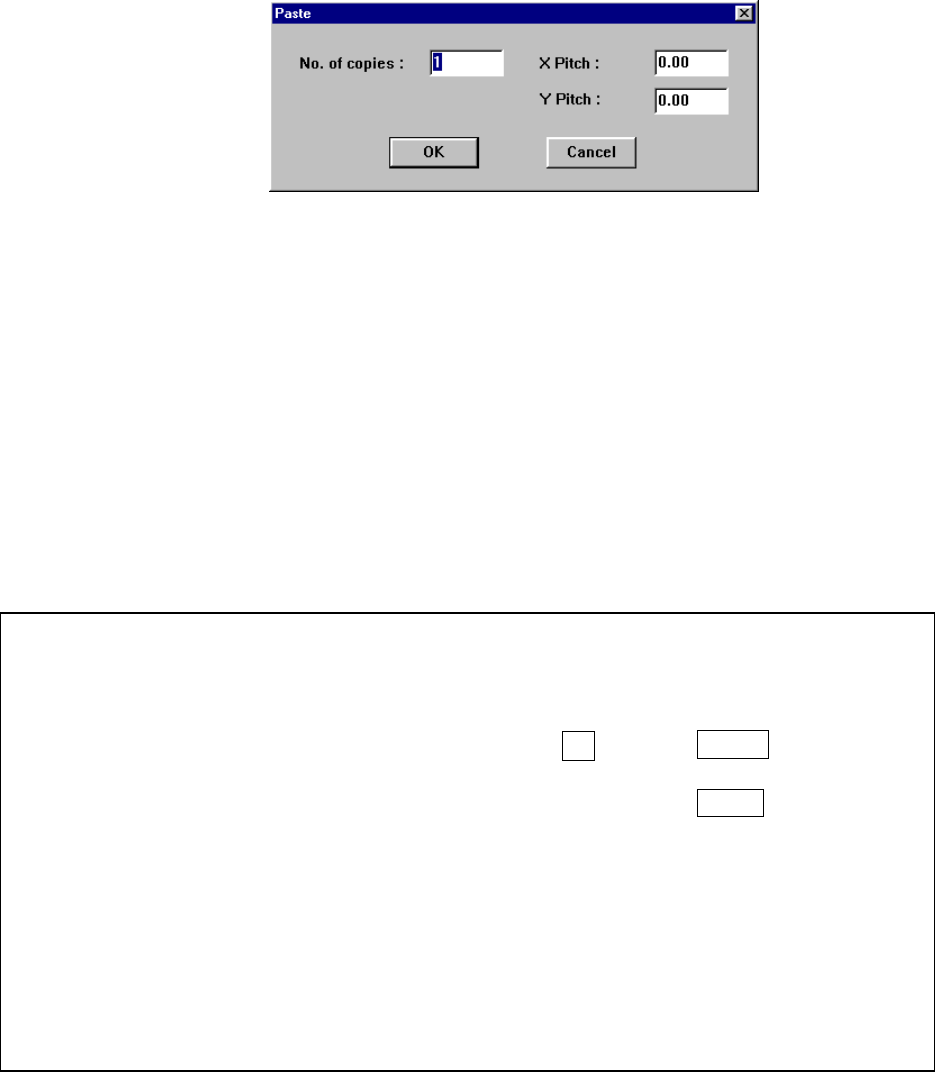
4.3.3 Paste
This command inserts the data which was cut or copied into the memory buffer at or
before which the cursor is located.
After you select the [Cut] command, the following dialog box appears on the screen.
When you specify the “X pitch” and “Y pitch”, you can execute the incremental copy
function which copies data with adding or subtracting the specified values to/from
the X placement position and Y placement position.
After executing the [Paste] function for Placement data, all of the component IDs are
set to “#” and data is pasted.
If there is no data in the memory buffer, this command is disabled.
① No. of copies: Specifies the number of times for copying data. The default
value is “1”.
② X pitch: Specifies the amount to increment or decrement the placement
position in the X direction. The default value is “0.00”.
③ Y pitch: Specifies the amount to increment or decrement the placement
position in the Y direction. The default value is “0.00”.
④ OK: Executes the “Paste” command.
⑤ Cancel: Cancels the “Paste” command.
Example of the paste result
When normally executed
例
)
Component IDs X Y Angle Component name
R1 5.00 10.00 45.00 1608-A
R2 10.00 10.00 0.00 1608-A
No. of copies 3 X Pitch: 0.50
Y Pitch: 1.00
# 5.50 11.00 45.00 1608-A
# 10.50 11.00 0.00 1608-A
# 6.00 12.00 45.00 1608-A
# 11.00 12.00 0.00 1608-A
# 6.50 13.00 45.00 1608-A
# 11.50 13.00 0.00 1608-A
• The copied block is inserted above the specified line.
• All of the Component IDs are set to “#”.
• The input focus is located at the first inserted Component ID.
4 − 25
When an error occurs
In the following cases, an error occurs, and the machine displays the respective error
dialog box as shown below.
① When the maximum number of data records exceeds the input limit
− OK: Cancels the copy operation. No data is copied.
② When the placement position exceeds the PWB or circuit layout
− OK: Continues the copy operation. The range over mark is appended to an
error data record.
− Cancel: Cancels the copy operation.
4 − 26
4.3.4 Insert line
This command inserts a blank line at the cursor position. After a blank line is
inserted, the cursor moves to the leftmost field of the inserted blank line.
4.3.5 Double line
This command copies the line at which the cursor is located, then inserts it between
the original line and the next line. After the line is copied, then inserted, the cursor
moves to the leftmost field of the copied line.
If you copy a line from Placement data, the component ID becomes “#”, and other
items are all copied.
Note that the original pickup coordinates are copied to the destination line if you
copy a line of an MTC/MTS component or DTS component. Even though you enter
a number of levels or lane, HLC will not calculate the pickup coordinates
automatically.
If you copy a line from Pick data, the component name and package style are
copied, and other items are initialized.
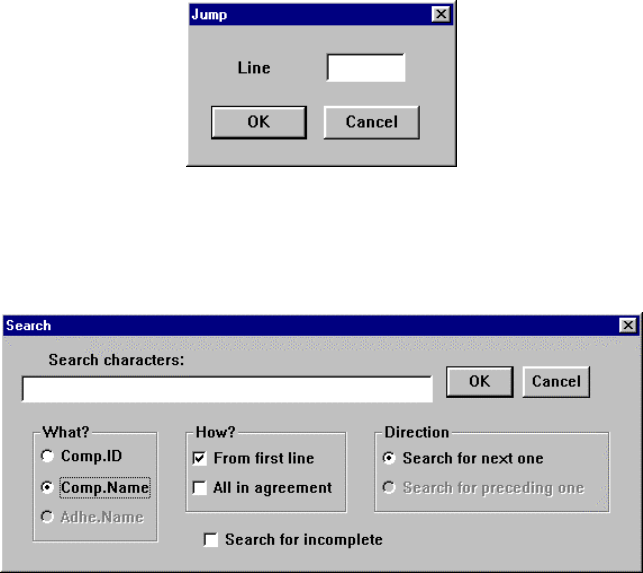
4.3.6 Jump
Specify the line number. If the machine finds the specified line number within the
screen, the cursor moves to the line. If the machine finds it outside of the displayed
screen, the screen scrolls so that the found line is located at the center of the
screen.
When you select the [Jump] command, the following dialog box appears on the
screen. Specify the line number to jump to. If the specified line is beyond the
input data area, the machine jumps to the last line.
4.3.7 Search
This command searches a command ID or command name. Specify the search
criteria on the following dialog box, then click the “OK” button to start searching the
specified character string.
If the machine finds the character string within the displayed window according to
the specified criteria, the cursor moves to that position, while if the machine finds it
outside the displayed area, the screen scrolls so that the found line is shown at the
center of the screen.