KE2010.Instruction Manual.Ver.2.01,Rev.08.pdf - 第166页
4 – 59 If you want to use the already assigned mark ID, select the desired mar k I D from the “Mark Dat a List”: this list allows you to specify the desir ed mark ID easily . T o open the “ Mark Data List” , use the Edit…
4 – 58
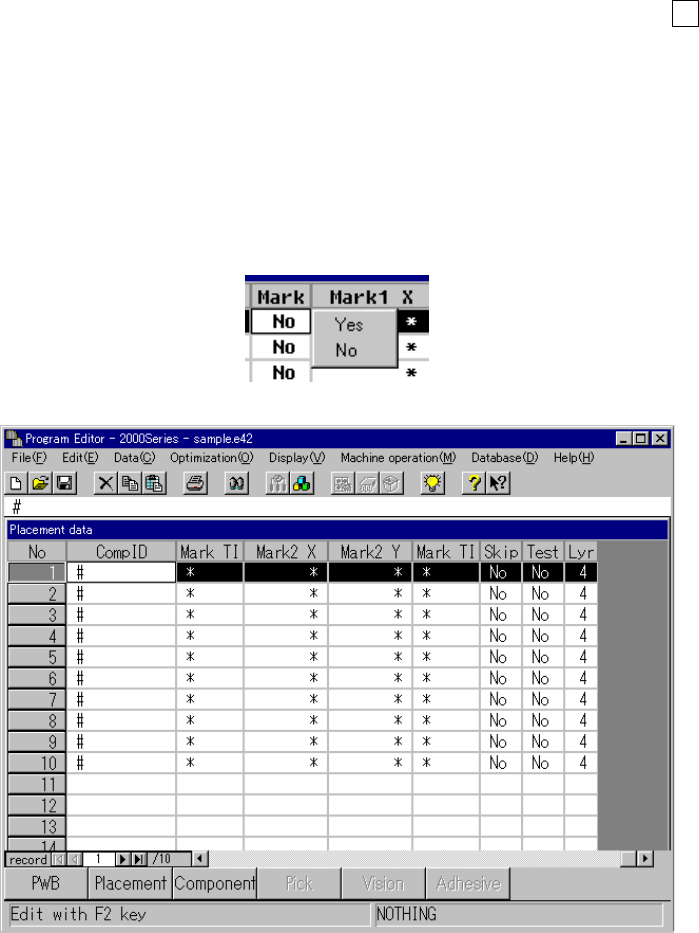
⑥ Mark
Select from the pop-up list box whether or not correction is made for placement
position using the area fiducial mark when the machine places a component on a
board.
When you enter the component ID, “No” (this means “not used”) appears as
default for the mark. To change the default setting, using the Edit key ( F2 key)
of clicking the input field with the right button of a mouse, open the list box to
select the desired item.
If you want to change the “Mark” items of Placement data at a time, select the
desired Placement data records in advance, and then change them.
When you select “Yes” (this means “planned to be used”), you have to enter
positions of two sets of area fiducial marks. Even though you enter the position
of only one set of fiducial marks, Placement data cannot be completed.
⑦ Mark ID
If you want to use a mark as an area fiducial mark, assign an ID to mark data so
that you can use specify the desired mark.
Use the formula bar to enter a mark ID. When the “Mark” item is set to “Yes”,
the system allows you to enter a mark ID and automatically generates it so the
same ID cannot be generated.
If you enter a mark ID manually and the same mark ID already exists, the mark
data is linked to each other and can be shared.
4 – 59
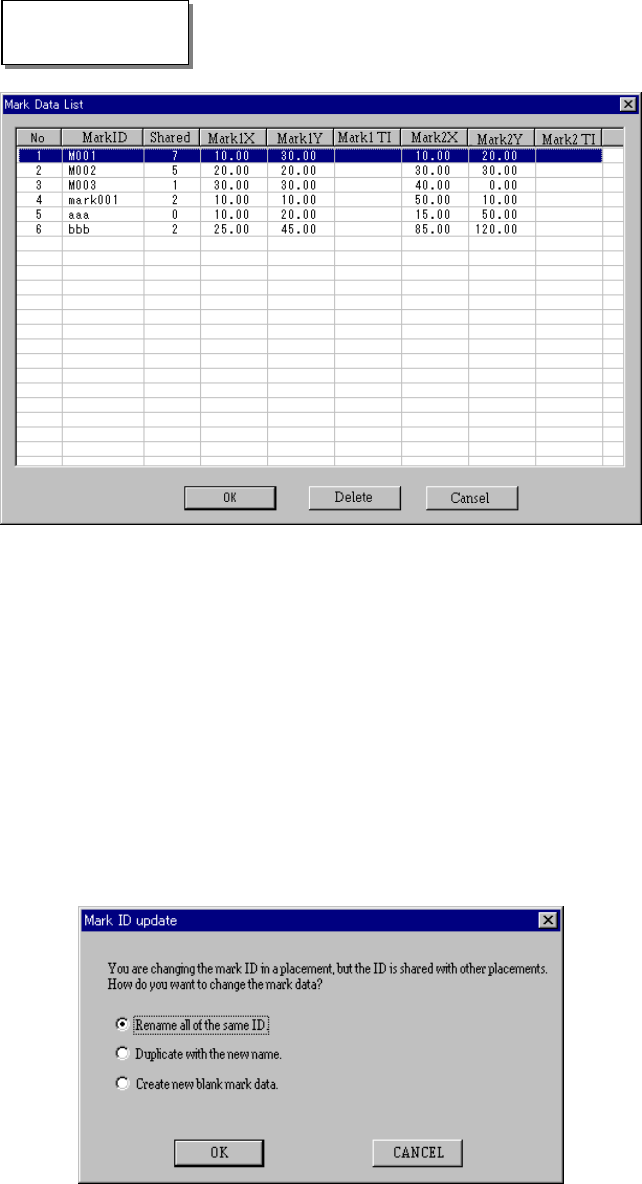
If you want to use the already assigned mark ID, select the desired mark ID from
the “Mark Data List”: this list allows you to specify the desired mark ID easily.
To open the “Mark Data List”, use the Edit key or click the input filed with the right
mouse button. The list box appears on the screen, and you can select and enter
a mark ID.
Note that only this “Mark Data List” allows you to change two or more mark data
IDs at a time. Select the desired Placement data, and change them.
This command allows you to display the “Mark Data List.”
Mark Data List
− Description of operation for changing a mark ID manually
(1) If the changed mark ID is shared
The message “Do you want to update the mark data?” appears on the
screen. When you click the <OK> button, the mark data specified for
Placement data is shared with the specified mark data. When you click the
<Cancel> button, the entered mark ID becomes invalid, and the system
displays the screen that appeared before you enter the mark ID.
(2) If the shared mark ID is changed to a new ID
The following confirmation message appears on the screen.
List Viewer
4 – 60
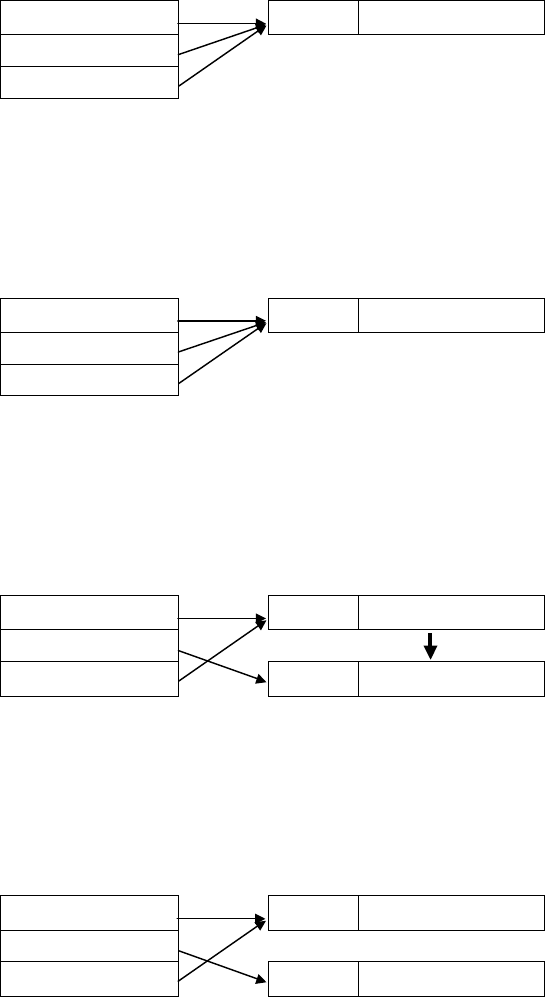
According to the radio button you check, the system handles Placement data and
mark data in the various ways as shown below.
Example: If you change the mark ID of the Placement data record 02 to “AAA” when
one mark data is shared with three Placement data records
Before changing the mark ID
Mark ID Mark data
Placement data 01 M001
X:
△△、
Y
:
□□、
TI:
●
........ Shared mark data
Placement data 02
Placement data 03
① When you select the radio button “Rename all of the same ID” and click the
<OK> button
The shared mark ID is changed. The shared mark ID is changed to the mark ID
you specified on the Placement data screen.
Mark ID Mark data
Placement data 01 AAA
X:
△△、
Y
:
□□、
TI:
●
........ Shared mark data
Placement data 02
Placement data 03
② When you select the radio button “Duplicate with the new name” and click the
<OK> button
New mark data is created. The shared mark data is copied to the mark data X,
Y and TI.
Mark ID Mark data
Placement data 01 M001
X:
△△、
Y
:
□□、
TI:
●
........ Shared mark data
Placement data 02
Copied
Placement data 03
AAA
X:
△△、
Y
:
□□、
TI:
●
........ Not shared mark data
③ When you select the radio button “Create new blank mark data” and click the
<OK> button
New mark data is created. Any data is not set to the mark data “X”, “Y” and “TI”
by default.
Mark ID Mark data
Placement data 01 M001
X:
△△、
Y
:
□□、
TI:
●
........ Shared mark data
Placement data 02
Placement data 03
AAA
X:
、
Y
:
、
TI:
........ Not shared mark data
④ When you click the <CANCEL> button
The mark ID you entered becomes invalid, and the original mark ID is set again.