KE2010.Instruction Manual.Ver.2.01,Rev.08.pdf - 第371页
5 − 18 5.4.2 Teaching of the User Defined Template The basic operat ion for teaching t he templat e is explained as follows: ① Move the cursor t o the mark position whose data is to be t aught. Note that t he X and Y coo…
5 − 17
Note: The mark size is indicated with the number of pixels.
To register the taught data onto the mark database newly, enter the name for
registering the data, then click the Add button.
To replace the taught data which was already registered with the newly taught data,
enter the new name, then move the cursor to the data line to be replaced, which is
displayed in the Registration area, then click the Replacement button.
If you do not want to register the taught data onto the mark database, click the
<Cancel> button.
No. Button to be selected Description
1 Add
Enters the registration name, registers the taught data onto the
mark database, then quits teaching operation.
2 Replacement Replaces the data displayed and selected on the cursor line.
3 Cancel
Quits the teaching operation without registering the taught data
onto the database.
Here, all operations of recognition teaching have been completed.
After completing recognition teaching, an asterisk (*) appears next to the mark data,
indicating that the teaching of that item is completed. Perform the teaching for all the
marks to be used.
If the CANCEL key on the HOD is pressed during teaching, the teaching is
terminated at that moment. (The data entered before this operation will become
invalid.)
When the CANCEL key is pressed, the device does not move.
Note: The machine detects a white part as the mark. Whether the mark is
recognized as white or black with respect to the board color depends on the
contrast between the mark and the board, and on the light level around the
camera’s field of view. Normally, the mark is recognized as white.
If, however, there are lands, patterns, or silk printings around the field of
view of the camera, the mark may be recognized as black with respect to
the board color. In this case, correction cannot be made normally.
Reverse the black and white by pressing the CAMERA key on the HOD so
that the mark appears as white. If a mark is recognized as black against
the board, press the CAMERA key to reverse the black and white so that
the mark can be recognized as white.
Reverse display of the mark by the CAMERA key is possible only when you
are entering the scale frame.
Note: If you use the user defined template, the taught data registration window
does not appear on the screen.
5 − 18
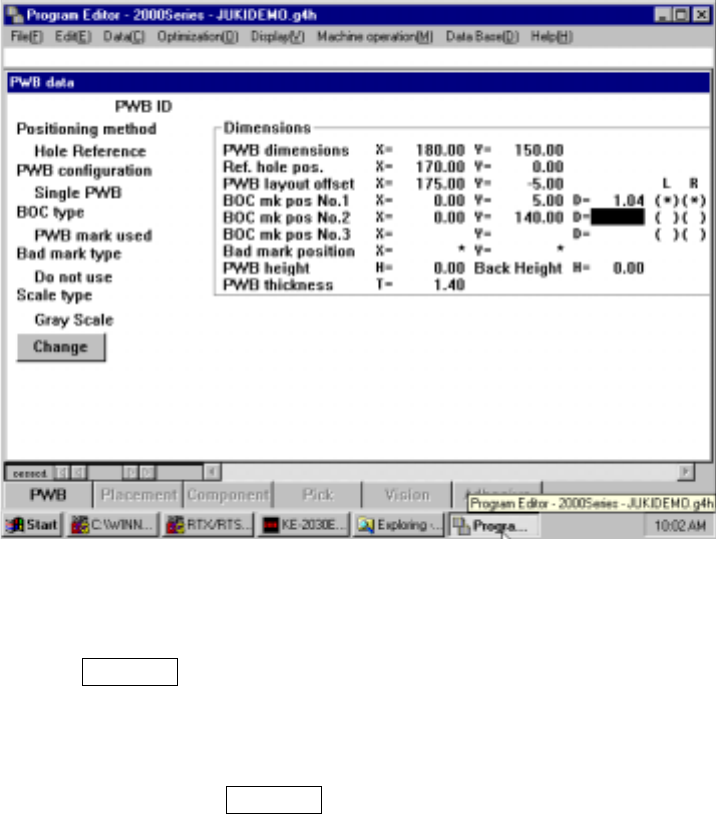
5.4.2 Teaching of the User Defined Template
The basic operation for teaching the template is explained as follows:
① Move the cursor to the mark position whose data is to be taught.
Note that the X and Y coordinates of the mark must be entered before teaching
the recognition mark.
Figure 5.4.3 Teaching the user defined template
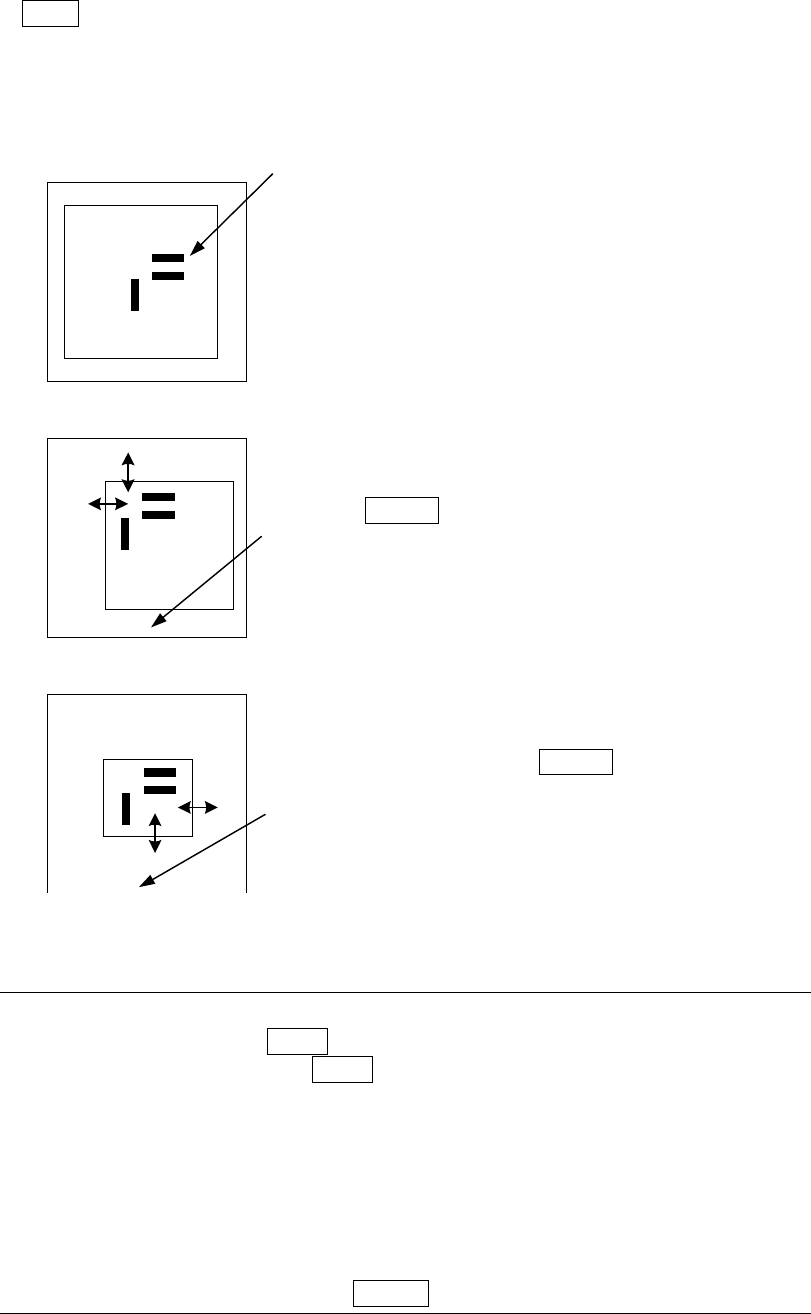
② Press the CAMERA key of the HOD to start teaching.
The camera moves to the X and Y coordinates of the mark, then the pattern to be
taught (to be stored) appears on the monitor display. If such a pattern does not
appear, check to see if the entered coordinates are correct.
If any key other than the CAMERA key is pressed, the error sound beeps, and
the mark recognition cannot be taught.
5 − 19
3. Teach the scale frame (template setting frame).
Use the up, down, left and right arrow keys to adjust and enter the scale frame
(FAST key changes the moving speed of the scale frame) in the order: upper
side, left side, bottom side, then right side.
The mark is automatically recognized, then the data necessary for correction is
obtained.
The image shot from the camera and the rectangle frames
are displayed.
Pad printing part
First, set the upper side and the left side of the scale
frame.
Set the upper side and left side to be recognized (by
moving the sides indicated with the arrow marks).
Press the ENTER key.
“Set Left-Top Point” appears at the bottom line of the
screen.
In the same manner, set the bottom side and the right side
of the scale frame.
After adjustments, press the ENTER key.
“Set Right-Bottom Point” appears at the bottom line of the
screen.
Note: To teach the scale frame only again without changing the information on
the mark, press the NEXT key of the HOD. Step 3 operation can be
skipped. However, the NEXT key pressing becomes invalid if the mark is
newly recognized.
The noise cut level around the mark is obtained, then displayed on the
monitor automatically.
Adjust the noise level so that the mark can be seen clearly and the noise
level can be decreased as much as possible with the up and down arrow
keys of the HOD (up/down arrow keys for moving X- and Y- axes).
After adjustments, press the ENTER key.
**********
**********