KE2010.Instruction Manual.Ver.2.01,Rev.08.pdf - 第394页
6 − 18 (2) Oper ation ① Setting it ems selection Select a dialog box to be displayed among the PW B production conditions dialog box, Tr ial run dialog box, and Blank run dialog box. ② Prod. PW B Enter t he number of PW …
6 − 17
6.2.1 PWB production
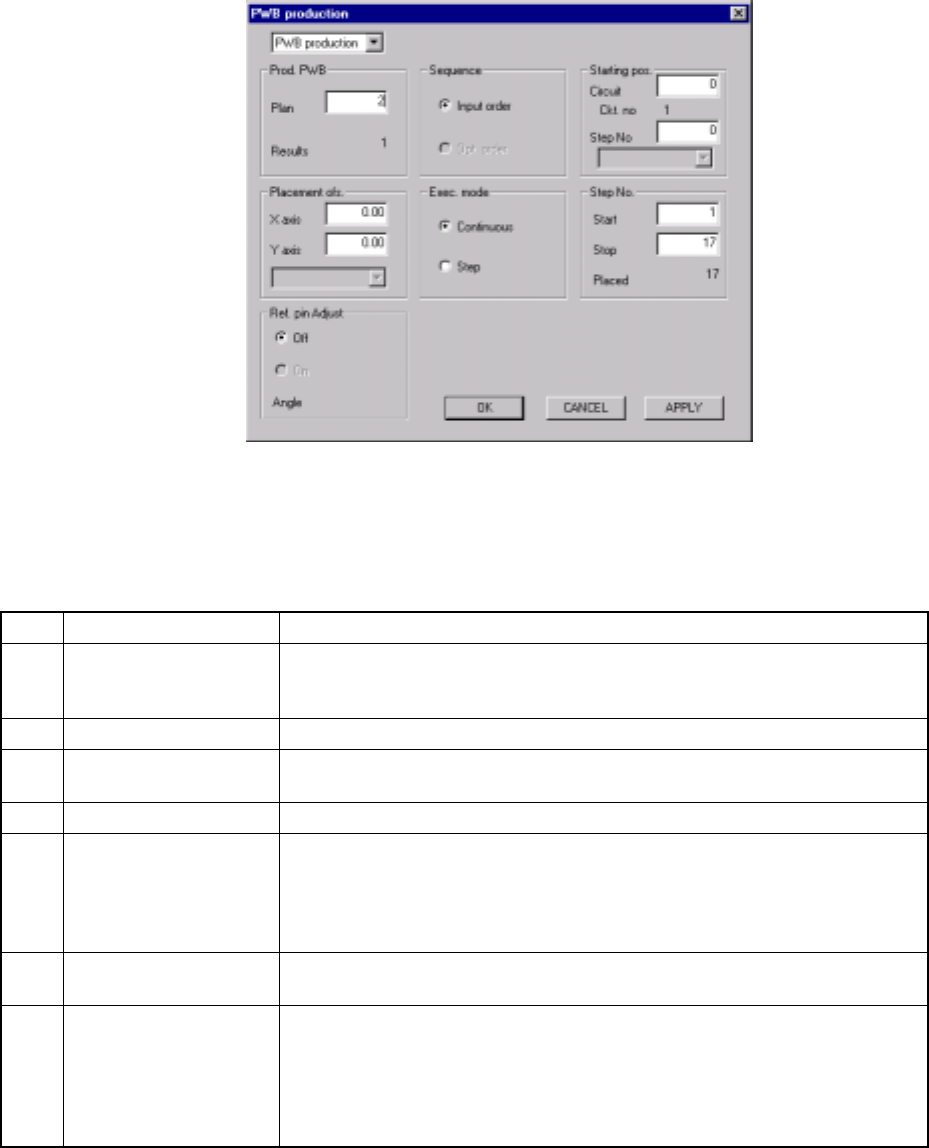
When you select the [Production conditions] command from the menu bar, then the
[PWB production] command, the PWB production conditions dialog box appears on
the screen as shown in Figure 6.2.1.1.
Figure 6.2.1.1 At start of production (PWB production conditions dialog box)
6.2.1.1 Production conditions
(1) Setting items
No. Item Description
1 Setting items selection Switches the dialog box to be displayed among the PWB production conditions
dialog box, Trial run conditions dialog box, and Blank run conditions dialog
box.
2 Prod. PWB Set the number of boards to be produced.
3 Sequence Select either “Input order” or “Opt. (Optimization) order” as the placement
sequence.
4 Exec. mode Select either "Continuous" or "Step" execution mode.
5 Step No. Specify a range of placement data with the placement start line and the
placement end line.
Specify the data in the order of "Input order".
When the item "Sequence" is set to "Opt. order", you cannot enter any data
here.
6 Placement ofs. Specify total offsets for all placement positions. This adds the set offset to the
placement data for actual placement.
7 Starting pos. This item is available only for the board fed initially after start of production.
Specify the circuit and placement number where the first placement is
performed. If, for any reason, board production on the machine is put in a halt,
this setting continues the production.
This is effective to place the remaining components on the board to which
placement was put in a halt.
* For the item of "Ref. pin Adjust", the status set on the Operation Options menu is displayed only. It cannot be
changed here.
6 − 18
(2) Operation
① Setting items selection
Select a dialog box to be displayed among the PWB production conditions
dialog box, Trial run dialog box, and Blank run dialog box.
② Prod. PWB
Enter the number of PWBs on which components are to be placed in the
"Plan" field.
The number of boards already processed displayed in the "Results" field is
reset to 0 when the Production screen is displayed.
Normally, the preset number of PC boards for "Plan" and "Results" are set in
their initial statuses. When item "Accumulated the number of boards
produced" of "Production" radio button on the Operation Options menu has
been selected, the number of "Plan" and that of "Results" are those of the
previous production. If, in this status, production is started, counting of the
board starts from the previous result number and the production continues
until the number of produced boards reaches the number set as "Results". If
a new number of boards is set for the "Plan", and the number in the "Results"
field is cleared to zero, the board production can be started newly.
When you enter “0” into the “Plan” field, the system plans to produce PWBs
endlessly.
③ Sequence
Select either "Input order" or "Opt. order" as the placement sequence and
click the radio button for it. For the data with which optimization has not been
performed by program editing, you cannot select "Opt. order".
Normally, "Input order" is selected as the default setting. However, when the
created production program initially appears on the Production window after
the Optimization utility is executed, "Opt. order" is selected as the default
setting.
④ Exec. mode
Select either "Continuous" or "Step" execution mode and click the radio
button for it.
⑤ Step No.
Enter the placement start line and the placement end line in the "Start" and
"Stop" fields to set a range of placement. The "Placed" field displays the
number of components to be placed. These fields display initial values.
When the "Opt. order" is selected as the Sequence, you cannot set this item.
⑥ Placement Ofs. (Offset)
In case a certain production lot has a specific offset (in printing process or in
reference holing process), enter the X and Y offsets in this field. The
position of placement that has been entered can be offset. You can enter the
offset for the left and right stations respectively with its own combo box.

6 − 19
⑦ Starting pos. (Position)
This setting is effective for the board which put in production halt after some
components are already placed.
Or, if necessary, a new number can be entered to start newly the production
at a specific sequence. This setting is effective, however, only for the first
board if the "Prod. PWB" is set to two or more.
For the "Ckt. No" field, the number of circuits of the production board is
displayed.
For a single pattern board, "1" is displayed at the "Ckt. No" field, and any
circuit number other than 1 cannot be set in the "Circuit" field.
6.2.1.2 Setting the number of components
After setting components to the component feeder unit specified in Pick data (Tape
feeder, Stick feeder, Bulk feeder), set the number of the components to be supplied to
the main body.
When the number of remaining components becomes below a certain level, it is
possible to flash the yellow signal light for warning. This can be done by setting the
number of components.
If a pick up retry over error occurs at a feeder, the feeder is regarded as faulty, and is
skipped over to continue production. To continue the production after adjusting the
machine for correct pick up of the components, this error status must be reset. The
reset operation can also be performed by setting the number of components.
(1) Setting items
① Items being displayed when called
No. Item Description
1 Sply (Supply) Shows the component supplied position. (LF: left front, LR: left rear, RF: right front,
RR: right rear)
2 L Shows the lane for a stick feeder.
3 Pkg. (Package) Shows the package of components. (Tape, stick, bulk, etc.)
4 Component name Shows the name of components.